Hi Stampers!
Wow! This is it! This is the final Tinsel Time Tuesday for the 2021 Holiday Season! Over the past twenty weeks we’ve made lots of cards, gift card holders, tags, treat and gift boxes. Today’s project is a gift bag made with Designer Series Paper (DSP). Creating your own gift bags is a great way to reduce your stash of Christmas themed DSP!
* Page down to view video tutorial.
The basic bag is easy to create, and uses minimal supplies. Once you get the hang of creating the bag you will be able to change the dimensions to make various sizes, and as always the bag design accommodates a variety of options! You know me; I am all about options. If you need a box as opposed to a bag, no problem. This bag easily transforms itself into a box! Let’s take a look at today’s project:

As you can see this gift bag pattern is versatile and can be modified for various sizes of paper to create bags and boxes. Let’s start with the basic gift bag pattern.

SUPPLIES FOR BASIC GIFT BAG


TO CHANGE THE DIMENSIONS OF THIS BAG / BOX

These bags are created using the same process as used for creating the basic gift bag. The measurements are the only difference. This bag is 4” square and 1” deep.

 * Adhere and fold


* Two matching pieces of 12 x 12 DSP (double sided patterned paper)
* Piece of cardstock - any color - 6” x 3”
* Scoreboard or scoring blade on trimmer
* Bone Folder
* Strong Adhesive - Stampin’ Seal +, Tear & Tape, liquid glue, etc
* 2 pieces of ribbon, each 18” long for handles (optional)
* Hole punch (if making handles)
ASSEMBLY
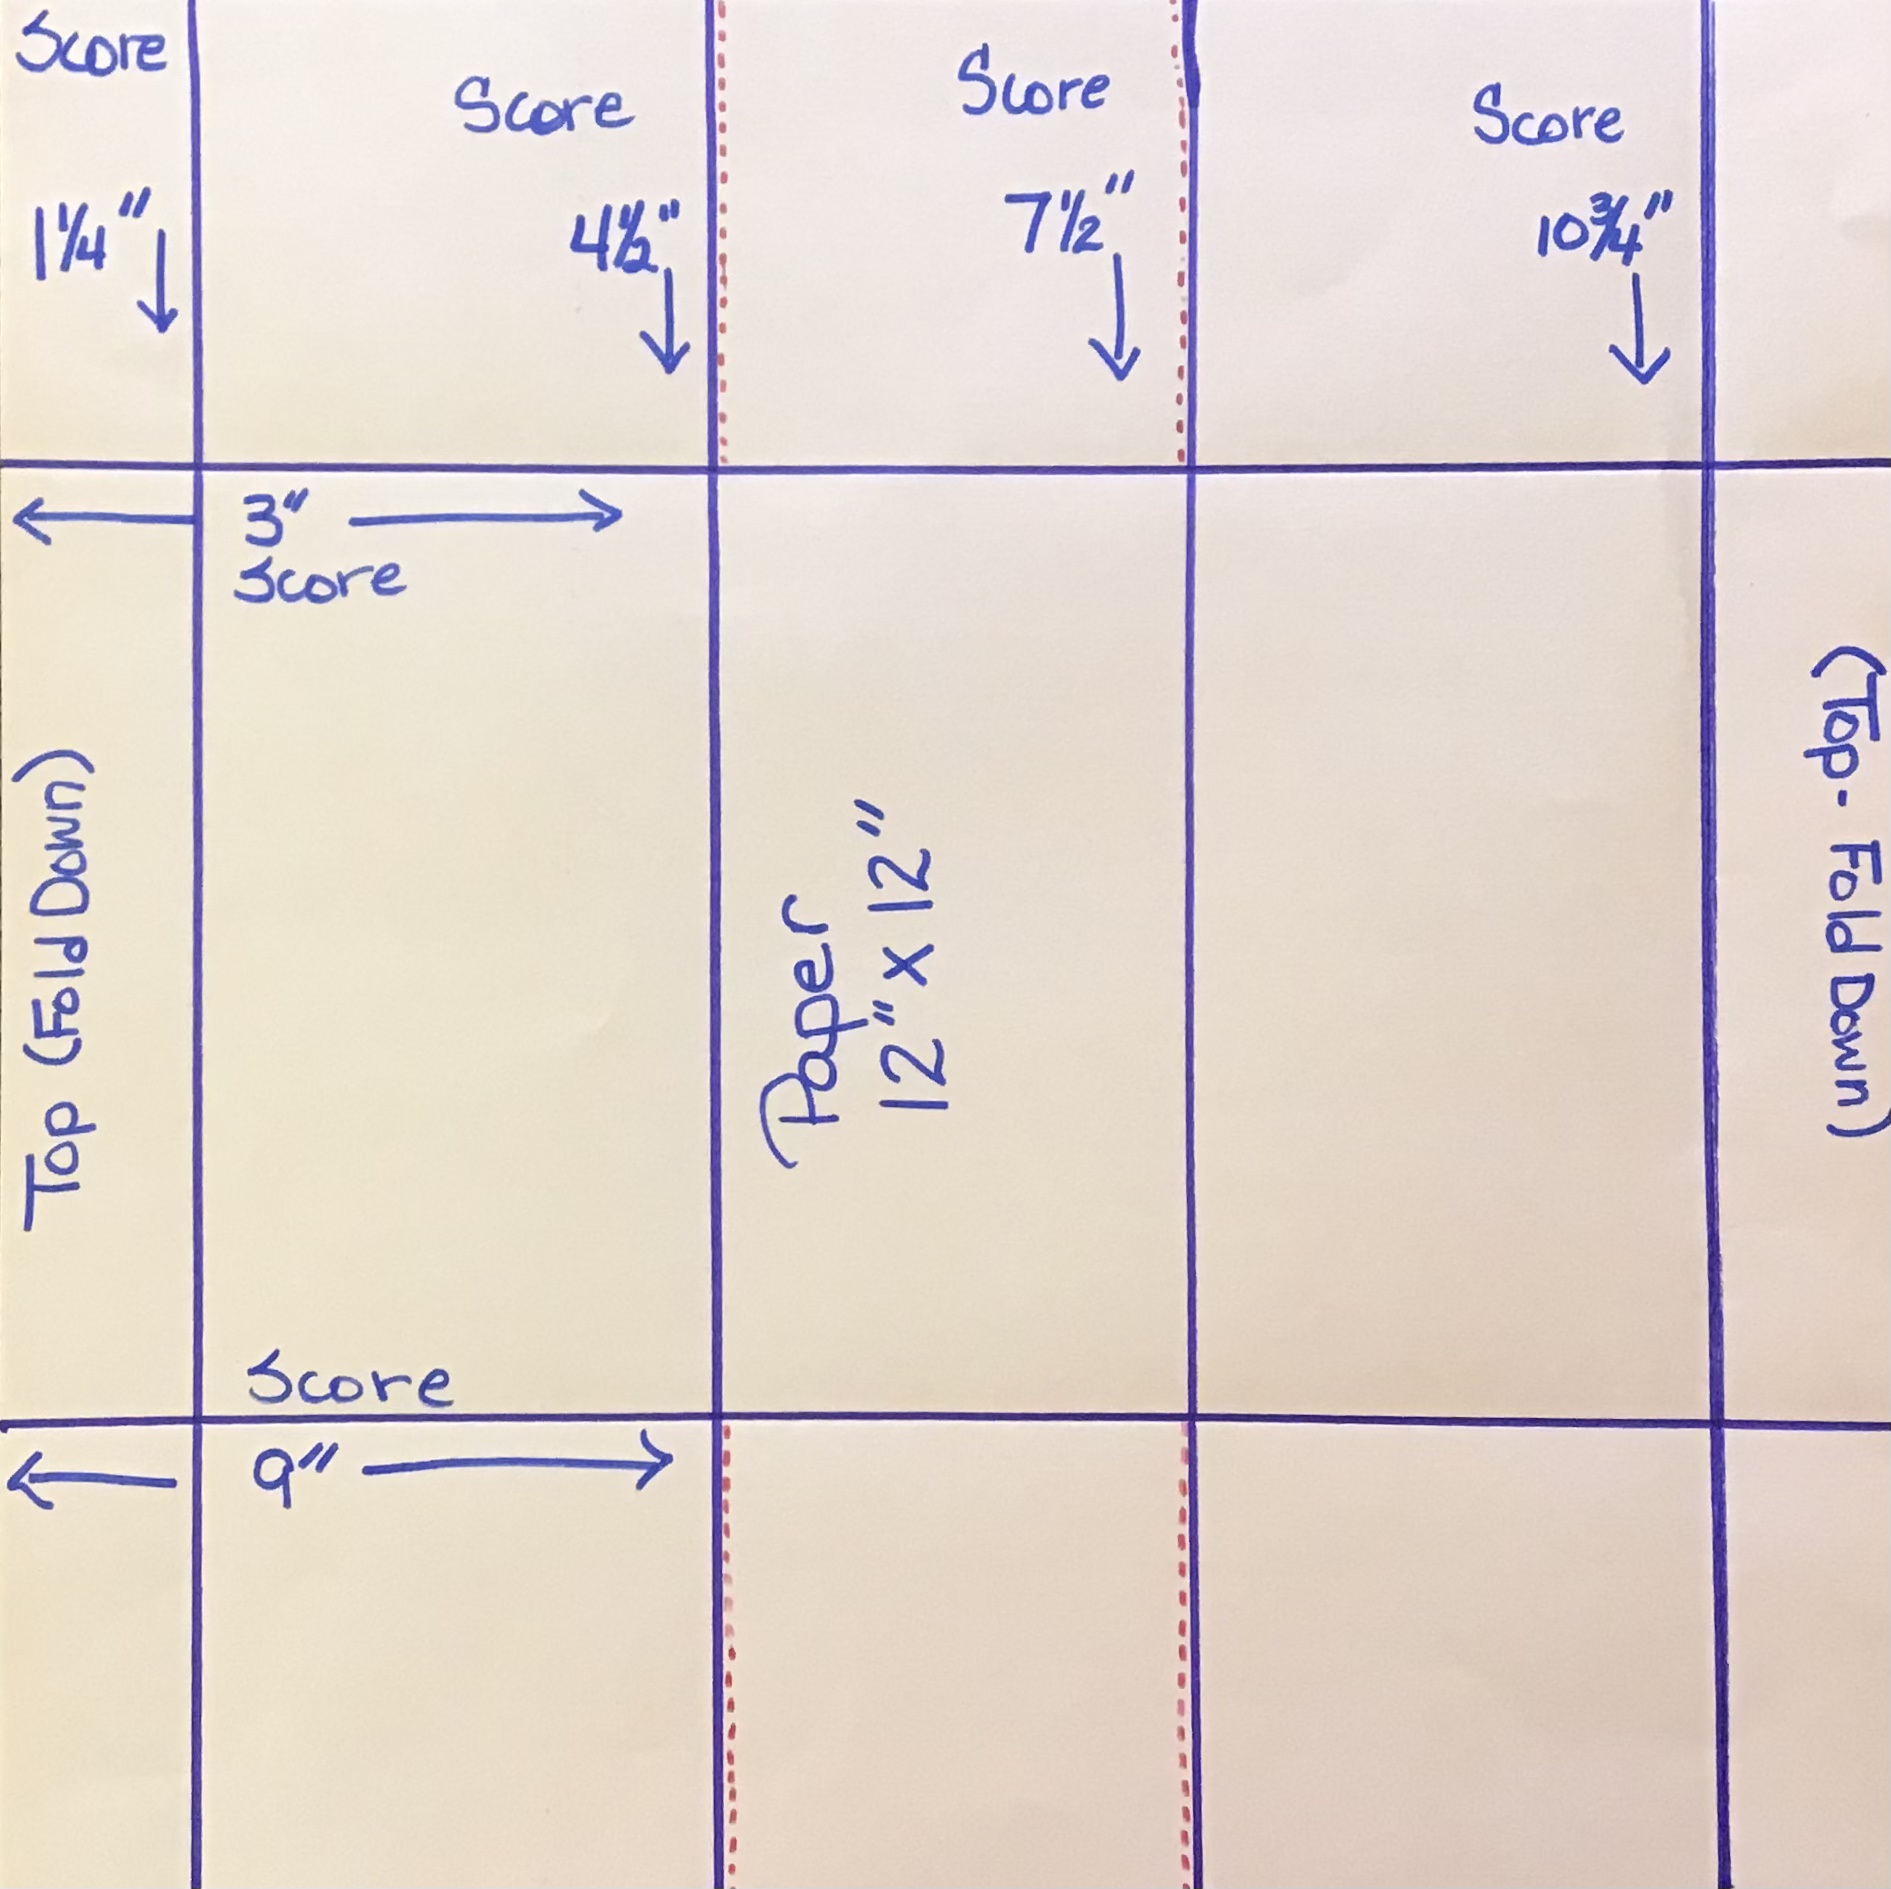
* Score each piece of 12” x 12” paper at 2” (this section will be the top of your bag.
* Score the remaining three sides at 3”.
* See the diagram below. The blue lines are score lines. Fold the paper along the score lines and burnish with bone folder.
* On one of the 12” x 12” pieces of paper form two tabs at what is the bottom of the bag by cutting along the score line from the edge of the paper to the next score line. See diagram below. The red dotted line indicates where you should cut.

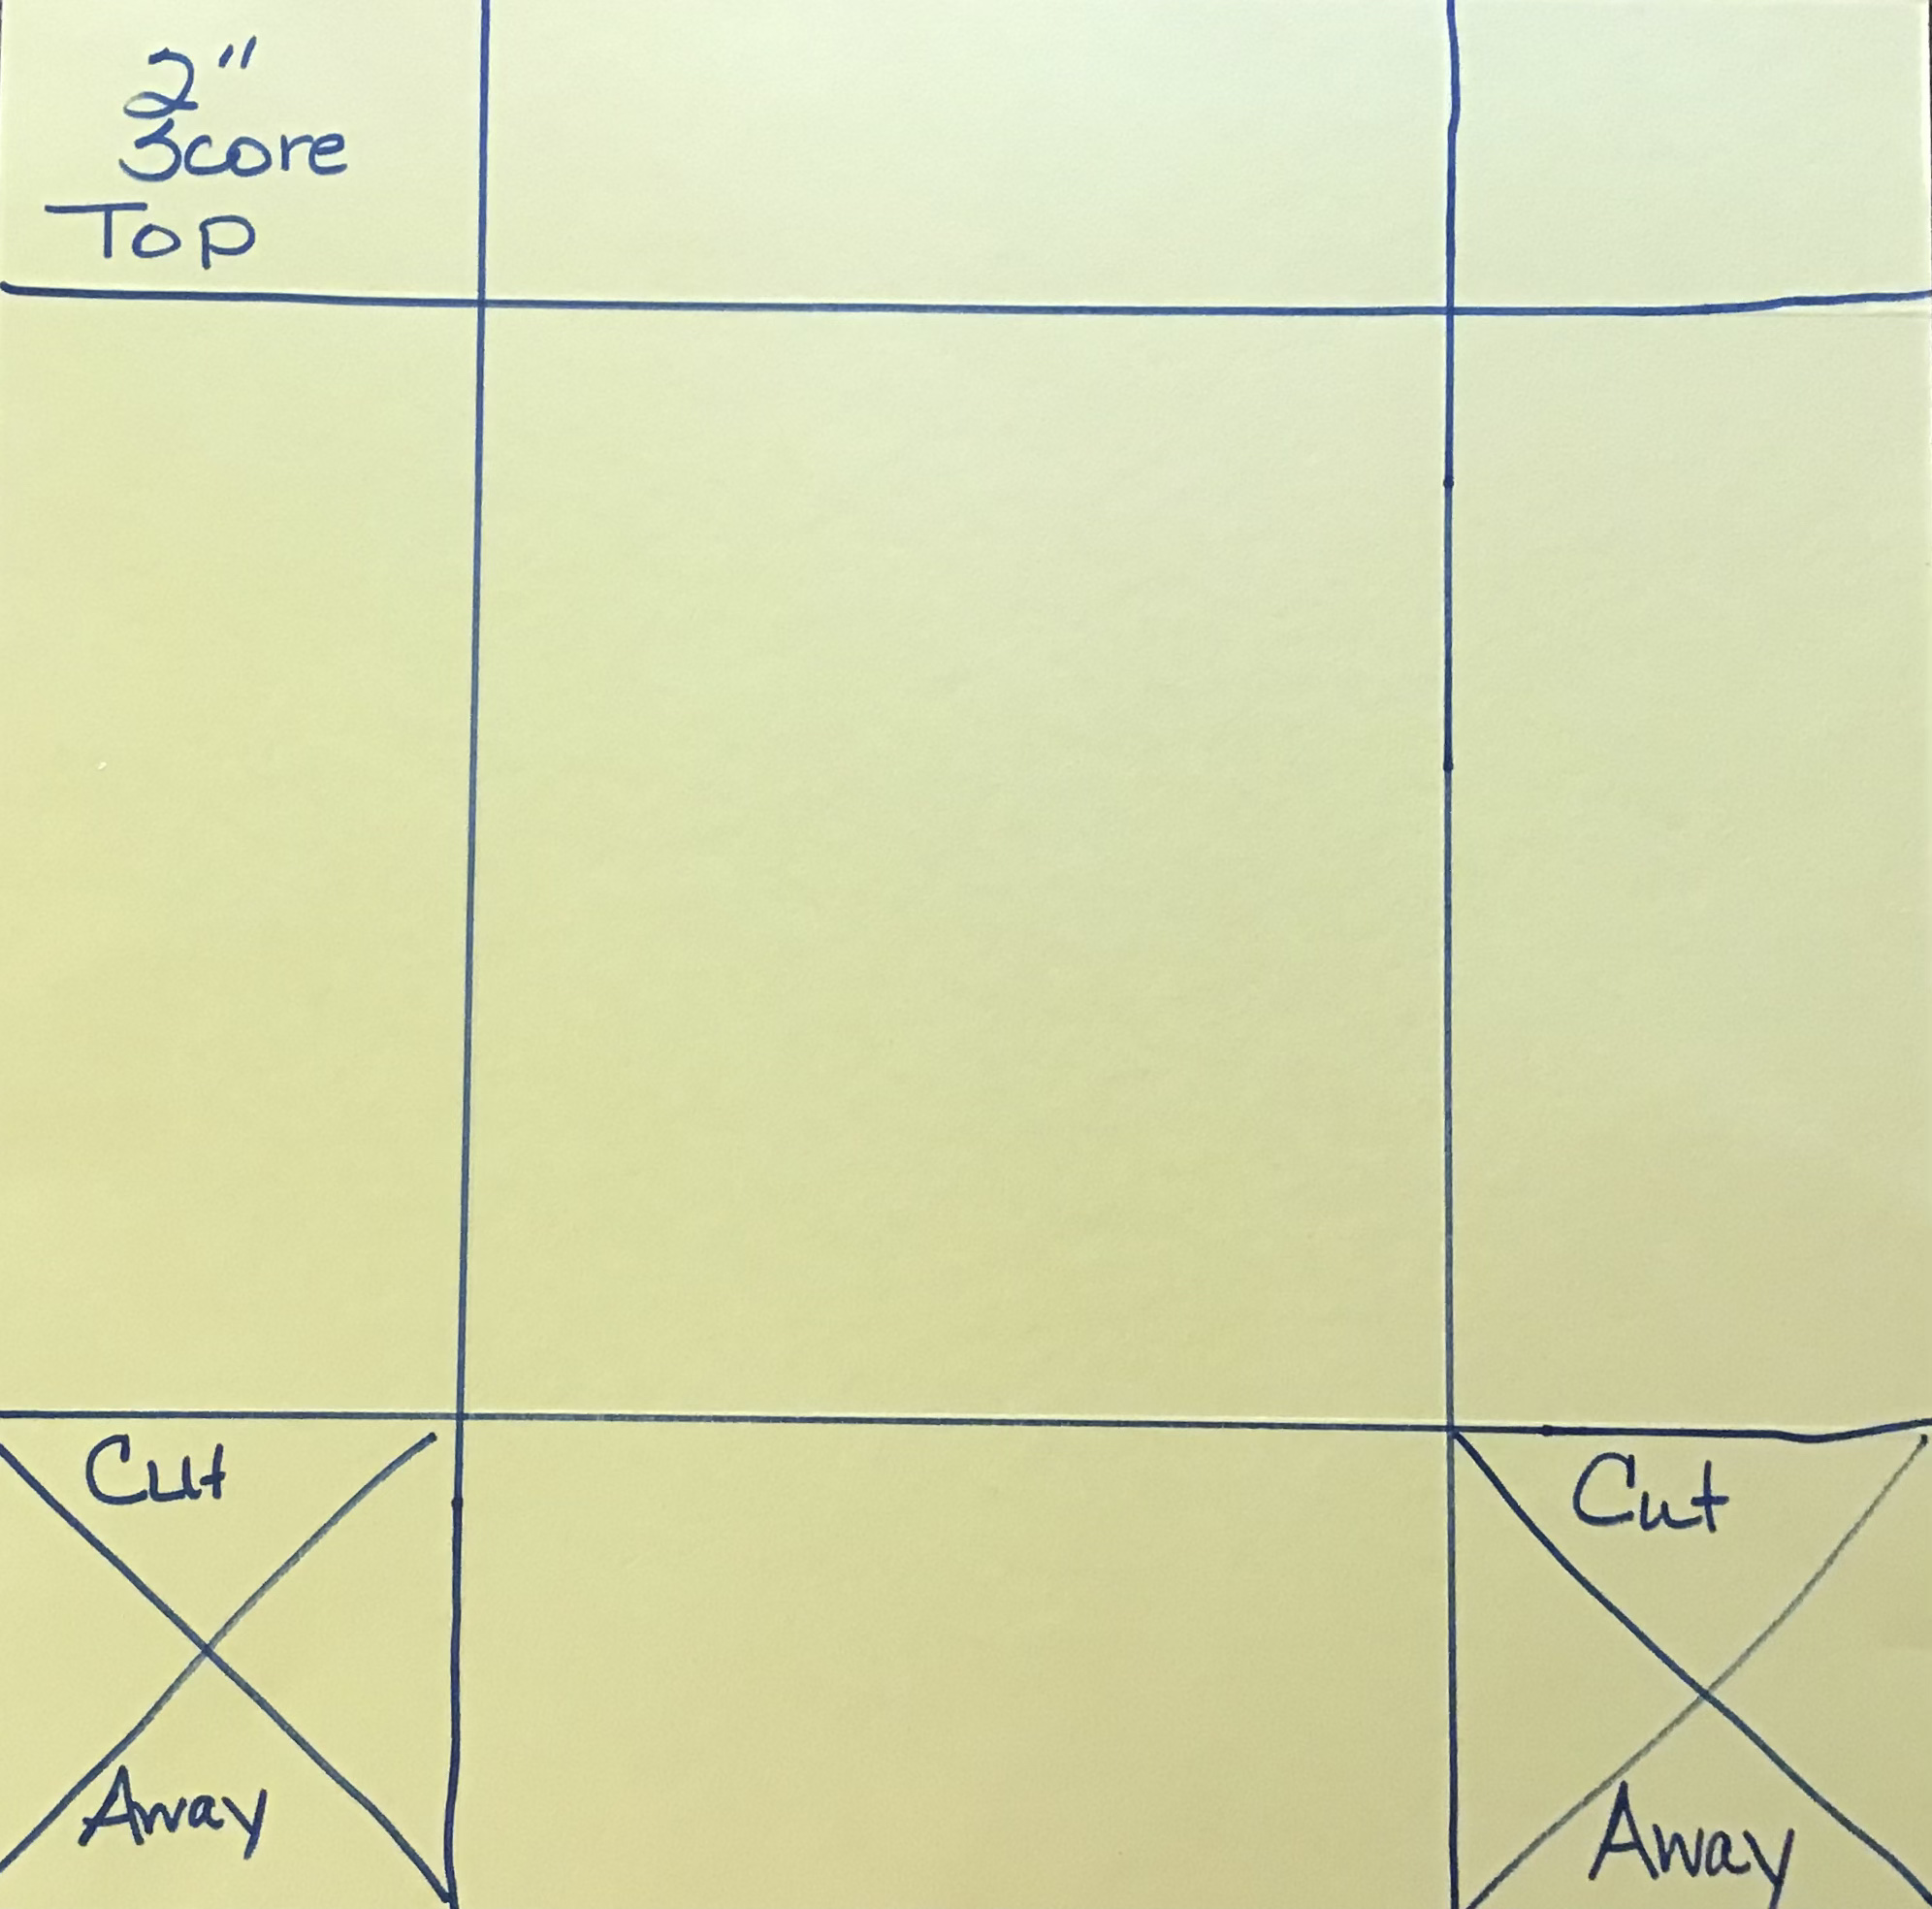
* On the second sheet of 12” x 12” DSP cut away the two 3” x 3” squares at the bottom of the page. See diagram below.
* Adhere the 6” x 3” piece of cardstock to right side (side of babe that will be on the outside) of the large tab created by cutting away the two 3” x 3” squares. This is part of the bag bottom.
* Place adhesive on the cardstock and adhere this to the corresponding piece on the wrong side of the paper (the pattern that will be on the inside of the bag.
* Apply adhesive to the top side and edges on the right side of the DSP - fold down to form a contrasting border along the top of the bag. If you do not like the pattern on the “wrong” side of the DSP simply reverse this process. Place the adhesive on the “wrong” side and fold down.
* With wrong side of box facing up, fold the two 3” x 3” tabs inward and place adhesive on them (it will go on the right side of the paper.
* Adhere these tabs to the sides of the bag on the inside.
* Fold the two remaining sides of the bag inward and put adhesive the right side of the two remaining sides of the bag.
* Adhere these on the inside of the other two sides of the bag.
TO ADD HANDLES
* Punch two holes along the top of each side of the bag. You can do this before assembly once you’re have folded down the 2” border. Just make sure the punched holes are located between the two 3” score lines. You can also punch the holes once the bag is assembled, but depending on the type of hole punch used it could be more difficult (Ask me how I know!)
*Here is my tip to make the holes even on both sides-
- I took a piece of cardstock that measured 1” wide - mine is 8 1/2” long, but the length is not that important. I made a mark at 1 1/2” and drew a line long ways across her vertical line at 1/4”. This formed a cross. I used the hole punch and punched at the intersection of the two lines.
- Now line the strip of paper up along the top of the bag with the upper left corner of the bag. Punch through the hole.
- Now flip the template and repeat the process on the other end.
- Turn the bag over and repeat.

TO CHANGE HEIGHT OF THIS BAG /BOX
* Instead of scoring across the top at 2” score at 1”. This will make the bag / box 8” tall, 6” wide, and 3” deep.
* Do not score along the top ( no folding over or under) This will make the bag 9” tall, 6” wide, and 3” deep.
* Use two pieces of DSP cut the same size.
* Keep the scoring for the two side and bottom of the box the same. The score line for the top can vary depending on the height you want.
EXAMPLE - Two pieces of DSP cut at 8” x 8” , scored at 1” across the top, and 2” on the other 3 sides will result in a bag that is 4” wide, 5” tall, and 2” deep.
SMALL GIFT BAG

SUPPLIES
* Two pieces of 6” x 6” DSP
* A piece of 4” x 1” cardstock for box bottom
* Other items listed for the basic bag.
GIFT BOX FROM 1 SHEET OF 12” x 12” DSP

These boxes measure 6” wide x 3 1/4” tall and 3” deep.
ASSEMBLY
* Score according to the diagram below.
* Burnish the score lines.
* Cut along the dotted red lines to form tabs. Miter the sides of the taps if you like.
the top (the 1 1/4” score line and the 10 3/4” score line) as for the basic bag.
* With the wrong side (inside of box) facing up, fold the two tabs inward and apply adhesive.
* Attach the tabs to the side panels of the the sides of the box.
* on the remaining side of the box fold the sides inward, apply adhesive. And adhere this sides on the inside of the other two sides.
NOTE - You can adhere a 6” x 3” piece of cardstock on the bottom of the box(inside) to make the bottom more sturdy if you like.
LIDS FOR BAGS /BOXES

Changing the basic bag or the smaller into a cute box only requires a lid. The gift box can be used open or with a lid. All lids are made using the identical process - the measurements are the only difference. The diagram above shows the score lines and when to cut the tabs to for a lid.
LID FOR THE BOX
* Score a 8 1/16” x 5 1/16” piece of cardstock at 1” on all sides.
* Fold along and burnish the score lines.
* Cut along the score lines as shown in the diagram above - miter the tabs a bit if you like.
* on the front side of the tabs apply adhesive and adhere each one to a side of the lid to form the corners.
LID FOR BASIC BAG / BOX
* Cut cardstock at 10 1/16” x 7 1/16”.
* Score all sides at 2”
* Assemble as for box lid.
LID FOR SMALL BAG / BOX
* Cut cardstock at 6 1/16” x 3 1/16”.
* Score all sides at 1”.
* Assemble as for box lid.
IT’S A WRAP! GIFT BAG /BOX VIDEO TUTORIAL
There you have it - pretty bags and boxes for to wrap up your Christmas gifts. As I mentioned in th3 beginning of this post, this is an excellent way to use up your stash of Christmas themed papers. Of course you can make versions of the bag/ box; or bags / boxes for, bridal showers, baby showers, birthdays, weddings, and oh so many other occasions!

I cannot believe Tinsel Time Tuesday has come to an end for the season! I hope my posts and videos have given you ideas and inspiration for Holiday cards and gift giving. I wish each of you a Very Merry Christmas and a Happy 2022 full of family, friends, and fun - oh, and lots of card making!
Until next time…
Stamp Happy!
Kim
All stamps and stamped images ©️1990 - 2021 STAMPIN’ UP!®️
No comments:
Post a Comment