Showing posts with label Snowman Builder Punch. Show all posts

Tuesday, September 14, 2021

WHEN YOU NEED MULTIPLES OF A CARD, GIVE THIS SNOWMAN SEASON CARD A TRY: A TINSEL TIME TUESDAY POST

Hi Stampers!

Today’s post is about making multiples of a single card design. There are several occasions when multiples of a card design may be necessary, or a better option - party, shower, or wedding invitations, thank you cards for a specific occasion, Christmas cards, etc. Even though multiple cards of the same design might be the best option, it is not my favorite thing. I have found a process to help me approach the project in an organized and focused manner, and before I know it the cards are finished. I am sharing the process I use. It is what works for me. Maybe it will work for you too. 

(Page down to view video for tips on assembling this card design.)

STEP 1 - DESIGN THE CARD
* Decide on a stamp set(s) and if you will use a punch / dies, etc.
* Select a color scheme
* Decide on the type of card - fun fold, shaker card, etc.
* What embellishments might be used (sometimes I need to make the card before deciding on this)
* Sketch out the card - be sure to jot down cutting measurements for cardstock, colors of ink used, etc.
* Make the card (I call this card the prototype; my husband find that humorous for some reason.😁)
* Decide if you like the card as is or if it needs tweaked a bit. 
(I use this step with every card I make.)

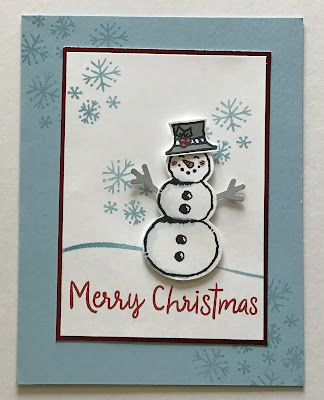
Here is the card I designed:


I used the SNOWMAN SEASON stamp set (Annual Catalog):


And the SNOWMAN BUILDER PUNCH (Annual Catalog):


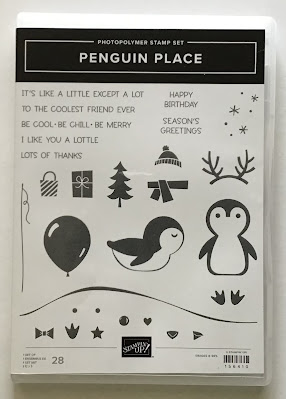
And one stamp from the PENGUIN PLACE stamp set (Mini Catalog):


Here is my prototype:

STEP 2 - GATHER SUPPLIES / CUT CARDSTOCK
(The stamp set/sets, punches, dies, etc have been selected, so are not included in this list.)

* I start with cutting my card bases, layering pieces, cardstock for stamping, etc. The amount needed will of course depend on the number of cards you will be making. (I made 5 copies of the card, so I will give the amounts for 5 cards.)
- 5 Balmy Blue card bases each cut at 8 1/2” x 5 1/2” , scored and folded at 4 1/4”.
- 5 pieces of Basic White cardstock cut at 5 1/4” x 4” (panel for inside card.)
- 5 pieces of Basic White cardstock cut at 4 1/4” x 3” (focal panel)
- 5 pieces of Red Foil (or Real Red cardstock) cut at 4 3/8” x 3 1/8” to mat focal panel
- Strip of Basic White cardstock 11” x 1 1/2” to stamp 5 snowman images
- Strip of Basic White cardstock about 5” x 1” to stamp 5 hats.
- Scrap of Smoky Slate cardstock to punch out snowman arms.


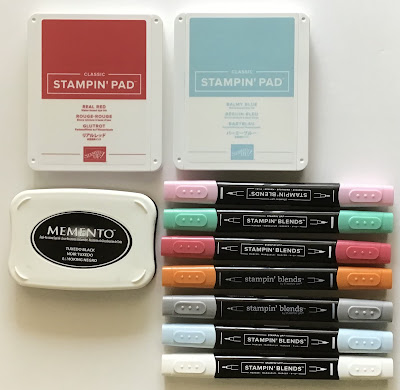
* Now gather inks, markers, or other coloring tools.


- Real Red, Balmy Blue, and Memento Tuxedo Black ink pads.
- Stampin’ Blends - Flirty Flamingo (light), Shaded Spruce (light), Real Red (dark), Pumpkin Pie (dark), 
Smoky Slate(dark), Balmy Blue (light), and the Color Lifter.

All of my adhesives are easily accessible at my work area, if yours are not collect adhesive of choice, glue dots (3 per card), and dimensionals (3-4 per card).

STEP 3 - DO THE STAMPING
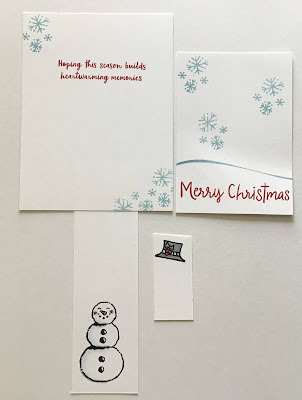
* Stamp the card bases. Add the snowflakes image to the upper left corner and lower right corner of the card bases with Balmy Blue ink. (I forgot to photograph the stamped card base. Refer to the finished card to see where I stamped the snowflake image on the card base. Watch the video to see a little tip for placement.)
* Stamp all the inside panels. Use Balmy Blue to stamp the snowflakes image in the upper left corner and the lower left corner . Use Real Red ink and stamp the sentiment centered just below the snowflakes in the upper left corner.
* Stamp all the focal panels. Stamp the snowline swoosh with Balmy Blue about 1” - 1 1/2” from the bottom of the card. Stamp the snowflake image with Balmy Blue 3 times. (Refer to card photo for placement.) Finally, Stamp the Merry Christmas in Real Red under the snowline.
* Stamp the snowman images and the hat images - then use the Stampin’ Blends to add color to the snowmen and the hats. (In the video I state which colors I used where, and demonstrate how I added a bit more shadowing to the snowman image.)


- 5 snowmen will fit on the 11” x 1 1/2” piece of Basic White cardstock, and 5+ hats will fit on the 5” x 1” piece. 

STEP 4 - PUNCHING & /OR DIE CUTTING
* I used the STITCHED RECTANGLES DIE (3 3/4” x 2 3/8”) to cut the center from the Red Foil to use on another project. You can use any die or punch you like as long as there is enough of an edge to adhere the focal panel to the foil and allow the focal panel to hide the hole. 
* Punch out the snowman images (Watch video for tip.)
* Punch out the hats.
* Punch out 5 sets of snowman arms.


STEP 5 - ASSEMBLE THE CARD
* Build the snowmen! Use glue dots to attach the hat and arms. Place dimensionals on the back side of the snowmen.

* Adhere the focal panels to the Red Foil (or Real Red cardstock) mats.
* Adhere these panels  to the card bases. (Watch video for placement tip.)
* Remove the backing from the dimensionals, and position the snowmen on the cards.


* Adhere the inside panels to the inside of the cards.


TOTALLY OPTIONAL
* Add Wink of Stella to the snowflakes and snow men for a bit of shimmer!


STEP 6 - CELEBRATE, THE MULTIPLE COPIES OF THE CARD DESIGN ARE COMPLETE!

VIDEO:  WHEN YOU NEED MULTIPLES OF A CARD


That is all for this edition of Tinsel Time Tuesday. Thanks for stopping by. Until next time…
Stamp Happy!

Kim

All stamps and stamped images ©️1990-2021 Stampin’ Up!®️

Thursday, August 6, 2020

TINSEL TIME THURSDAY

TINSEL TIME THURSDAY
CARD #1

Today is 6 August 2020, and that means we are 20 weeks away from Christmas Day!I know some of you start making your Christmas cards in January. That is wonderful! You plan ahead, your cards are ready and waiting for you when the time comes to mail them. I also know some of you begin making your cards in December. That is perfectly fine. You work well under pressure, and card making is part of your Christmas festivities! I like to begin my cards in August. Summer activities are winding down, new products have been released for the holiday season, and it is usually so unbearably hot and muggy outside I do not mind spending some time inside where there is air conditioning. I decided I would share my Holiday card making with you every Thursday from today through 10 December. I am calling this card sharing, Tinsel Time Thursday! So here we go!

For my first card I decided to use a stamp set and punch you might already own. The Snowman Season stamp set and the Snowman Builder punch made their debut in last year’s Holiday Mini Catalog. They are currently featured in the Stampin’ Up!®️ 2020-21Annual Catalog. 

I made the card in 3 color versions; Balmy Blue, Pacific Point, and Pool Party. Coastal Cabana and Night if Navy are two other color choices that would coordinate with the DSP. For purposes of the instructions I will use Pool Party.

GATHER SUPPLIES:

STAMPS AND TOOLS
Snowman Season stamp set
Snowman Builder Punch
Tasteful Labels Dies

CARDSTOCK / PAPER
For the card base: Thick Whisper White that measures 4 1/4” x 11” scored at 5 1/2”.
For the focal panel: Pool Party cardstock 3 1/4” x 4 1/2”
                                Whisper White cardstock 3 1/8” x 4 3/8”
                                 Snowflake Splendor DSP 3” x 4 1/4” (small snowflakes pattern)
                                 Whisper White cardstock scraps for snow man and snow panel
                                 Gray Granite cardstock scrap for snowman’s arms
For the greeting:      Pool Party cardstock 1” x 3 1/4”
                                Whisper White cardstock 3/4” x 3”

INKS
Pool Party Classic Ink Pad 
Memento Tuxedo Black Ink Pad
Stampin’ Blends - Pumpkin Pie Dark and Flirty Flamingo Light or Stampin’ Write Markers - Pumpkin Pie 
                              and Blushing Bride

ADHESIVES
Stampin’ Seal or Multipurpose Liquid Glue
Dimensionals


1. Cut your cardstock and DSP.
2. Cut out the die cut. Cut it in half long ways. Line the straight edge up along the bottom of the cut piece of DSP. Center it, and adhere it to the DSP, but do not put adhesive all the way to the edge of the curved part of the die cut. You want to be able to place the bottom of the snowman under the die cut just a bit. From the back side, trim off the cardstock that goes past the end of the DSP. 


3. Fold your card base along the score line. Using Pool Party ink and the snowflakes stamp stamp the snowflakes all along each edge of the card. I stamped one full strength (so to speak) then stamped again with out reinking my stamp. I continued this process all around the card.


4. Stamp the Merry Christmas on the 3/4” x 3” piece of Whisper White cardstock.
5. Stamp the snowman on a scrap of Whisper White cardstock using Memento Tuxedo Black ink. Color the snowman’s carrot nose and cheeks with your choice of Stampin’ Blends, or Stampin’ Write Markers. 


6. Punch out the snowman. Then punch out his arms from the scrap of Gray Granite cardstock. Attach the snowman’s arms to his body by adding Stampin’ Seal or multipurpose glue to the back side of the snowman.


7. Assemble the card. Adhere the DSP panel to the remaining piece of Whisper White cardstock then attach this to the Pool Party cardstock. Center and adhere this panel to the card base. Place adhesive on the back side of the bottom sections of the snowman, and a deminsional on the backside of his head. Position the snowman to the right side of the focal panel slightly under the “snow” leaning a bit to the right. Next adhere the greeting to its Pool Party mat. Place 3 demimsionals on the back and position the greeting toward the top of the focal panel toward the left side of the card slightly off the focal panel. 


I hope you will give this card a try. You can certainly add your own touches to the card, change the stamp set, make your own DSP, etc. As always my goal is to provide you with greatinkspirations!

If you would like to purchase products for this project click HERE

Next week for Tinsel Time Thursday I’ll share a “Warm & Toasty” card!

Until next time...
Stamp Happy!

Kim
greatinkspirations.blogspot.com
greatinkspirations.stampinup.net
greatinkspirations@gmail.com
On You Tube - Kimberly Tolbert / Greatinkspirations

All stamps and stamped images ©️1990-2020 Stampin’ Up! ®️