Hi Stampers,
In less than two weeks the STAMPIN’ UP! JULY-DECEMBER 2021MINI CATALOG goes live! What could be better? How about a second round of SALE-A-BRATION? That’s right, this year Stampin’ Up! is offering another two months of SALE-A-BRATION! This round begins 3 August and ends 30 September 2021. Remember, during SALE-A-BRATION your Stampin’ Up!product purchases of $50 or $100 allows you to select free items from the SALE-A-BRATION BROCHURE.
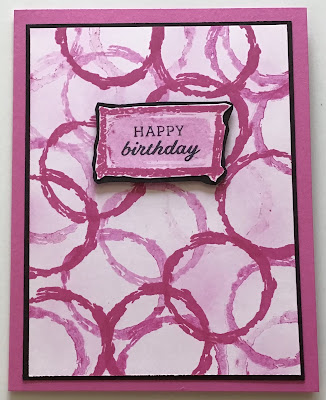
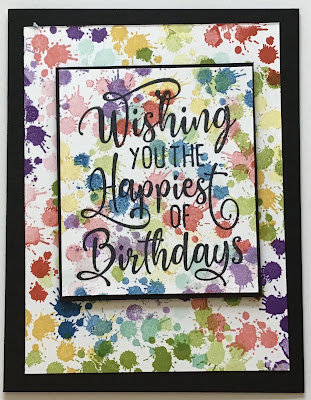
Today’s cards were created using the TEXTURES AND FRAMES stamp set, which is featured in the SALE-A-BRATION BROCHURE. Here is a look at the cards:
Here is a peek at the stamp set:
TEXTURES AND FRAMES
GRANNY APPLE GREEN CARD
* Granny Apple Green card base
* Basic White cardstock cut at 5” x 3 3/4” and a scrap for the greeting and a piece cut at 5” x 3 3/4” for the inside of the card.
* Basic Black cut at 5 1/8” x 3 7/8” for mat
* Layering Circles Dies
* Inks - Granny Apple Green and Memento Tuxedo Black
* Blending Brush
* Adhesive of choice and dimensionals
ASSEMBLY
* On the Basic White cardstock stamp the 3 parallel lines stamp vertically then horizontally with the Granny Apple Green to fill the card. Stamp the image in the same way, but off set the images a bit and stamp of on scrap paper before stamping on the card panel. Use the blending brush and the Granny Apple Green ink and apply a touch of ink all over the card front to “tone down” the Basic White.
* On the Basic White scrap of cardstock stamp the round image with Granny Apple Green ink - stamped off once.
* Stamp the circle image around the outside of the round image.
* Stamp the greeting in Basic Black in the center of the circle image. (The greeting is from DAYS TO REMEMBER stamp set - Annual Catalog).
* Die cut the greeting with the Layering Circles Dies. Select the die that fits around the greeting best.
* Use a Layering Circles Die one size larger than the sentiment circle, and die cut a circle from the center of the Basic Black cardstock..
* Adhere the focal panel to the Basic Black mat, then adhere this piece to the card base.
* Adhere the greeting to the Basic Black circle mat.
* Use dimensionals to attach the greeting to the card base.
MAGENTA MADNESS
* The card base, mat and focal panel are the same dimensions as for the previous card. The card base is Magenta Madness. The mat is Basic Black, and the focal panel is Basic White.
* Scraps of Basic White and Basic Black
* Inks - Magenta Madness and Memento Tuxedo Black
* Blending Brush
* Adhesive of choice and dimensionals
ASSEMBLY
* On the Basic White cardstock use the circle stamp and Magenta Madness ink to stamp the image multiple times. Stamp the image 2-3 times without reining the stamp. Over lap the images and stamp the images off the sides of the cardstock.
* Use the blending brush and the Magenta Madness ink and go over the panel with a very light touch to add a bit more color to the cardstock.
* Use the rectangular-like image and the Basic White scrap of cardstock for the greeting. Ink the image, stamp off then stamp on the cardstock.
* Use the rectangular frame stamp, ink it with Magenta Madness and stamp it over the rectangle image.
* Stamp the Happy Birthday (from DAYS TO REMEMBER stamp set) with Memento Tuxedo Black.
* Fussy cut the image and adhere it to the Basic Black scrap. Fussy cut around the image again to form the mat for the greeting.
* Adhere the focal panel to the Basic Black cardstock, then adhere this piece to the card base.
* Use dimensionals to attach the greeting to the card.
* Adhere 5” x 3 3/4” piece of Basic White cardstock inside the catd.
BASIC BLACK CARD
* Basic Black card base cut at 8 1/2” x 5 1/2” scored and folded at 4 14”
* Three pieces of Basic White cardstock, two cut at 5” x 3 3/4”(one for the card front and one for inside the card) and one cut at 3 1/4” x 2 3/4”.
* Basic Black cardstock cut at 3 3/8” x 2 7/8”
* Inks - I chose 8 of the colors in the Brights Color Family. (I used all, but Bermuda Bay and Mango Melody.) Memento Tuxedo Black
*Adhesive of choice and dimensionals
ASSEMBLY
* On one 5” x 3 3/4” piece an the smaller piece of Basic White fill the cardstock with the “spatter” stamp image in various colors - stamp and then stamp again with each color.
* On the smaller piece of Basic White use the Memento Tuxedo Black to stamp the greeting (from HAPPIEST OF BIRTHDAYS - Annual Catalog)
* Adhere the focal panel to the Basic Black mat, and adhere the 5” x 3 3/4” panel to the card base.
* Use dimensionals to adhere the greeting to the card.
* Adhere the remaining Basic White piece to the inside of the card.
That’s all for today. Thanks so much for stopping by. Until next time…
Stamp Happy!
Kim
All stamps and stamped images ©️1991-2021 Stampin’ Up!®️


No comments:
Post a Comment