Hi Stampers!
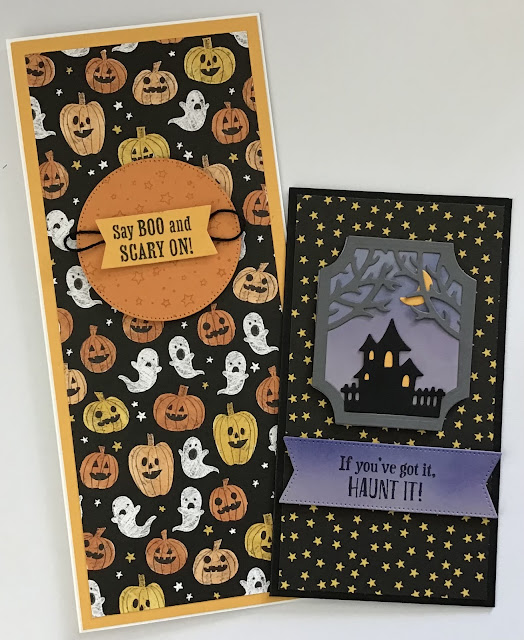
Welcome to week eight of my Stamp Happy Holidays series. Today I have two Halloween cards to share. The cards are slimline cards. The taller card fits in a business size envelope. My mini-slimline card fits in a letter size envelope. I use the envelopes that do not have the security lining. Let’s look at the cards:
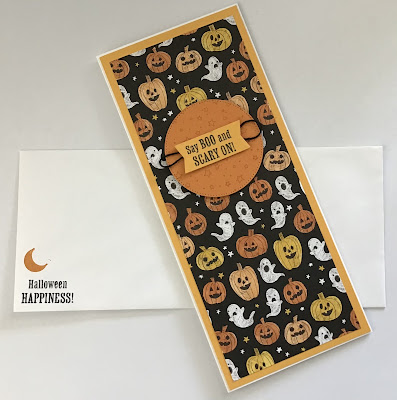
SAY BOO! SLIMLINE CARD
SUPPLIES FOR THIS CARD
* Basic White card base 9 1/4” x 8” - along 8” side score and fold at 4”
* Mango Melody cardstock cut at 9 1/8” x 3 7/8”
* Celebrate Everything DSP - Jack-o-lantern & Ghost pattern, 8 3/4” x 3 1/2”
* Pumpkin Pie cardstock large enough to cut a 2 1/2” circle die cut
* Baker’s Twine, black - about 7”
* Inks - Memento Tuxedo Black, Pumpkin Pie -Stampin’ Blends - Pumpkin Pie (light & dark), Daffodil Delight (dark)
* Scary Silhouettes Dies, Stylish Shapes Dies
* Best Witches and Scary Cute stamp sets
* Adhesive, dimensionals
ASSEMBLY
* Die cut the circle from the Pumpkin Pie cardstock using the Sylish Shapes Dies (circle), and die cut the banner from the Mango Melody mat using the Scary Silhouette dies
* Use the Stampin’ Blends to color the pumpkins on the DSP
* Use the Pumpkin Pie ink and the stars stamp from the Best Wishes stamp set and stamp stars on the circle die cut
* Stamp the greeting on the banner with Memento Tuxedo Black ink
* Place some adhesive on the back side of the banner and adhere the baker’s twine create a loop on each end
* Place dimensionals on the back side of the greeting and adhere it to the circle die cut
* Place dimensionals on the back side of the greeting piece
* Adhere the DSP to the Mango Melody card base and adhere this to the card base
* Place the greeting on the card
* Stamp a sentiment inside the card using Memento Tuxedo Black ink
+ If desired use Memento Tuxedo Black ink to stamp a greeting in the lowers left corner of the envelope.
+ Use Pumpkin Pie ink to stamp the crescent moon image above the greeting
SAY BOO CARD AND ENVELOPE
HAUNT IT MINI SLIMLINE CARD
SUPPLIES FOR THIS CARD
* Card base - Basic Black cut at 7” x 6 3/8” along the 7” side score and fold at 3 1/2”
* Celebrate Everything DSP - black with star pattern - cut at 6 1/8” x 3 1/4”
* Basic White cardstock cut at 6 1/8” x 3 1/4” for inside panel
* Scraps of Smoky Slate, Basic Gray, Basic Black, and Mango Melody
* Inks - Memento Tuxedo Black, Gorgeous Grape, Starry Sky
* Blending Brushes
* Best Witches and Scary Cute stamp sets
* Scary Silhouettes Dies & Stylish Shapes Dies - largest banner
* Adhesive, dimensionals, cellophane tape
+ TIP - The 6 3/8” mark is a bit difficult to find on the Paper Trimmer. One way to overcome this is to score the cardstock on the Simply Scored Scoring Tool at 6 3/8”, then on the Paper Trimmer line up the scored line right at 0 - where the blade cuts.
ASSEMBLY
* Die cut the pieces for the focal image using the Scary Silhouettes Dies - haunted house (Basic Black), moon (Mango Melody), tree frame (Basic Gray) label (Smoky Slate), and die cut the banner using the Stylish Shapes Dies (Smoky Slate)
* Use the blending brushes, Gorgeous Grape and Starry Sky inks and create a night sky look on the label die cut and the banner die cut. I started at the bottom of the pieces and added Gorgeous Grape ink. Next I added Starry Sky, then I went back over the pieces adding a bit more of each color of ink until I reached a saturation I liked.
* Put the focal image together - adhere the moon to the label die cut. Adhere the tree frame (I used liquid glue and only put it on the outside part of the frame, but not on the trees. Use small pieces of Mango Melody and tape them behind the windows of the haunted house. Adhere the house to the focal piece.
* Stamp the greeting on the banner using Memento Tuxedo Black ink.
* Stamp a greeting from the Scary Cute stamp set on the Basic White panel for inside the card using the Memento Tuxedo Black ink.
* Adhere the DSP to the front of the card and adhere the inside panel inside the card.
* Use dimensionals to attach the focal piece and greeting banner to the front of the card.
+ If desired use the Memento Tuxedo Black ink and stamp a greeting in the lower left corner of the envelope and stamp the star images from the Best Witches stamp set in Mango Melody above the greeting.
HAUNT IT CARD AND ENVELOPE
HALLOWEEN SLIMLINE CARDS
That is all for today. Until next time…
Stamp Happy!
Kim
All stamps and stamped images ©️1990 - 2022 Stampin’ Up,©️


No comments:
Post a Comment