Hi Stampers!
Have you ever run out of ideas for a card layout? I certainly do from time to time. One strategy I use to help me create a design is something I call “start with three.” It is based on the rule of three. This theory posits humans process information through pattern recognition, and 3 is the smallest number that allows for pattern recognition. We tend to see groups of 3 as pleasing to the eye and balanced.
So, how do I practically apply this theory to my cards? Like I said, it starts with three - three images. They can be stamped or die cut, they can be the same image or different, whatever you want. The size of the images can help determine the card size. For example if the images are smaller they can be placed on a 4 1/2” square card, or a mini slimline cards. Larger images look better on A-2 cards or even a regular slimline card. Without using adhesive, place the images on the card to get an idea of what to use as a background. This also helps to determine if other image might be added for balance and what sentiment to use. Before long the card layout is completed and you’ll find yourself wanting to make more cards!
Let’s take a look at my sample cards:
VIDEO
IT ALL STARTS WITH THREE
A STRATEGY FOR CARD LAYOUTS
THREE BUBBLE SNOWMEN CARD
* Card base Azure Afternoon cardstock 8 1/2” x 4 1/4” scored and folder at 4 1/4”
* Focal panel and inside panel - Basic White cardstock each cut at 4” x 4”
* Basic white cardstock for stamping and fussy cutting
* Inks - Distress Oxide - Tumbled Glass, Memento Tuxedo Black; Stampin’ Blends - Pumpkin Pie (light), Poppy Parade (light & dark), Lemon Lime Twist (light and dark), Smoky Slate (light and dark)
* Blending brush or sponge
* Stamp Sets - Bubble Snowmen, Holiday Cheer (sentiment)
* Embellishment - White Loose Snowflakes
* Adhesive. liquid glue, and dimensionals
ASSEMBLY
* Focal panel - use the Tumbled Glass ink and blending brush to add a bit of color to the center of the panel
* Inside panel - Use the Memento ink to stamp the sentiment and a snowman head. Color snowman’s nose with Pumpkin Pie Stampin’ Blend. Adhere to inside card
* On white cardstock stamp three snowmen, color with Stampin’ Blends, fussy cut and place dimensionals on back side. Adhere in place.
* With Memento ink, stamp the greeting.
* Adhere panel to front of card.
* Use small drops of glue to adhere snowflake embellishments to card front
HO HO HO! SILLY SANTA CARD
* Card base - Poppy Parade cut at 8 1/2” x 4 1/4” scored and folded at 4 1/4”
* Focal panel and inside panel - Basic White cardstock 4” x 4” each
* Embossing folder - Snowflake Sky
* Basic White cardstock for stamping and die cutting, Poppy Parade cardstock for die cutting
* Ink - Poppy Parade
* Stamps set Silly Santa’s with coordinating dies
* Adhesive and dimensionals
ASSEMBLY
* Stamp the Santa image and sentiment on inside panel with Poppy Parade ink
* Adhere inside panel to inside of card
* Emboss focal panel with embossing folder.
* Die cut Santa and Ho, Ho, Ho and background. Adhere the Ho Ho Ho to backgrounds with glue
* Adhere Santa and sentiment -pieces to focal panel with dimensionals
* Adhere card front to card base
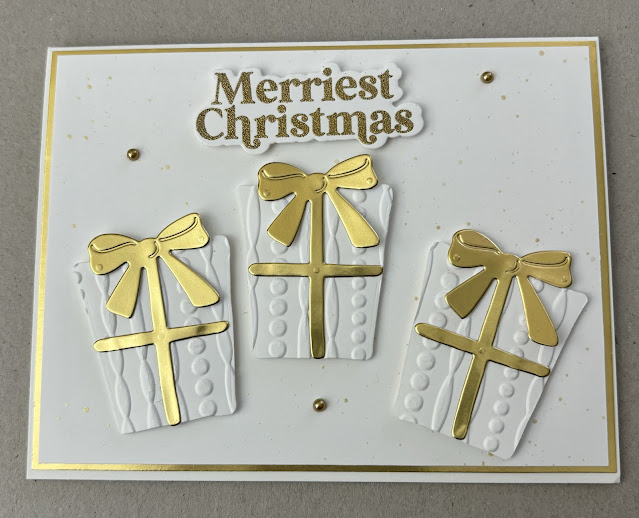
THREE GIFTS CARD
* Card base - Basic White (thick) cardstock cut at 8 1/2” x 5 1/2” scored and folded at 4 1/4”
* Mat - Gold foil cut at 5 3/8” x 4 1/8”
* Folcal panel - Basic White cardstock cut at 5 1/4” x 4”
* Basic White cardstock and gold foil for stamping and die cutting
* Ink - Versa Mark, gold embossing powder, metallic gold watercolor
* Paint brush
* Stamps - Holiday Cheer and dies
* Other dies - Sending Cheer
* Embossing folder - no idea the name of this one, I’ve had it for a really long time. It is from Sizzix.
* Embellishments - Gold pearls -3
* Adhesive and dimensionals
ASSEMBLY
* For focal panel - use some water on paintbrush with gold metallic watercolor paint - ta- on paint brush with bone folder, pencil, or finger to create gold spatters on the white cardstock.
* If you like use a die to cut out center area of gold foil, then adhere focal panel to cover cut away area of gold foil.
* Stamp greeting with Versa Mark, cover with embossing powder, heat set.
* Die cut greeting, the gifts, and bows.
* Adhere bows to gifts.
* Use dimensionals to adhere gifts and greeting to card front.
* Add three gold pearls to card.
IT STARTS WITH THREE CARDS
The next time you are stumped for a card layout idea, remember - it all starts with three! Page down to find resource list for products used to create today’s cards. Thank you so much for stopping by today. Until next time . . .
Stamp Happy!
Kim
SUPPLY RESOURCES
STAMPIN’ UP!
* All Cardstock and Gold Foil (all colors are current)
* Stampin’ Blends (all colors are current)
* Poppy Parade Ink (current)
* Sending Cheer Dies (retired)
* Snowflake Sky Embossing Folder (current)
* White Loose Snowflakes (current)
SIMON HURLEY
* Silly Santa’s Stamp Set & Dies (current)
WAFFLE FLOWER
* Holiday Cheer Stamp Set & Dies (current)
WOODWARE CRAFT COLLECTION
* Bubble Snowmen Stamp Set (current)


No comments:
Post a Comment