Hi Stampers!
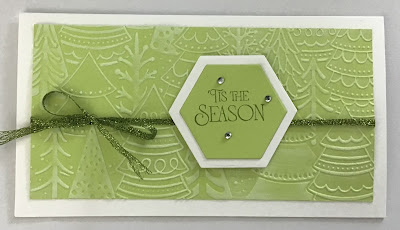
Thank you for stopping by. Today’s Stamp Happy Holidays cards feature a technique I call “Ink Swiping.” This technique can result in a piece with a bit of a distressed look, depending on the embossed image and the amount of pressure used as you swipe. There is an example of this technique and the card I CASEd (CASE = Copy And Share Everything) on page 39 of the Stampin’ Up!®️July-December 2022 Mini Catalog. The Stampin’ Up! Catalogs are great resources for card layouts, techniques, and more!
The ink swiping technique requires, cardstock, ink pad, and an embossing folder. Once the cardstock is embossed, lightly swipe the ink pad across the cardstock. That’s all there is to it! Let’s look at my sample cards:
INK SWIPING TECHNIQUE CARDS
TIPS FROM MY EXPERIENCE
As simple as this technique is , it does take some practice. I recommend practicing on scraps of embossed cardstock.
I used the White Craft Ink (as in the catalog sample) on the Parakeet Party cardstock and heat set it. Suddenly the white ink sort of faded into the cardstock. It is possible my ink pad needed reinking as the white craft ink pads do require frequent reinking. It is also possible I was not adding enough pressure as I swiped the ink across the cardstock.
The colored inks on Basic White cardstock worked much better for me, so I definitely recommend using that combination of cardstock and ink.
THE CARD BASE
These cards are what I call mini slimline cards. I enjoy making them on occasion. These cards fit perfectly inside a letter sized envelope (#6 3/4). The cardstock for these cards is cut at 6 3/8” x 7” and scored and folded at 3 1/2” along the 7” side. It is true you will get only one card per sheet of cardstock, but I use what is left over for matting focal panels or sentiments, or for projects other than cards. For tips on finding the 6 3/8” mark on the Stampin’ Up! Paper Trimmer, and another idea on cutting cardstock at 6 3/8” watch the video included in this post.
For today’s cards the focal panels measure 5 7/8” x 3”. I cut panels for inside the cards that measure the same as the focal panels.
WHIMSICAL WOODLAND EMBOSSING FOLDER
I like this embossing folder. It is so festive and fun. It is a 3D embossing folder and the sandwich for the Stampin’ Cut & Emboss machine couldn’t be easier! It is simply the Base Plate (plate 1), the embossing folder with the cardstock inside, and the Specialty Plate (plate 4). That’s it!
BRIGHTEST GLOW STAMP SET
I chose greetings from the Brightest Glow stamp set for my cards, but of course, you can use any greeting you like.
CASEing & SWIPING MERRY & BRIGHT HOLIDAY CARDS VIDEO
SUPPLIES NEEDED FOR ALL CARDS
* Whimsical Woodland Embossing Folder, or embossing folder of choice
* Brightest Glow stamp set or stamps of choice
* Card base 6 3/8” x 7” scored and folded at 3 1/2” along 7” side
* Focal panel - 5 7/8” x 3”
* Inside panel - (Basic White or color of choice) 5 7/8” x 3”
* Beautiful Shapes Dies - hexagon shapes two center ones or sizes that fit greeting
* Adhesive & dimensionals
WHIMSICAL WOODLAND
WHITE CRAFT INK ON PARAKEET PARTY
SUPPLIES FOR THID CARD
* Card base - Basic White Thick
* Focal panel - Parakeet Party
* Scrap of Basic White and Parakeet Party for greeting
* Metallic Woven Ribbon - Parakeet Party, about 20”
* Inks - White Craft Ink and Parakeet Party
* Rhinestone Basic Jewels -3
NOTE - since the cardbase is Basic White I did not add an inside panel, I simple stamped the sentiment on the card base.
WHIMSICAL WOODLAND
POLISHED PINK INK ON BASIC WHITE
SUPPLIES FOR THIS CARD
* Cardbase - Polished Pink
* Focal and inside panels - Basic White
* Scraps of Polished Pink and Basic White for greeting
* Ink - Polished Pink
* Open Weave Ribbon - Polished Pink - about 15”
* Elegant Faceted Gems - Clear -3
WHIMSICAL WOODLAND
TAHITIAN TIDE INK ON BASIC WHITE
* Card base - Tahitian Tide
* Focal and inside panels - Basic White
* Scraps of Basic White and Tahitian Tide cardstock for greeting
* Ink - Tahitian Tide
* Metallic Woven Ribbon - Tahitian Tide, about 15”
Stamp Happy!
Kim
All stamps and stamped images ©️1990 - 2022 Stampin’ Up!®️


No comments:
Post a Comment