Showing posts with label Stand Alone Card. Show all posts

Monday, July 1, 2024

TRY A DOUBLE Z FOLD CARD FOR TWICE THE FUN

Hi Stampers!

Today’s cards are another version of a Z Fold card. This one is called a DOUBLE Z FOLD. The design consists of an A-2 sized Z fold card and a smaller version of a Z fold card. This card fits inside a A-2 sized envelope. The card fold is not difficult to create, and is sure to make the recipient feel special. Let’s take a look at the sample cards:


VIDEO
TRY A DOUBLE Z FOLD CARD FOR TWICE THE FUN


HOW TO MAKE A DOUBLE Z FOLD CARD


SUPPLIES
* Card base - Cardstock cut at 11” x 4 1/4” scored and folded at 2 3/4” and 5 1/2”
* Small card base - Cardstock cut at 9” x 3 1/4” scored and folded at 3” and 6”
NOTE - For more on cutting and scoring the card bases, see the diagrams below.
* Back panel - Light colored cardstock at 5 3/8” x 4 1/8” or for larger border 5 1/4” x 4”
* Back panel patterned paper (optional) 2 7/8” x 4 1/8” or for larger border 2 3/4” x 4”
* DSP panels for A-2 card -  Cut two at 4 1/8” x 2 5/8” and one at 5 3/8” x 4 1/8” or for larger border cut two at 4” x 2 1/2” and one at 5 1/4” x 4”
* DSP panel for small card - Cut 3 at 2 7/8” x 2 7/8”
* Stamps, inks, die cuts, supplies for sentiment
* Adhesives

CUTTING, SCORING AND FOLDING DIAGRAMS


ASSEMBLY
* Cut, score, and fold both card bases go over folds with bone folder
* Adhere patterned paper to the individual sections of each card base
* Any stamping directly onto the card base should be done prior to adhering the two card bases together
* Time to adhere the card bases together - start by adhering the left section of the small card base to the left section of the larger card base. Start by centering the smaller one over the larger one, then move it to the left or right, up or down, until you like where it is. Add adhesive to the back of the left hand side of the section and adhere in place.
* To adhere the right section of the small card to the right section of the larger card, close card, turn face down, lift back of larger card. The right section of the smaller card should be face down - put adhesive on it. Fold the back of the larger card over the smaller one and pres. The card is assembled.
* Add die cut images, greeting, embellishments, etc.

FRIENDLY FINS CARD


SHARK FRENZY CARD


VIDEO CARD
 WE’LL WALRUS BE FRIENDS CARD


That’s all for today. Thank you so much for stopping by Until next time . . .
Stamp Happy!

Kim

Supplies for the cards are from Stampin’ Up!®️ 

Stamp sets ©️1990-2024 Stampin’ Up!®️
Current:
Friendly Fins Bundle - view details HERE
Retired:
Shark Frenzy Bundle 
We’ll Walrus Be Friends


Friday, September 9, 2022

JUST STAND ALONE & CREATE QUICK & EASY HOLIDAY CARDS - A STAMP HAPPY HOLIDAY POST

Hi Stampers,

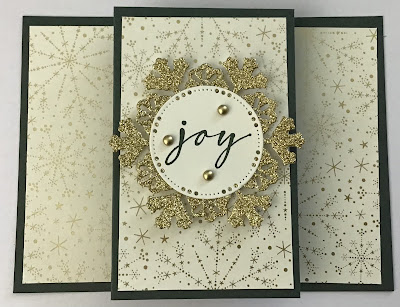
Welcome to this edition of my Stamp Happy Holidays series. Today I am sharing a super easy card fold. I call this the STAND ALONE CARD FOLD as it stands up straight making it perfect for display on tables, mantles, shelves, etc. Let’s take a look at the card:

STAND ALONE JOY


STAND ALONE JOY
(Standing)


STAND ALONE JOY
(Back / Inside)


For my card I used products from the LIGHTS AGLOW SUITE found in the Stampin’ Up!®️ July - December 2022 Mini Catalog. Of course this fun fold can be used with any stamps, papers, and inks you like. 
TWINKLING LIGHTS DIES
(Die cut images)


I used the the two dies that make up the large snowflake for the focal image on the card.

BRIGHTEST GLOW STAMP SET


I used two stamps from this set for greetings on my card - Joy and Hoping Your Christmas Shines…

LABELS AGLOW DIES


I used the circle die to cut out the greeting for the front of the card.

JUST STAND ALONE AND CREATE QUICK & EASY 
HOLIDAY CARDS VIDEO


CUTTING & SCORING MEASUREMENTS FOR THE STAND ALONE CARD
* Card base - cardstock cut at 4 1/4” x 11” score along the 11” side at 2 3/4”, 4 1/8”, 6 7/8”, and 8 1/4”
* Designer Series Paper, specialty Paper, etc - cut 3 at 4” x 2 1/2”
* White or light colored cardstock for back panel - cut at 4” x 2 1/2”

SUPPLIES USED FOR MY CARD
* Brightest Glow stamp set
* Twinkling Lights Dies
* Labels Aglow Dies
* Card base - Evening Evergreen
* Lights Aglow 6” x 6” DSP - Very Vanilla with gold foil snowflakes pattern
* Glimmer 12” x 12” Specialty Paper - Gold - for die cut
* Very Vanilla cardstock - 1 piece cut at 4” x 2 1/2” (for back of card), and a scrap piece for the Joy sentiment
* Ink - Evening Evergreen
* Brushed Metallic Dots - Gold - 3 or Festive Pearls - Gold - 3
* Adhesive and dimensionals 


Thank you for stopping by. Until next time…
Stamp Happy!

Kim

All stamps and stamped images ©️1990 - 2022 Stampin’ Up!®️


Thursday, November 4, 2021

STAND ALONE FUN FOLD HANUKKAH CARD

 Hi Stampers!

Today I am sharing a Hanukkah version of the Stand Alone Fun Fold card. To see more information on Stand Alone Cards see my previous post (2 November 2021). Today’s card features A WISH FOR EVERYTHING stamp set and the STITCHED TRIANGLES DIES. Both items are found in the Stampin’ Up!®️ 2021-2022 Annual Catalog.

Here is the card:

STAND ALONE HANUKKAH CARD


A WISH FOR EVERYTHING


SUPPLIES FOR THIS CARD


* Card base - Pacific Point cardstock cut at 8 1/2” x 5 1/2” score along 8 1/2” side at 2”, 3 1/8”, 5 3/8”, and 6 1/2” OR 2” and 3 1/8” on each end.
* Basic White cut at 5 1/4” x 2” for back of card, and scrap of Basic White cardstock for greeting.
* DSP - 6” x 6” Designer Series Paper Assortment - Brights (Pacific Point) - any of the designs you like.
* Silver Foil - mirror finish.
* Pacific Point Ink
* Stitched Triangles Dies - two equal lateral triangles: the largest one and the third largest one.
* Layering Circles Dies or Circle Punch - the circle needs to measure about 2 1/4” in diameter.
* Adhesive, dimensionals, and glue dots.

ASSEMBLY

* Cut the cardstock for the card base and score the cardstock. Cut the pieces of DSP - first cut 1/2” off the 6”x 6” piece. Cut two 2” x 1/2” pieces from this.  
* Die cut or punch the Basic White circle?
* Use the two Stitched Triangles Dies to cut two triangles from the Silver Foil. (See below.)


* Place the Silver Foil on the cutting plate of your die cut machine. 
* Arrange the two triangle dies on top of the foil sheet with the smaller one inside the larger one, center it as best you can. Hold the dies in place with low tack tape or sticky notes.
* Place another cutting plate on top of the dies, and run this through the die cut machine. 
* Repeat the process.
* You now have two triangles with open centers.


* To form the Star of David, place one triangle with a single point at the top. Position the second triangle wit the two points at the top, slip behind the first triangle, then slip it’s single point under the bottom of the first triangle. (See photo above.) 
* Use glue dots to attach the two triangles.


* Stamp the greeting in Pacific Point centered on the Basic White die cut circle. Stamp the sentiment for the back of the card in Pacific Point on the 5 1/4” x 2” piece of Basic White cardstock.
* Adhere the DSP to the card front. 
* Line up the greeting piece behind the star and use adhesive or glue dots to hold it in place. Use dimensionals to adhere the star greeting piece to the card front.
* Adhere the two 2” x 1/2” pieces of DSP to the 5 1/4” x 2” piece of Basic white  about 1/4” from the top and 1/4” from the bottom. Adhere this piece to the center of the back side of the card. (See below.)


This card fits inside the Stampin’ Up! Medium size envelope. I hope you give this fun fold a try.


That is all for today. Thank you for stopping by. Until next time…
Stamp Happy!

Kim

EDEN’S GARDEN COLLECTION
AVAILABLE FOR ORDER NOW!


EDEN’S GARDEN BUNDLE is an early release bundle from the upcoming Stampin’ Up! January- June 2022 Mini Catalog. The stamp set and the dies can be purchased separately or bundled for a 10% savings. Now through 3 January 2022 you can purchase the bundle with the coordinating Ever Eden Designer Series Paper, the Ever Eden Cotton Paper, and the Garden Gems as a collection. Although the bundle will be featured in the upcoming Mini Catalog, the coordinating items are only available during the promotion while supplies last. As always, each of the coordinating items may also be purchased separately.


All stamps and stamped images ©️1990-2021 Stampin’ Up!®️

Thursday, August 13, 2020

TINSEL TIME THURSDAY

 TINSEL TIME THURSDAY

Card # 2

Welcome to week two of Tinsel Time Thursday! Today’s cards feature the Warm &Toasty stamp set from the Stampin’ Up!®️ August- December 2020 Mini Catalog. (Page 42.) The cards also feature the Heartwarming Hugs Designer Series Paper from the same catalog. (Page 9.) 


Today’s card is a Paneled Stand Alone Fun Fold Card. I made one of these many years ago.  Several versions, a lot of examples, and  some tutorials for this type of card Can be found on various web sites like Pinterest.  Here is the card I made using the original instructions I was given for this type of card. It is created in portrait orientation.


I wanted to make a similar card using a landscape orientation, so I did a bit of math, and this is the result:


Both cards measure 5 1/2” x 4 1/4” when flat, and easily fit into this Stampin’ Up! medium envelopes (A-2 size).

MEASUREMENTS FOR PORTRAIT VERSION (Polar Bear)

Card Base - Real Red, 8 1/2” x 5 1/2” - scored along the 8 1/2” side at 2” and 3 1/8” on each end (or at 2”, 3 1/8”, 5 3/8”, and 6 1/2”)
DSP - Heartwarming Hugs
     2 pieces cut at 1 3/4” x 5 1/4” (red and green check pattern)
     1 piece cut at 2” x 5 1/4” (Mossy Meadow with tiny dots)
OTHER CARDSTOCK - 
     Real Red 4 1/4” x 3 1/4”
    Whisper White 3 3/4” x 2 3/4”
    Whisper White 2 x 5 1/4 for back I’d card to add your message.
    Real Red and Whisper White scraps.
The image and Real Red mat are die cut with the Stitched So Sweetly Dies - the largest and the next to largest scalloped rectangles. The sentiment and Real Red mat are cut from the Layering Circle Dies - the scalloped ones - for the sentiment the die measures about 1 1/2” in diameter, and the die for the mat measures about 1 3/4” in diameter.

LANDSCAPE VERSION (Reindeer)


Card Base - Mossy Meadow 4 1/4” x 11”
Other Cardstock - Whisper White 3 1/2” x 4”, large scraps of Mossy Meadow and Whisper White for focal image, sentiment and mats.
Designer Series Paper- Heartwarming Hugs, 2 pieces 2” x 4” (pay attention to orientation of stripes), 2 pieces at 1 1/8” x 4” (paying attention to orientation of stripes). Finally, one piece of contrasting DSP
3 1/2” x 4”.

INKS
Memento Tuxedo Black, Mossy Meadow Classic Stampin’ Pad; Stampin’ Blends in Crumb Cake (light and dark), Smoky Slate (light and dark), Ivory, Flirty Flaming (light), Real Red (dark and light), Mossy Meadow (dark).


DIES
Stitched Shapes Dies - Ovals, largest and next largest for focal image. Stitched Shapes Dies - Squares, one 
up from smallest. Layered Squares Dies - the one that measures about 1 5/8” square.


EMBELLISHMENTS
Whisper White 1/4” Crinkle Seam Binding Ribbon about 18” long and died with the Mossy Meadow (dark) Stampin’ Blend, and Red Rhinestone Basic Gems (4).


ADHESIVES
Stampin’ Seal or Multipurpose Glue, and 1 glue dot to hold Ribbon in place.

ASSEMBLING THE CARD

Score the cardstock along the 11” side at 2 1/4” and 3 5/8” from each side, or 2 1/4”, 3 5/8”, 7 3/8”, and 8 3/4”.  
Fold the cardstock - beginning at either end, valley fold, mountain fold, mountain fold, valley fold.


Adhere the DSP to the card base. With the Mossy Meadow ink stamp the Warm and Toasty Wishest to You on the 3 1/3” x 4” Whisper White cardstock and adhere it to the largest portion of the card on the back side.

On a scrap of Whisper White stamp the Sharing Christmas Cheer sentiment in Mossy Meadow. 

On a large scrap of Whisper White stamp the reindeer Using the Memento Tuxedo Black Ink. Use Crumb Cake (light and dark) for the body. Real Red (light and dark) on the ribbon. Basic Gray (light and dark) on the hooves, Ivory with a touch of Crumb (light) on the antlers, and Flirty Flaming (light) on the inner ears, and a touch on the face for rosy cheeks. 

Using the appropriate dies, cut out the focal image, sentiments, and each corresponding mat. Adhere the focal image and the sentiment to its mat.


Tie the ribbon around the card as shown below.


Adhere the focal image and the sentiment to the card front. Add two Red Rhinestones to the sentiment. And add two Red Rhinestones to be greeting on the reverse side.


The card is finished!

I hope this card provides you with greatinkspirations, and that you will give it a try; either version - or both! 

Check back next Thursday when the featured stamp set will be Merry Moose! That’s all for today.

Until next time...
Stamp Happy!
Kim

greatinkspirations.blogspot.com
greatinkspirations.stampinup.net
greatinkspirations@gmail.com
On You Tube - Kimberly Tolbert / Greatinkspurations

All stamps and stamped images ©️ 1990-2020 Stampin’ Up!®️