Hi Stampers!
I enjoy trying new stamping techniques, but I also enjoy using techniques that have been around for a while. Today’s technique is one of the first I learned when I started stamping over 15 years ago. The baby wipe stamp pad technique is easy to learn, and lets you create a uniquely colored ink pad for your project.
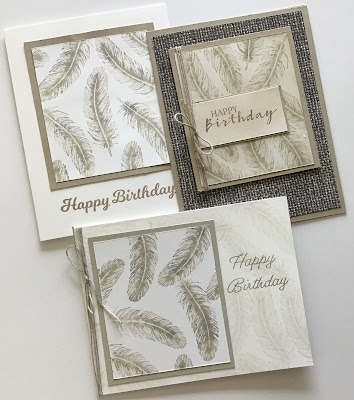
Here are some cards I created using the baby wipe stamp pad technique:

The feather image was stamped using Crumb Cake, Gray Granite, and Sahara Sand inks. The subtle color variation provides some depth and dimension as well as a monochromatic look.
The feather image is from the TASTEFUL TOUCHES stamp set. This stamp set is featured in the Stampin’ Up!®️ 2021-2022 Annual Catalog.
TASTEFUL TOUCHES

BABY WIPE STAMP PAD TECHNIQUE
SUPPLIES:
* Ink Refills; 3-4 colors
* Silicone Craft Sheet, Clear Block (I recommend Block D or larger), a plate, or other non porous surface.
* A baby wipe - fold it in half twice.


* Basic White card base 8 1/2” x 5 1/2” scored and folded at 4 1/4”.
* Basic White cardstock cut at 3” x 3 1/2” for focal panel.
* Crumb Cake cardstock cut at 3 3/8” x 3 7/8”
* Crumb Cake Ink
* Adhesive

SUPPLIES FOR THIS CARD:


This technique is easy and the “stamp pad” will have enough ink to make several cards. I hope you give the baby wipe stamp pad technique a try.
That’ all for today. Thank you so much for stopping by. Until next time…

* Basic White card base 11” x 4 1/4” scored and folded at 5 1/2”
* Basic White cardstock cut at 3” x 3 1/2” for focal panel.
* Sahara Sand cardstock cut at 3 1/4” x 3 3/4” for mat
* Linen Thread
* Gray Granite ink for sentiment
* Adhesive
* Note - for the feather images on the card base I stamped off on scrap paper before Stampin on the card base.

SUPPLIES FOR THIS CARD:
* Crumb Cake card base 8 1/2” x 5 1/2” scored and folded at 4 1/4”
* Basic White cardstock cut at 3” x 3 1/2” for focal image.
* Crumb Cake cardstock cut at 3 1/4” x 3 3/4” for focal image mat.
* Basic White and Crumb Cake cardstock appropriate size for greeting.
* Crumb Cake ink
* Blending Brush
* Crumb Cake twine
* DSP (In Good Taste)
* Adhesive and dimensionals for the focal panel.
* Note - After stamping the focal panel and the sentiment I went over each piece with a blending brush inked with Crumb Cake.
For a more noticeable color differentiation use a very light color, a medium shade, and a dark shade. Below is a card I made using Fresh Freesia, Highland Heather, and Gorgeous Grape for the floral images, and Old Olive and Pear Pizzazz for the leaves. I used the HYDRANGEA HAVEN stamp set found the Stampin’ Up! 2021-2022 Annual Catalog.

HYDRANGEA HAVEN


Stamp Happy!
Kim
All stamps and stamped images ©️ 1990-2021 Stampin’ Up!®️
No comments:
Post a Comment