Hi Stampers!
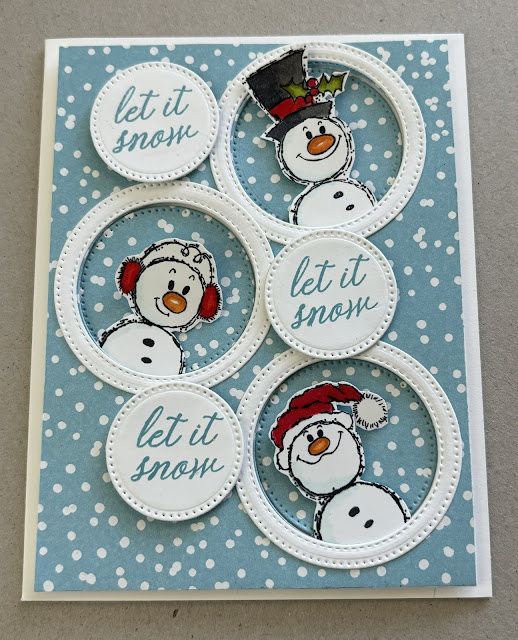
Today is the first Saturday in October, and that means today is World Card Making Day! I thought we’d celebrate by creating a multi-window card. It’s easy. Let’s take a look at the sample cards:
Multi-window cards are easy to make and are very versatile. There are dies available that cut out multiple windows, but you can get the same or similar look with basic shaped dies or even punches. I chose 3 windows of the same size for each card, but more windows can be added and the sizes can be different. The images and sentiment chosen will help determine the sizes of the windows. Remember, it is okay to use just part of an image.
The circles I die cut from the focal panel were placed back in the windows either popped up on dimensionals, or adhered to the card base with the focal panel popped up. The die cut pieces can be omitted if you like. Frames around the windows can add that little extra something to the card. Simply place the die used for the window on the cardstock and place a die that is 1/4” larger in diameter around it, and cut. Punches can be used in the same way. Punch the smaller shape first, then place the larger punch around the hold, and punch again to create the frame.
VIDEO
LET’S MAKE A MULTI-WONDOW CARD
LET IT SNOW CARD
SUPPLIES I USED
* Stamps - Bubble Snowmen (Woodware Craft Collection). SparklingSnowflakes (Stampin’ Up!®️ - retired); Holiday Cheer (Waffle Flower)
* Card base - white cardstock (Basic White - thick) 8 1/2” x 5 1/2” scored and folded at 4 1/4”
* Focal panel - white cardstock (Basic White) and blue (Balmy Blue) patterned paper with snow-like pattern - use what you have, cut at 5 1/4” x 4”; put adhesive along the edges of the white cardstock and place the blue patterned paper on top.
* Other cardstock - white for frames, sentiments, and for stamping images
* Dies - Stylish Shapes (Stampin’ Up!) - circle dies - 1 3/4” diameter for windows; 2” + 1 3/4” diameter for frames, and 1 1/4” for sentiment
* Inks - Memento Tuxedo Black, Balmy Blue; Stampin’ Blends - Real Red, Poppy Parade, Old Olive, Granny Apple Green, Pumpkin Pie, Smoky Slate, Badic Black, Pool Party
* Temporary adhesive, liquid glue or adhesive of choice, and dimensionals
ASSEMBLY
* Cut 3 windows from the focal panel save the die cut patterned paper circles
* Die cut or punch out the frames and the circles for the sentiments
* Prepare the images and stamp sentiments.
* Put temporary adhesive on the focal panel, center it on the card front, and press.
* Place adhesive on back of die cut patterned paper and put these pieces in the windows.
* Remove panel, add frames to panel, put dimensionals on the back of panel, Arrange and attach snowmen to panel putting dimentionals behind each snowman head; adhere this to card front.
* Adhere sentiments.
* Stamp inside the card
MAGICAL BIRTHDAY CARD
SUPPLIES I USED
* Stamps - Majestic Unicorn and dies (Trinity Stamps), Pirates & Mermaids (Stampin’ Up! - retired)
* Card base - Teal-blue cardstock (Tahitian Tide - retired) 8 1/2” x 5 1/2” scored and folded at 4 1/4”
* Focal panel - white cardstock cut at 5” x 3 3/4”
* Inside panel - white cardstock cut at 5” x 3 3/4”
* Other cardstock - white for stamping images
* Inks - Distress Oxide - Picked Raspberry, Salty Ocean, Squeezed Lemonade, Twisted Citron; Memento Tuxedo Black; Stampin’ Blends - various colors
* Blending tool of choice
* Circle Die - 1 3/4” diameter (Stylish Shapes- Stampin’ Up!)
* Adhesives and dimensionals
NOTES
* Use the Distress Oxide inks and blending tool to add color to the focal panel.
* This card is assembled as the previous card, except the only dimensionals used were for the back of the sentiment.
VIDEO CARD
SUPPLIES I USED
* Stamps - Silly Santas and dies (Simon Hurley) and Holiday Cheer (Waffle Flower)
* Card base - red (Poppy Parade) - 8 1/2” x 5 1/2” scored and folded at 4 1/4”
* Focal panel and inside panel - white cardstock, both cut at 5 1/4” x 4”
* Other cardstock - white and red for stamping and die cutting
* Circle dies - 1 1/4” diameter
* Embossing folder - Snowflake Sky (Stampin’ Up!)
* Adhesives and dimensionals
NOTE
* For focal panel - cut windows, then put panel and die cut circles in embossing folder and emboss.
* Assemble in same manner as snowmen card.
AUGMENTED VIDEO CARD
I added frames to the card. I think the frames add a lot of definition and dimension. For the frames I used a 1 1/4” an 1 1/2” diameter circle dies (Stylish Frames - Stampin’ Up!).
MULTI-WINDOW CARDS
Thank you for stopping by today. I hope you have the opportunity to create at least one card today to celebrate World Card Making Day! Until next time . . .
Stamp Happy!
Kim
SUPPLY SOURCES
I list supply sources as a resource only. I am not affiliated with nor do I receive compensation from any company or other entity.
CARDSTOCK
* I use Stampin’ Up! cardstock. All colors used are current unless otherwise noted in supply lists.
INKS
* I use mostly Stampin’ Up! inks. All colors are current unless otherwise noted.
* For one card in today’s cards I used Distress Oxide inks. They are readily available from a number of online sites and craft stores.
STAMPS
* Stampin’ Up! Current stamps can be viewed HERE
* Bubble Snowmen (Woodware Craft Collection); Holiday Cheer (Waffle Flower), Silly Santas (Simon Hurley), Majestic Unicorn (Trinity Stamps) - all were purchased through Scrapbook.com HERE. These products are also available through other online outlets.


No comments:
Post a Comment