Hi Stampers!
Have you ever reached a point where you just cannot come up with an idea for a Christmas card (or any card) no matter how hard you try? I have, many times! When I experience this challenge there is a strategy I use, and I am sharing that strategy today. I tried to come up with a snappy name or acronym, but was unsuccessful. It’s a simple 4 step strategy to help focus creativity by starting with a basic card layout So, let’s get started. Here is a peek at my sample cards:
STUCK FOR A CARD IDEA? GIVE THIS A Try
MY 4 STEP STRATEGY
STEP 1 - KEEP IT SIMPLE
Start with a very basic layout. I chose this one for today’s cards.
This layout is for an A-2 size card (8 1/2” x 5 1/2” scored and folded at 4 1/4”). There is one panel (layer) that is 5 1/2” x 2 3/4” and centered on the card front. The card can be portrait oriented (above) or landscape oriented (below).
STEP 2 -USE YOUR FAVORITES
Select colors and images that are your favorites. These are colors and images are familiar and you feel comfortable with them. Using them will help you relax and allow ideas to start coming to mind.
STEP 3 - DRESS IT UP
It’s time to focus on the panel. You can use cardstock, patterned paper, specialty paper, etc. This is also a good time to pull out those backgrounds you created but haven’t used.
Add a bit more pizzazz
* Add texture with an embossing folder
* Spritz, sprinkle or spatter color
* Stamp on it
* Blending brushes can be used to add soft color or color with no harsh lines
* Sponges and ink create definition and dimension by adding color along the edges of a panel
* Add a border on each 5 1/2” side - for “how to” see SNOWMAN CHEER card
STEP 4 -PUT IT ALL TOGETHER
Favorite color card base (yes, it can be white) + dressed up panel + favorite image (stamped or die cut, matted, etc) + greeting = a great card
MOOSE HOLIDAY CARD
INSIDE
SUPPLIES
* Card base - blue cardstock (Azure Afternoon) cut at 11” x 4 1/4” scored and folded at 5 1/2”
* Inside panel - white cardstock (Basic White) cut at 5 1/4” x 4”
* Panel - white cardstock cut at 5 1/2” x 2 3/4”
* Embossing folder - Snowflake Sky (Stampin’ Up!®️)
* Other cardstock blue and white for stamping and die cutting
* Stamp set - Christmas Friends ©️ Stampin’ Up! and coordinating dies
* Ink - Memento Tuxedo Black, Azure Afternoon; Stampin’ Blends - Azure Afternoon, Tahitian Tide (retired), Pecan Pie, Smoky Slate, Ivory
* Sentiment - Christmas Sentiments l from Scrapbook.com
* Die cut snowflakes -3 (can use punched ones)
* Adhesive and dimensionals
NOTE
* Color and die cut moose. Die cut 3-4 more moose shapes, stack them and adhere together. Adhere with glue or other adhesive to card front.
* Adhere greeting to card with dimensionals.
SNOWMAN CHEER CARD
INSIDE
SUPPLIES
* Card base - Red cardstock (Real Red) cut at 8 1/2” x 5 1/2” scored and folded at 4 1/4”
* Inside panel - white cardstock cut at 5 1/4” x 4”
* Panel - green cardstock (Granny Apple Green) cut at 5 1/2” x 2 1/2” plus 1 strip of gold cardstock or gold foil paper cut at 5 1/2” x 3/4”. (See note)
* Sentiment cardstock - green cardstock cut at 2” x 1 3/4” gold cardstock cut at 2 1/4” x 2”
* Ink - Memento Tuxedo Black; Versa Mark, gold embossing powder; Stampin’ Blends - Pool Party, Pumpkin Pie, Old Olive, Real Red, Poppy Parade, Smoky Slate, Basic Black
* Stamps - Bubble Snowmen from Woodware Craft Collection for image, and Holiday Cheer from Waffle Flower for sentiment
* Adhesive and dimensionals
NOTE
* For background panel I cut down a piece of 5 1/2” x 4 1/4” green cardstock I’d sprayed with Distress Oxide Spray - Tumbled Glass and Shabby Shutters.
* Cut down this panel to 5 1/2” x 2 1/2”
* Cut the gold paper at 5 1/2” x 3/4” - cut this piece in half long ways. You will have 2 pieces that are 5 1/2” x 3/8”
* Place 5 1/2” x 2 1/2” piece face down. Place adhesive along the 5 1/2” sides of the green cardstock, place gold paper pieces face down along the edges of the green cardstock. This will form the gold edges along the green panel.
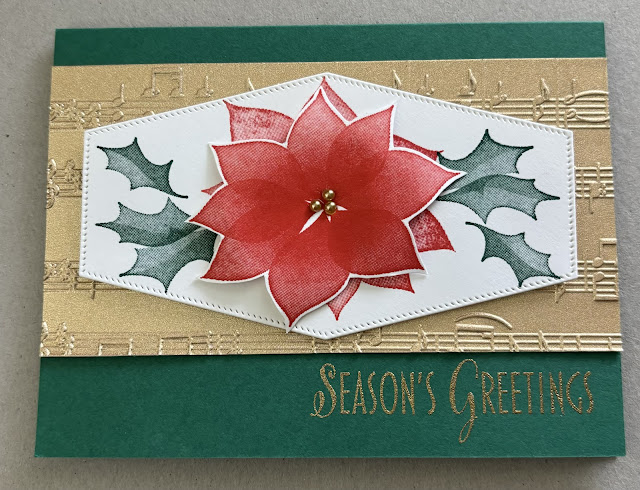
POINSETTIA GREETINGS CARD
INSIDE
SUPPLIES
* Card base - green cardstock (Shaded Spruce) cut at 8 1/2” x 5 1/2”scored and folded at 4 1/4”
* Inside panel - white cut at 5 1/4” x 4”
* Other cardstock - white for stamping and die cutting
* Panel - Shimmer paper - gold (or other gold paper) cut at 5 1/2” x 2 3/4”
* Embossing folder - Merry Melody (Stampin’ Up! - retired)
* Dies - Nested Essentials (Stampin’ Up!)
* Stamp Set - Stylish Christmas (Stampin’ Up! retired)
* Inks -Poppy Parade, Shaded Spruce, Wild Wheat, Versa Mark, gold embossing powder
* Embellishment - gold pearls, 3
* Ahesive and dimensionals
4 STEP CARDS
Stamp Happy!
Kim
SUPPLY SOURCES
* I list supply sources as a resource for you. I am not affiliated nor do I receive compensation from any company or entity.
* Sources for stamps, dies, embossing folders, etc. are mentioned in the supply list for each card.
* Cardstock - I use Stampin’ Up! cardstock. All colors cited in supply lists are current
* Inks - I use Stampin’ Up! inks and Memento Tuxedo Black. All colors cited in supply lists are current.
* Alcohol markers - I use Stampin’ Blends from Stampin’ Up! Colors cited in supply lists are current with the exception of Tahitian Tide.


No comments:
Post a Comment