Hi Stampers!
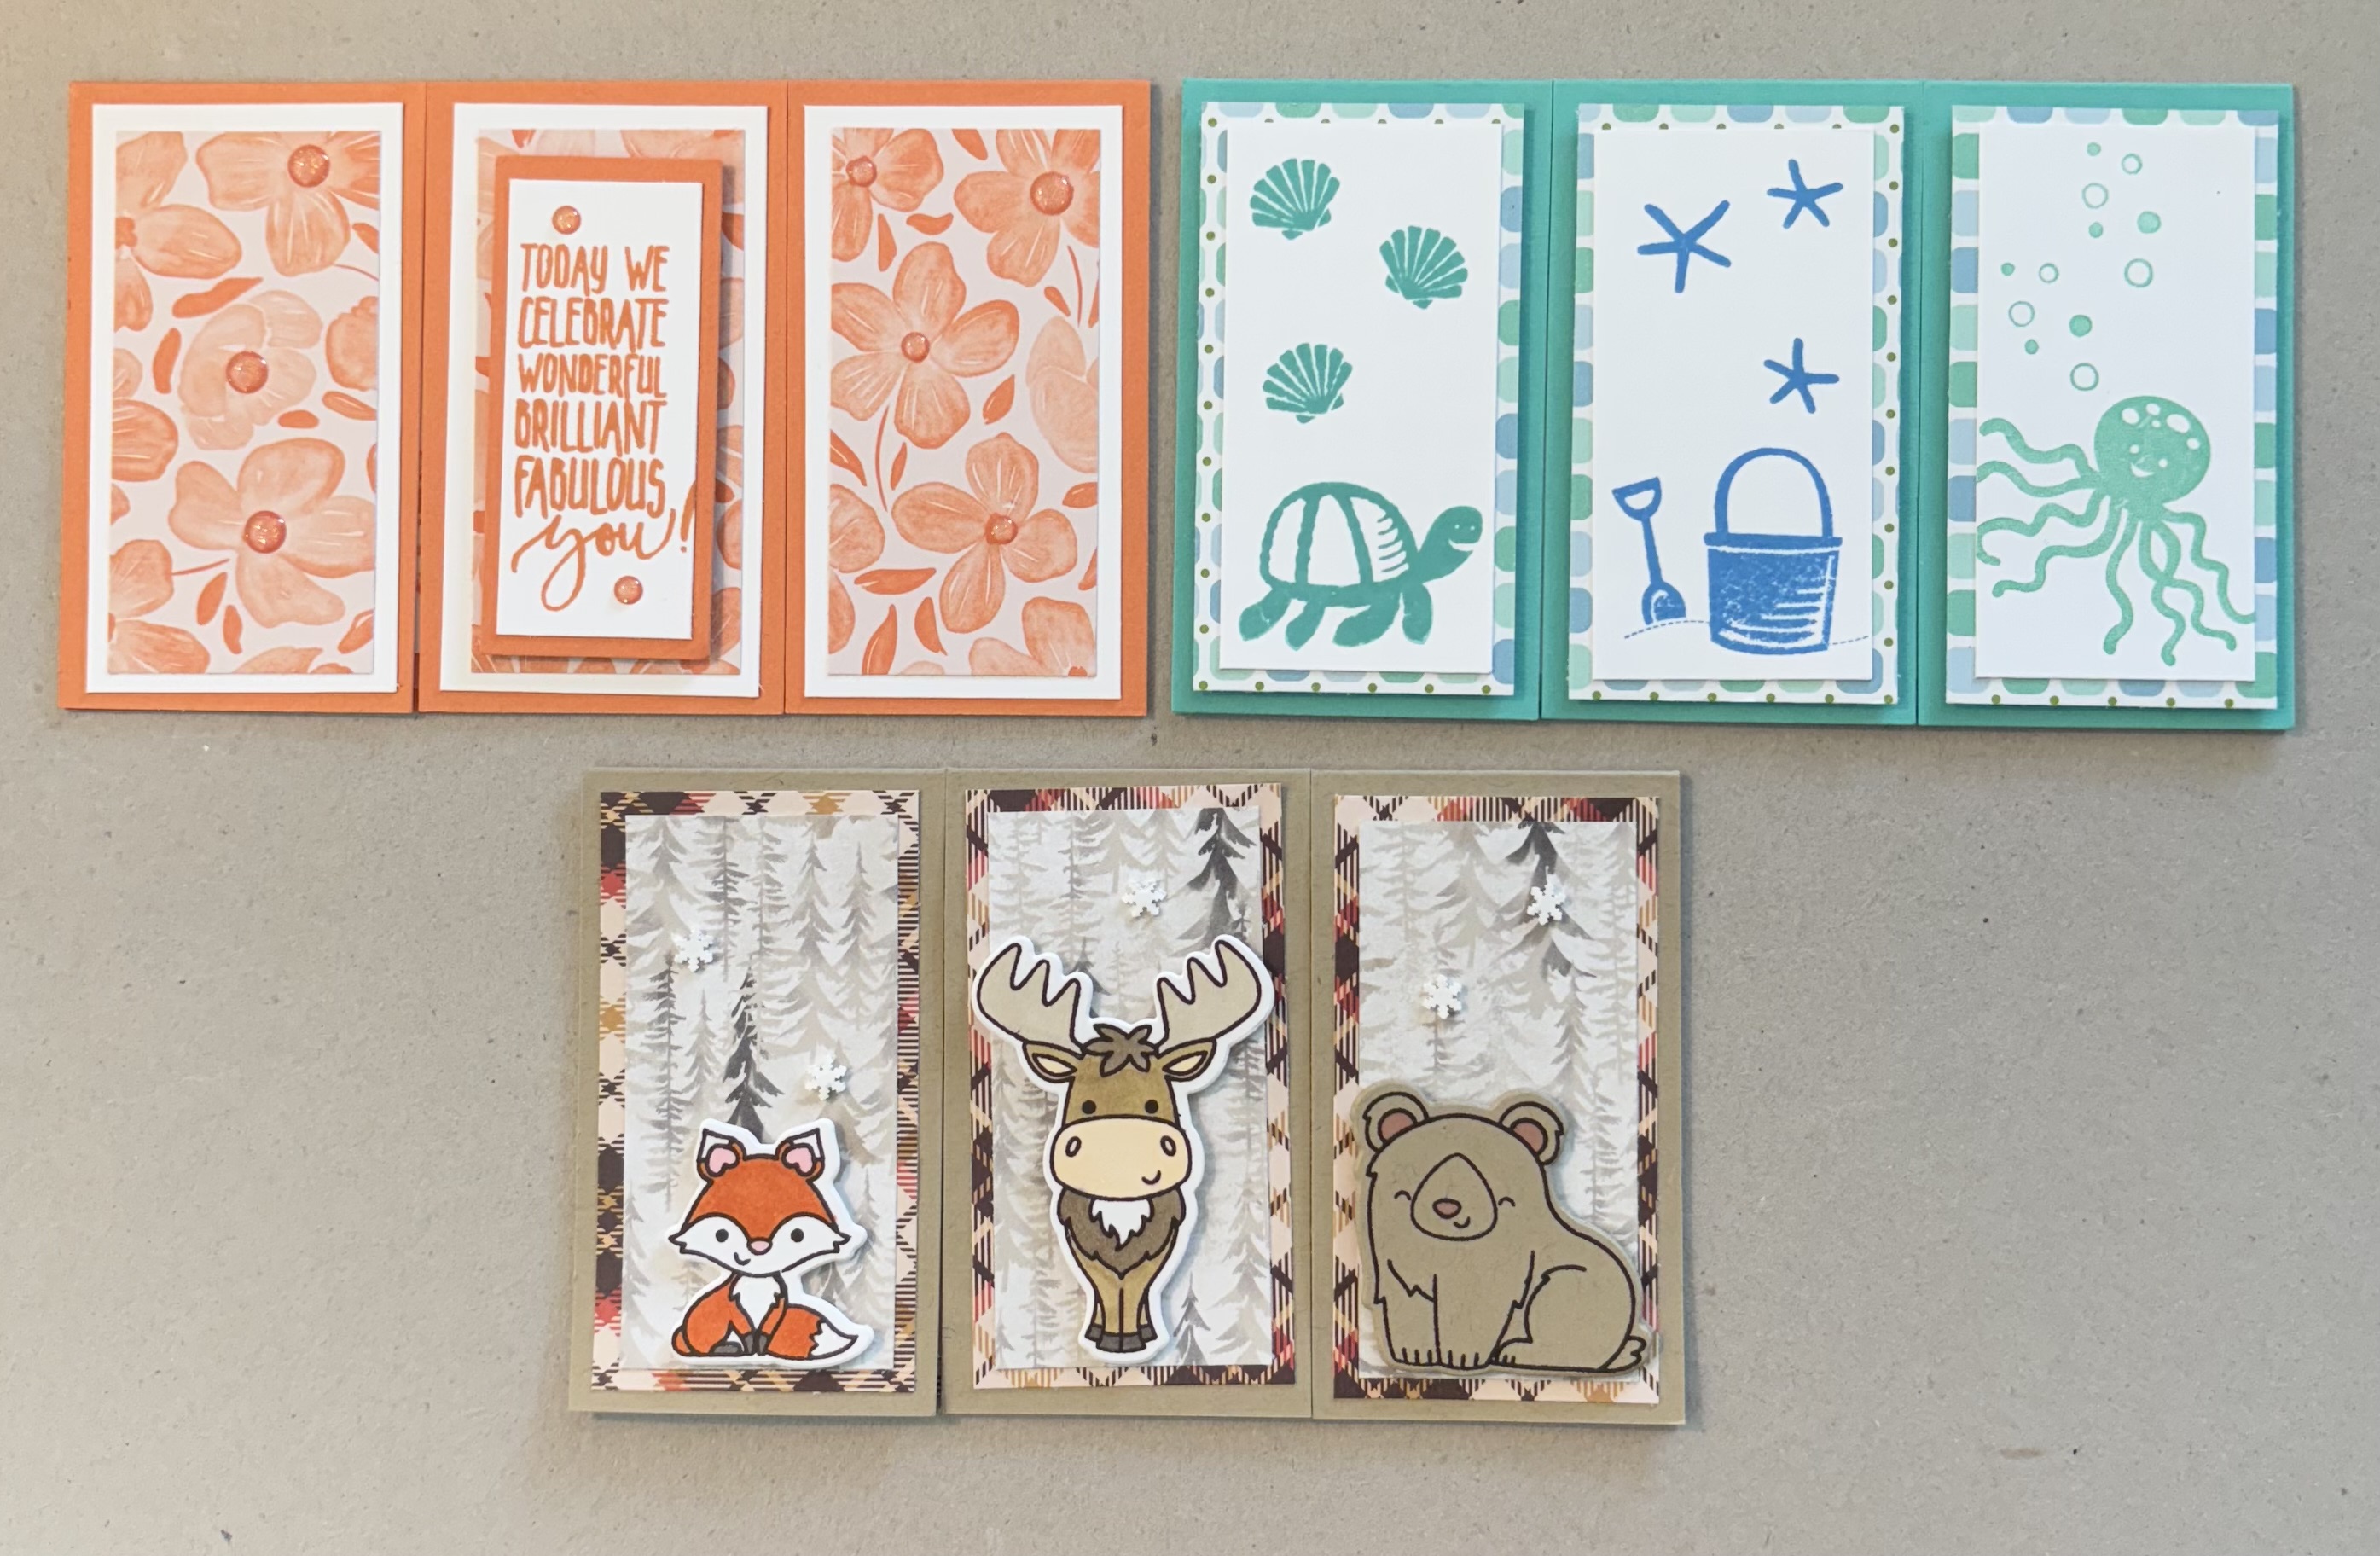
I call today’s card a TRIPLE PANEL FLAP CARD. I am certain someone somewhere has created a card like this or similar, but maybe not. The card is created with 1 score line and 2 cuts. I made the card as a mini slim line and as an A-2 size. Options are always good, right? The three flaps allow you to create a little surprise under each flap. As for the flaps you can decorate by adding 1-2 layers of cardstock or patterned paper or both! Stamp images on the layers or add die cuts. It’s up to you! I did not put a greeting on the outside of some of the cards, and let the flaps be the star of the show! Let’s take a look at the cards:
MINI SLIM LINE TRIPLE PANEL FLAP CARD

A-2 TRIPLE PANEL FLAP CARD

VIDEO
LET’S TRY A TRIPLE PANEL FLAP CARD
MINI SLIM LINE TRIPLE PANEL FLAP CARDS
WHAT YOU NEED TO CREATE THE CARD
* Card Base- 7” x 6” score along 7” side at 3 1/2”
* Inside Panel - White or light color cardstock cut at 5 3/4” x 3 1/4”
* First Layer -(for panels) - cut 3 at 3 1/4” x 1 3/4” - patterned paper or cardstock
* Second (top)Layer - cut 3 at 3” 1 1/2” - patterned paper or cardstock
* Other - stamps inks, die cuts, adhesives, etc
* Envelope - Regular letter size, it is called a 6 3/4 envelope and measures 6 1/2” x 3 5/8”
WHAT TO DO
* Cut and score the card base.
* Put paper in the trimmer with the 6” side at the top, move over to the 2” mark and cut down to the score line (3 1/2”). Move over to the 4” mark and repeat the process.
* Adhere the inside panel. To stamp in the 3 different areas - lift the left flap, but keep the center one closed. Stamp your image or sentiment . Repeat for area on right side. Finally, close the left and right flaps, stamp image or sentiment in the center. If needed mask areas you do not want stamped.

BEACHY TRIPLE PANEL FLAP CARD

FIRST FLAP OPENED

SECOND FLAP OPENED

ALL FLAPS OPENED

SUPPLIES I USED
All supplies for this card are from Stampin’ Up!®️* Cardstock - Simmer Splash, Basic White
* Inks - Summer Splash, Azure Afternoon, Coastal Cabana
* Stamps - Seas the Day, Seaside Shore, Summer Splash (all retired), Friendly Fins (still available)


SUPPLIES I USED
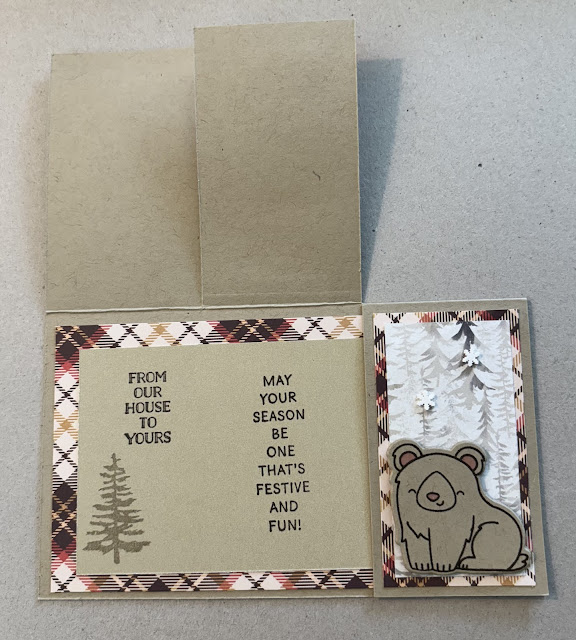
GINGHAM FOREST FRIENDS

Here is another example of how the flap conceal individual messages.


* Cardstock - Crumb Cake (Stampin’ Up!)
* Patterned Paper - Gingham Christmas (Creative Expressions), One Horse Open Sleigh (Stampin’ Up! - retired)
* Stamps - Forest Friends (Doodlebug Designs Inc.) Festive Fun, Itty Bitty Christmas (Stampin’ Up! - retired)
* Ink - Crumb Cake, Gray Granite, Early Espresso (Stampin’ Up!); Stampin’ Blends - Timid Tiger, Pretty In Pink, Crumb Cake, Pecan Pie, Petal Pink, Pebbled Path (Stampin’ Up!); Glitter Brush - Clear (Scrapbook.com)
* Embellishments - White Snowflakes (Stampin’ Up! retired) - For similar (almost identical) snowflakes embellishments - Embellish Mix - Plum Pudding (Picket Fences Studios), Sprinkletz - Pearly Snowflakes (Buttons Galore and More), and Penguins and Snowflakes Mix (Dress My Craft)

TIMID TIGER TRIPLE PANEL

SUPPLIES I USED
* Cardstock - Timid Tiger and Basic White (Stampin’ Up!)* Patterned Paper - 2025 - 2027 In Color DSP - Timid Tiger (Stampin’ Up!)
* Ink - Timid Tiger (Stampin’ Up!)
* Stamps - Picture Perfect Birthday, Birthday Blooms (Stampin’ Up! - retired)
* Embellishments - Heartstrings Glitter Enamel Dots - Simple Storiesi
A-2 TRIPLE PANEL FLAP CARD
The supplies for this card are the same as for the mini slim line card. The only difference is the measurements! The flaps for this version are not the same measurements. The left and the right panels measure 4 1/4” x 1 3/4”. The middle panel measures 4 1/4” x 2”
WHAT YOU NEED TO CREATE THIS CARD
* Card Base - cut cardstock at 8 1/2” x 51/2” score along 8 1/2” at 4 1/4”
* Inside Panel - white or light colored cardstock cut at 5 1/4” x 4”
* First Layer Cut 2 at 4” x 1 1/2” cut 1 at 4” x 1 3/4” (this is for the middle panel)
* Second Panel - Cut 2 at 3 3/4” x 1 1/4” and cut 1 at 3 3/4 x 1 1/2”.
* Envelope - A-2 size (5 3/4” x 4 3/8”)
WHAT TO DO
* The card base is prepared as for the slim line version, the cutting measurements are different.
* Slide the card base into the trimmer with the 5 1/2” side at the top.
* Slide cardstock over to the 1 3/4” mark and cut to the score line (4 1/4”).
* Slide the cardstock over to 3 3/4” mark and cut down to the 4 1/2” mark.
* Fold down the panels, crease with bone folder
* Decorate your card as desired following suggestion mentioned for the slim line version.

BIRTHDAY PANSIES


SUPPLIES I USED
All supplies are from Stampin’ Up!
* Cardstock - Melon Mambo, Basic White, Timid Tiger, Soft Sea Foam
* Patterned Paper - (retired)
* Stamp- Pansy Patch with dies (retired)
* Inks - Timid Tiger, Melon Mambo, Soft SeaFoam, Peach Pie, Secret Sea, Wild Wheat (retired)
* Dies - Layering Ovals and Scallop Ovals (retired)
* Embellishments - Tiny Bees (Stampin’ Up!)
GOLD AND WHITE CHRISTMAS


SUPPLIES I USED
* Cardstock - Basic White Thick, Gold - scrap (retired)
* Patterned Paper - metallic foil - scrap (retired)
* Stamps - All Ye Faithful (retired); Itty Bitty Christmas (retired)
* Ink - Crumb Cake; Versa Mark (Tsukineko), Gold Embossing Powder (?)
A TIP FOR USING SCRAPS
This card is an example of why planning is important when using scraps! I had a very limited amount of the foiled patterned paper and the gold cardstock. My husband who has built everything from furniture to houses, always says measure twice cut once, meaning it’s better to be sure of your measurements before cutting. In the long run this saves time and money, cuts waste, and creates a successful project. So, I put that principle into practice, did my measuring and more measuring, cut , and had all the pieces I needed with just a tiny bit of scrap left. I certainly got the most out of my original purchases and my scraps. So definitely measure twice and cut once. When using scraps measuring first helps ensure you actually have enough paper to complete the project.
MIMICKING METALLICS
Another tip for when creating white and gold cards or white and silver cards is choose inks that mimic the metallic colors. Certain colors of ink when used with metallics will take on the appearance of that metallic. For gold select a tan to khaki colored ink. Stampin’ Up!’s Crumb Cake is a great choice to mimic gold. For silver look for a medium to light gray color - Smoky Slate is a Stampin’ Up! Color that mimics silver. Yes, you can always use metallic inks or emboss with gold or silver. Sometimes these options are not practical for inside of cards, or maybe you do not have the supplies. The khaki and gray inks are a good option!
TRIPLE PANEL FLAP CARDS

I enjoyed making these cards. I think the three separate panels allow for all types of creative ways to great or surprise your recipient. Why not give one a try?
Thanks for stopping by. Until next time …
Stamp Happy!
Kim
NOTE
I list the supplies I use as reference only. Most, but not all my supplies are from Stampin’ Up! Other manufacturers are listed as needed. I encourage you to use the card fold, layout, color schemes, etc with supplies you have at home. We bought our supplies, let’s use them!
No comments:
Post a Comment