Showing posts with label Cutest Halloween. Show all posts

Thursday, October 14, 2021

FUN HALLOWEEN DIY PATTERNED PAPER & AN EASY CARD LAYOUT

 Hi, Stampers!

Halloween is a bit over two weeks away. There is still time to create faboolous cards to send spooky greetings to family and friends. Today’s Halloween cards feature a focal panel of hand stamped cardstock and a quick and easy card layout.

Here is a look at the cards:


Once again I used the CUTEST HALLOWEEN  stamp set.


FOR THE CARD LAYOUT
The card can be made in either portrait or landscaper orientation. Add greeting of choice.

* Card base 8 1/2” x 5 1/2” scored and folded at 4 1/4”.
* Basic White card stock cut at 4” x 2 3/4” for focal panel and a piece cut at 5” x 3 3/4” for inside card.
* Contrasting cardstock to mat focal panel cut at 4 1/8” x 2 7/8”.

FOR THE DIY PATTERNED PAPER
* Stamp an image multiple times on the Basic White focal panel. Remember to stamp some of the images off the edge of the paper. The CUTEST HALLOWEEN stamp set contains many “Two Step” stamping images. This makes it easy to fill the outline images with color. The candy corn images I stamped with Pumpkin Pie ink and colored in the tops of the candy with the Daffodil Delight Stampin’ Blend.

ASSEMBLY
* Adhere focal panel to mat.
* Center the matted focal panel on the card base. 
* Add a greeting.


CANDY CORN CARD

SUPPLIES
* Card base - Pumpkin Pie
* Mat - Daffodil Delight
* Inks - Pumpkin Pie, Versa Mark (for tone on tone look on card base); Stampin’ Blend - Daffodil Delight (light) or Daffodil Delight Stampin’ Write Marker 
* Greeting - scraps of Daffodil Delight (2 7/8” x 1”) Pumpkin Pie, and Basic White; Picture This Dies (circles). You can use other circle dies or circle punches.
* Adhesive and dimensionals.

JACK-O-LANTERN CARD

SUPPLIES
* Card base - Pumpkin Pie. 
* Mat Basic Black
* Inks - Pumpkin Pie and Memento Tuxedo Black.
* Greeting - scraps of Basic White, Pumpkin Pie, and Basic Black; Picture This Dies (circle), Layering Circles Dies. ( You can use circle punches too.)
* Adhesive and dimensionals.
Note - stamp the pumpkin outline with the Pumpkin Pie ink. Add the color to the pumpkin by inking the stamp with Pumpkin Pie, stamp off on scrap paper, then stamp the color on the image.

HALLOWEEN SKULLS CARD

SUPPLIES
* Card base - Basic Black.
* Mat - Basic Gray.
* Inks - Memento Tuxedo Black, Smoky Slate (I stamped off the Smoky Slate before stamping on the cardstock.)
* Greeting - Scraps of Basic White and Basic Black; Layering Circles Dies (or other dies or punches you have on hand).
* Adhesive and dimensionals.

NOT  SO SCARY CAT CARD

SUPPLIES
* Card base - Gorgeous Grape
* Mat - Pumpkin Pie
* Inks - Memento Tuxedo Black, Basic Gray.
* Greeting - scraps of Pumpkin Pie, Gorgeous Grape, and Basic White. The greeting is from CLEVER CATS  stamp set. I stamped the greeting and trimmed around it with my trimmer, and trimmed the Matt’s to fit.


There you go, simple cards that are simply spooktacular for wishing everyone a fun filled Halloween! That is all for now. Until next time…
Stamp Happy!

Kim

All stamps and stamped images ©️1990 - 2021 Stampin’ Up!®️


Friday, September 24, 2021

USING SCRAPS FOR CARDS - THE LONG AND THE SHORT OF IT!

 Hi, Stampers!

I am enjoying creating cards with items from the CUTE HALLOWEEN SUITE featured in the STAMPIN’ UP! JULY-DECEMBER 2021 MINI CATALOG. I have collected quite the stack of scraps from the CUTE HALLOWEEN 6”x6” DSP. I decided it was time to put those scraps to work by making them the stars of a batch of Halloween cards.

Here is a look at the cards:


As you can see, I used one of my go to card layouts! I call this layout the Three Scrap Strips Card, because that is exactly what I used to make each card - 3 strips of DSP. All of the cardstock pieces, except for the card bases were also pulled from my scrap bin. The skulls, ghosts and jack-o-lanterns were punched or fussy cut from scraps of DSP!

Before we talk more about the cards let’s take a look at the stamp sets I used:

CUTEST HALLOWEEN BUNDLE


CLEVER CATS


Now, let’s talk about the card layouts. As you can see, the background for each card is made up of three strips of DSP. Each strip of DSP is matted with a strip of cardstock. The strips can be long or short and the orientation of the strips can be portrait or landscape for either length of strips.

Here are the cutting dimensions for the strips

SHORT VERSION
DSP - cut at 3 3/4” x 1 1/4”
Cardstock mat cut at 3 7/8” x 1 3/8”

LONG VERSION
DSP - 4 7/8” x 1”
Cardstock mat cut at 5” x 1 1/8”.

Here are lists of supplies for each card:

SUPPLIES
* Basic Black card base.
* Basic White - 3 pieces 5” x 1 1/8” plus piece for stamping.
* Candy DSP - three strips cut at 4 7/8” 1”.
* Stitched Rectangles Dies - 3 1/4” x 1 1/4”.
* Inks - Memento Tuxedo Black, Pumpkin Pie; Stampin’ Blends - Daffodil Delight (dark), Pumpkin Pie (dark), Highland Heather (dark), and Granny Apple Green (dark).
* Adhesive of choice and dimensionals.

Note - It took a little extra time to color the candies on the DSP, but it sure was worth it!

SUPPLIES:
* Basic Gray card base and small scrap Basic Gray to mat greeting.
* Basic White cardstock cut at 5” x 1 1/8”- 3 strips.
* Highland Heather cardstock - scrap for mat.
* Skull, Ghost, Bat, & Pumpkin DSP x three strips cut at 4 7/8” x 1”
* Skull DSP to fussy cut images for card.
* Ink - Basic Gray.
* Adhesive of choice and dimensionals.

SUPPLIES:
* Pumpkin Pie card base and a piece to mat the greeting.
* Basic Black cardstock - 3 pieces cut at 5” x 1 1/8” for mat
* Small piece of Basic White for greeting.
* Polka Dot DSP - 3 strips cut at 4 7/8” x 1”.
*  Jack-o-lantern DSP to punch out three jack-o-lanterns.
* Black Glittered Organdy Ribbon - about 14-16 inches.
* Memento Tuxedo Black Ink
* Matte Black Dots.
* Layering Circles Dies - 1 3/8” diameter and 1 1/2” diameter.
* Adhesive of choice and dimensionals.

Note - I angled each strip a bit to add a little Halloween whimsy to the card. (Truth be told - I messed up one strip, but hey, it all worked out!😁)

SUPPLIES:
* Basic Black card base and piece of Basic Black for mat.
* Pumpkin Pie cardstock for mat.
* Basic White cardstock - 3 strips cut at 3 7/8” x 1 3/8” and piece for greeting (BOO)
* Boo DSP - 3 strips cut at 3 3/4” x 1 1/4”.
* Ghost DSP to punch out three ghosts.
* Black and white gingham ribbon - about 16”.
* White Crinkled Seam Binding Ribbon Pumpkin Pie (dark) and Highland Heather (dark) Stampin’ Blends to die ribbon.
* Cute Stars Adhesive Backed Sequins - 3 Highland Heather.
* Layering Circles Dies - 2 1/8” and 2 3/8” diameter.
* Playful Alphabet Dies.
* Foam Adhesive Sheets, Adhesive of choice, and dimensionals.

SUPPLIES:
* Granny Apple Green card base.
* Basic White cut at 2” x 1 3/4” for greeting and piece to stamp other images to fussy cut.
* Highland Heather - 3 pieces cut at 3 7/8” x 1 3/8” for mats, and piece cut at 2 1/8” x 1 7/8”.
* Small Stripes DSP - 3 cut at 3 3/4” x 1 1/4”.
* Inks - Pumpkin Pie and Memento Tuxedo Black.
* Cute Stars Adhesive Backed Sequins - 5.
* Adhesive of chose and dimensionals.


If you have a pile of DSP, why not give these layouts a try, and before you know it you will trade that pile of scraps for a pile of great greeting cards! And… that is the long and short of it!

That is all for today. Thank you for taking a peek. Until next time…
Stamp Happy!

Kim

All stamps and stamped images ©️1990-2021 Stampin’ Up!®️


Friday, September 10, 2021

USE THE LAYERING DIORAMA DIES TO CREATE SPOOKTACULAR HALLOWEEN CARDS!

 Hi Stampers,

Today I am sharing another Halloween card that is frightfully easy to create. I used items from the CUTE HALLOWEEN SUITE (Stampin’ Up®️ July-December 2021Mini Catalog), and two sets of dies - LAYERING DIORAMA DIES & PLAYFUL ALPHABET DIES (Stampin’ Up! 2021-2022 Annual Catalog). 

Here is a look at the card:


In my 24 May 2021 post I shared a similar card using the LAYERING DIORAMA DIES. Here is a look at that card.


SUPPLIES FOR THIS CARD
LAYERING DIORAMA DIES


* I used (from the inside) the 2nd (for the Basic Gray cardstock) and 4th die (for the Gray Granite cardstock).


* CUTEST HALLOWEEN stamp set - ghost face / hands, and “Have a fa(boo)lous Halloween for inside of card.
*  Halloween Punch
* Cute Halloween DSP - black and white “Boo” pattern, cut at 5 1/2” x 4 1/4”.
* Cute Stars Adhesive Backed Sequins - 3 Pumpkin Pie
* Black and White Gingham Ribbon - one piece about 4” long and one about 3” long.


* Card base color of choice- I chose Gray Granite.
* Gray Granite and Basic Gray cardstock cut at 4 3/4” x 3 1/2” and a piece of Basic Black large enough to cover the die cut hole in the Basic Gray cardstock; I used a 2 1/2” x 4 3/4” piece. 
* Small scraps of Basic Black and Pumpkin Pie cardstock for greeting.
* Scraps of Basic White cardstock for the ghosts.
* Playful Alphabet Dies - letters to spell “BOO.”
* Wink of Stella
* Memento Tuxedo Black ink


* White Crinkled Seam Binding Ribbon - one piece 4” long and another piece 3” long.
* Pumpkin Pie (dark) Stampin’ Blends marker.

OTHER
* Adhesive of choice, dimensionals, liquid glue

OPTIONAL - I used the “sand”stamp from the FRIENDS ARE LIKE SEASHELLS stamp set to add some texture to the Gray Granite and Basic Gray layers. Any stamp that produces a dotted image will work. To stamp the “texture” I used the inks that coordinate with the cardstock.


ASSEMBLY

* Use the smaller of the two Layering Diorama dies to die cut the center from the Basic Gray cardstock. Repeat this step with the larger of the two dies and the Gray Granite cardstock. (Note: If you are using the texture stamp, stamp the texture on each piece of cardstock before die cutting.)
* Use the Playful Alphabet Dies and the scraps of Basic Black and Pumpkin Pie and die cut the B, O, O in each color.
* Use the Halloween Punch and punch out three ghost images from the scraps of Basic White cardstock.
* Adhere the “Bool DSP to the front of the card base.
* Adhere the Basic Black cardstock strip to the back side of the Basic Gray die cut layer.
* Adhere the Gray Granite over the Basic Gray layer with dimensionals.
* Use the Tuxedo Black ink and stamp the features on the punched out ghosts. Adhere them to the focal panel.
* Use liquid glue and glue the Basic Black and Pumpkin Pie “B” together - Pumpkin Pie on top and off set. Repeat the process with the remaining letters. Place liquid adhesive on the back of each letter just on the bottom half of the letter and adhere to the top layer of the focal panel in the bottom right corner area.
* Go over the “BOO” with Wink of Stella.
* Use the Pumpkin Pie Stampin’ Blend marker to dye both pieces of the white ribbon.
* Adhere one end of the 4” piece of gingham ribbon to the back of the top left side of the focal panel and adhere the other end to the bottom back side. Repeat with the 4” piece of Pumpkin Pie ribbon.
* Place the remaining piece of Pumpkin Pie ribbon on top of the remaining piece of gingham ribbon. Slip the ribbons under the ribbon adhered to the cardstock and tie a knot. Trim the ends.
* Add the three star sequins to the focal panel
* Adhere the focal panel to the card base.
* Stamp the inside sentiment with the Tuxedo Black ink.


Thank you for stopping by. Until next time…
Stamp Happy!

Kim

All stamps and stamped images ©️1990-2021 Stampin’ Up!®️

Friday, September 3, 2021

CUTEST HALLOWEEN MEETS SPIRAL DYE = FUN HALLOWEEN CARDS!

 Hi Stampers!

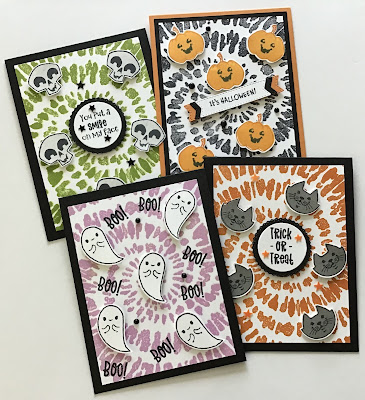
I had some fun creating Halloween cards with the CUTEST HALLOWEEN BUNDLE and the SPIRAL DYE stamp. The cards reminded me of the intro to an episode of The Twilight Zone! I suppose that is appropriate for Halloween cards.😁 Here is a look at the cards:


CUTEST HALLOWEEN BUNDLE


SPIRAL DYE BACKGROUND STAMP


These cards were very easy to make. The most difficult task was selecting colors for the SPIRAL DYE image. The cat, jack-o-lantern, and ghost images were all cut using the HALLOWEEN PUNCH. The skull images were stamped then fussy cut. All card bases are 11” x 4 1/4” scored and folded at 5 1/2”. The SPIRAL DYE panels are all on Basic White cut at 5” x 3 3/4”. The jack-o-lantern card has a mat for the focal panel of Basic Black cut at 5 1/4” x 4”.

CAT CARD


SUPPLIES FOR CAT CARD
* Basic Black card base and Basic White focal panel as stated above.
* Basic White for stamping greeting and the cats (5 images) plus a scrap of Basic Black die cut with a Tasteful Labels Die.
* Inks - Pumpkin Pie for the spiral image, Memento Tuxedo Black and Basic Gray for the cat images, Tuxedo Black for the greeting.
* Five CUTE STARS SEQUINS - Pumpkin Pie.
* Adhesive and dimensionals

SKULL CARD
 

SUPPLIES FOR SKULL CARD
* This card is basically the cat card. The cardstock and adhesive supplies are the same.
* Inks - Granny Apple Green for the spiral image, Tuxedo Black and Sahara Sand (stamped off) for the skulls, and Tuxedo Black for the greeting.
* The CUTE STARS SEQUINS for this card are the Shimmery Black ones.

JACK-O-LANTERN CARD


SUPPLIES FOR JACK-O-LANTERN CARD
* Pumpkin Pie card base, Basic Black cardstock mat, Basic White cardstock for focal panel.
* Basic White cardstock for stamping the jack-o-lanterns; scraps of Basic White, Basic Black, and Pumpkin Pie for the greeting.
* Inks - Pumpkin Pie, Mango Melody, and Tuxedo Black
* Matte Black Dots - 5.
* Adhesive and dimensionals
* Tasteful Labels Dies - the banner die.
** The greeting is from the CLEVER CATS stamp set. Stamp the greeting on Basic White, die cut with the banner die. Cut two more of the banner die images; one Basic Black and one Pumpkin Pie. Cut the Basic Black and Pumpkin Pie banners in half. Adhere one piece of the Basic Black pieces on each end of the Basic White greeting piece. Do the same with the Pumpkin Pie banner.

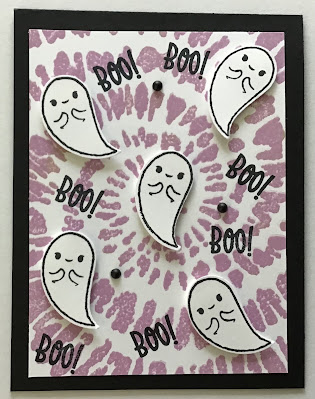
GHOST CARD


SUPPLIES FOR GHOST CARD
* Basic White cardstock for the ghosts
* Inks - Fresh Freesia and Tuxedo Black
* Matte Black Dots - 3
** This card is just a bit different as I stamped the “greeting(s)” directly on the focal panel. The BOO! Is from the CUTEST HALLOWEEN stamp set. I simply cut the “Hey, Boo!” stamp apart. If the thought of cutting stamps apart sends chills up your spine, not to worry there is an alternative - or two. 
 1. The words on this stamp are spaced in such a way you can have great success just inking the “BOO!” end of the stamp … or
2. Use washi tape, painter’s tape, or sticky note to mask the “Hey,” part of the stamp. Ink the stamp, remove the mask, and stamp the image.

There you go, that is how I made my Twilight Zone-like Halloween cards. 

CUTEST HALLOWEEN & SPIRAL DYE CARDS


Thank you for stopping by today. Until next time…
Stamp Happy!
Kim

All stamps and stamped images ©️1990-2021 Stampin’ Up!®️

Tuesday, July 27, 2021

MORE “BOOTIFUL” CARDS USING ITEMS FROM THE CUTE HALLOWEEN SUITE

 Hi Stampers!

Today I have two more cards to share created with items from the CUTE HALLOWEEN SUITE. This suite is featured in the STAMPIN’ UP!®️ JULY - DECEMBER 2021 MINI CATALOG. This catalog’s sales period begins Tuesday (3 August 2021). 

Today’s cards were also created using the PICTURE THIS DIES, but today’s cards feature the rectangle die. To see cards made using the round die see my 25 July 2021post. 


CUTEST HALLOWEEN STAMP SET & HALLOWEEN PUNCH
(These items can be purchased as a bundle for a 10% savings.)


CUTE HALLOWEEN 6” x 6” DSP


PICTURE THIS DIES
(Annual Catalog)


BOO CARD


SUPPLIES FOR THIS CARD
* Basic Black card base cut at 11” x 4 1/2” scored and folded at 5 1/2” 
* Basic Black cardstock cut at 5” x 3 3/4” and a scrap for die cutting the BOO
* Basic White cardstock 5” x 3 3/4” for inside of card and a piece that is about 3 1/2” x 1 1/4” for greeting background
* DSP - Old Olive with Basic Black houses pattern cut at 5 3/8” x 4 1/8” and the ghost pattern paper for die cutting and fussy cutting ghosts
* Black & White Gingham Ribbon
* Adhesive of choice and dimensionals 
* Picture This Dies (rectangle) and Playful Alphabet Dies (Annual Catalog)

ASSEMBLY
* Die cut the Basic Black frame and the BOO, punch out the ghost with the jack-o-lantern bag, and fussy cut the other three ghosts from the DSP.
* Adhere the Basic White strip to the back of the center frame. Adhere the BOO to the strip. 
* Adhere the house pattern DSP to the card base and use dimensionals to attach the frame to the card front. 
* Use dimensionals to attach the ghosts inside the other two frames
* Cut about 16” of the ribbon, wrap around the front of the card, and tie a bow. Trim ends.
* Adhere the Basic White to the inside of the card

TRICK OR TREAT CARD


SUPPLIES FOR THIS CARD
* Old Olive card base cut at 11” x 4 1/4” scored and folded at 5 1/2”
* Old Olive cardstock cut at 5” x 3 3/4” 
* Highland Heather cardstock cut at 5 1/8” x 3 7/8” for mat, and small scrap for greeting
* DSP - dots pattern and the cat and jack-o-lantern pattern 
* Matte Black Dots
* Gorgeous Grape Sheer Ribbon
* Adhesive of choice and dimensionals
* Ink - Memento Tuxedo Black
* Picture This Dies - rectangle and Layering Circles Dies for greeting

ASSEMBLY
* Use the Picture This Dies (rectangle) and die cut the 5” x 3 3/4” piece of Old Olive cardstock. Save the frame for another project and use the stitched rectangles for this card; die cut a Highland Heather circle for the greeting
* Punch out three cats and three jack-o-lanterns from the DSP
* Adhere the dotted patterned paper to the Highland Heather mat and adhere this piece to the Old Olive card base
* Adhere the cats and jack-o-lanterns to the wide rectangles and adhere the greeting to the narrower rectangle
* Use dimensionals to attach the three rectangle panels to the card. 
* Cut about 16” of the Gorgeous Grape ribbon, wrap it around the card and tie it in a bow
* Add three of the Matte BlackDots on the greeting rectangle.


That does it for today! Thank you for dropping by. Until next time…
Stamp Happy!
Kim

All stamps and stamped images ©️1990-2021 Stampin’ Up!®️