Showing posts with label Halloween Cards. Show all posts

Wednesday, July 29, 2026

ONE MORE ASYMMETRICAL CARD LAYOUT - THE PORTRAIT VERSION

Hi Stampers!

Today we are taking one more look at an asymmetrical card layout. This week’s card is the portrait version of last week’s card.  If you missed that post you can see it HERE. Just like the landscape version, the portrait version helps you create two cards. Let’s take a peek at the sample cards:


This layout offers opportunities to try different color combinations. I decided to try some combinations that are a bit outside my comfort zone. I think they are growing on me!

VIDEO


CARD LAYOUT #2630


WHAT YOU NEED
* A-2 Card Base - Cut cardstock, color of choice - 8 1/2” x 5 1/2” scored and folded at 4 1/4”
* Inside Panel - white or light colored cardstock cut at 5 1/4”x 4”
* Bottom Panel - Cardstock, color of choice, cut at 4” x 1 1/2”
* Two pieces of cardstock - one should be white or light colored - cut each at 4” x 3 3/4”
* Stamps, dies, inks, embossing folder, adhesive, embellishments and other items needed to complete the card.

WHAT TO DO
* Fold card base, go over fold with bone folder.
* Prepare inside panel and adhere inside card
* Stamp or emboss or otherwise prepare bottom panel. 
* Take one 4” x 3 3/4” panels - the 4” sides will be the top and bottom edges. Measure over 1 1/2” across the top left, and mark. Then do the dame on the bottom right edge.
* Place both pieces of cardstock one on top of the other. Put in trimmer and line up the two marks in the cutting tray and cut. Match 1 of each color with its opposite.
* Place bottom panel on card front, leaving about 1/8”border on all three sides.
* Line up left panel along bottom panel and adhere. Line up right panel along left panel a bottom panel and adhere. 
* Add focal images and stamp greeting.

HALLOWEEN FUN CARDS


The teals and orange is a bit different color combination for Halloween, but I like it. Both of the cards have a lot of shimmer, but it doesn’t show up in the photos. I stamped the spider web with a light gray ink, went over it with a white gel pen, the went over it with a clear shimmer pen. The die cut sentiment and the spider also were gone over with the shimmer pen. I used the shimmer pen on the tree, mom, and cat’s eyes on the card on the right. The tree is adhered to the card front with 1mm foam tape, but the branches are loose. I stamped a background design on some of the card panels.

(Clear Shimmer Pen - Scrapbook.com; All other supplies - Stampin’ Up!)

BIRTHDAY GREETINGS


This color combination was REALLY stepping out of my comfort zone! I like the navy blue card base and ink. It tones things down a bit. I really like the greeting placed on that bottom panel. I think the colorful flowers tie all the cardstock colors together. I also think the neutral colors of the sea shells ties everything together as well. 

(Floral stamp - Trinity Stamps; Navy Enamel Dots - Simple Stories; All other - Stampin’ Up!)

VIDEO CARDS


(Stamps & dies, ink for fish - Catherine Pooler; embossing Folder - Darice; 
All other supplies - Stampin’ Up!)


TODAY’S CARDS


I enjoy making cards with asymmetrical layout. The asymmetrical aspect adds a fun twist to the card background. This layout gives you an opportunity to try new color  combinations. You can also use different techniques on the panels. Stamp a small design on them with a coordinating ink for a tone on tone look, or use a darker color ink for a more dramatic look. Stamp before adhering the pieces to the card base. You can emboss the panels with an embossing folder. It is best if you emboss the asymmetric panels, embossing not as the embossing will change the size slightly. Adhere the pieces to 4” x 3 3/4” piece of printer paper. Emboss, then adhere to card front as one piece. There are many other techniques and options. The possibilities are truly endless! What techniques will you use?

That’s all for today! Thanks for stopping by. Until next time . . .
Stamp Happy!

Kim

Thursday, July 23, 2026

TWO FOR ONE ASYMMETRICAL CARD LAYOUT - FUN AND EASY

Hi Stampers!

Today’s layout is perfect for creating two cards at once. I call it the Asymmetrical Layout. I enjoy using this layout, because it is a little bit different, allows me to use 3-4 colors of cardstock, and yes it can help me use larger cardstock scraps! Let’s take a look at the sample cards:


If you are interested in reading the story behind this card layout, another version of it, and more samples, see this POST

TODAY’S VIDEO


CARD LAYOUT # 2629


WHAT YOU NEED


* You will need the pieces of cardstock shown above. For card bases cut cardstock at 8 1/2” x 5 1/2” score and fold at 4 1/4”. (Check your cardstock scraps! You might find scraps you can use.)
* I select 3 colors of cardstock - 1 for the card bases, 1 for the strips, and 1 for one of the 5 1/4” x 3” pieces. For the other 5 1/4” x 3” piece I use white or light colored cardstock
* Inside panel - white or light colored cardstock cut at 5 1/4” x 4”
* Pencil and ruler
* Embossing folder (optional)
* Stamps, dies, punches, inks, embellishments, adhesives, etc

WHAT TO DO
* Cut cardstock pieces. Prepare  card bases by folding and going over gold with bone folder.
* On one piece of the 5 1/4” x 3” cardstock, measure from the top left corner over 2” and mark, then do the same at the bottom right.
* Stack the two 5 1/4” x 3” pieces with the marked piece on top.  Keeping the two pieces stacked, place on trimmer and line up the two marks, then cut. Match up the pieces Top left with bottom right, and bottom left with bottom right.
* Emboss the two strips with embossing folder (optional)
* Adhere a strip at the bottom of each card base leaving about 1/8” border along bottom and on the left and right sides. 
* Adhere the left hand piece, lining it up against the bottom strip, leaving that 1/8” border along the left side and top. Adhere the last piece in place.
* Stamp or otherwise prepare inside panel and adhere.
* Prepare focal image and greeting for card and stamp, adhere, etc. 
* Add embellishments.

BIRTHDAY HANDBAGS


(Stamps & Dies - Catherine Pooler; Embellishments -Altenew; All other supplies - Stampin’ Up!)

BUTTERFLY GREETINGS


(All supplies - Stampin’ Up!)

BRIGHT GREETINGS


(Stamps and dies - Catherine Pooler; All other supplies - Stampin’ Up!)


(All Supplies - Stampin’ Up!)

VIDEO CARDS


SUPPLY LINKS
SUDS EMBOSSING FOLDER *the embossing folder I used is no longer available, this one is similar

TODAY’S CARDS


So there you have it, the asymmetrical card layout. It makes it so easy to create two cards in no time! I think using an embossing folder on the bottom strips adds a lot to the card, but it is not necessary. Tone on tone stamping on the strip would add an interesting touch, as would scoring the piece at every 1/4”. There is always the option of doing nothing to the strip! I hope you give this card layout a try and add your own spin to the layout!

Thank you so much for stopping by. Until next time . . .
Stamp Happy!

Kim


Tuesday, October 7, 2025

CREATE A CARD WITH A SPOOKY SURPRISE FOR A STAMP HAPPY HALLOWEEN - A STAMP HAPPY HOLIDAYS BONUS POST 🎃

Hi Stampers!

Today we are going to do something a bit different. This post and corresponding video are bonus entries to my Stamp Happy Holidays series. Welcome to Stamp Happy Halloween! I realize not everyone celebrates Halloween or makes cards for the holiday but you can still get value from this post. The card layouts can be used for any card. The product I am focusing on can be used on cards and paper crafting projects for any occasion. 

So, what is so special about these cards? On each card I used Neon Glossy Gel from Lisa Horton Crafts. The glossy gels are similar to embossing paste. I used the gel with stencils, and I also applied it directly to paper, let it dry, then stamped an image on it, and die cut the image. These gels come in 8 different colors. They are creamy, and very glossy, and definitely have a neon look. They add a little extra fun to cards, because the gel will glow in the dark! This characteristic makes the gels perfect for Halloween paper crafting projects! Let’s take a peek at the sample cards:


WHAT I USED
Aren’t these colors great? I love their bright boldness!!!


I ordered the Neon Glossy Gels from HERE

Here are swatches of the gels on white cardstock (left), and on black cardstock (right).


Colors from top left to bottom left and top right to bottom right
Blossom, Cerise, Marmalade, Lemon Peel, Apple, Malachite, Summer Sky, and Lilac

Here are the same sets of swatches photographed in the dark.


Yes, they truly do glow in the dark after exposure to light.


NOTE - I am not affiliated with, nor do I receive compensation from Lisa Horton Crafts or any other manufacturer, company, or other entity. I am simply sharing a fun product I came across recently. 

VIDEO
CREATE A CARD WITH A SPOOKY SURPRISE FOR A STAMP GAPPY HALLOWEEN!


BEST WITCHES AND STARS


HOW IT LOOKS IN THE DARK


SUPPLIES I USED
* Cardstock - Granny Apple Green, Secret Sea, Basic White
* Stamps - Best Witches, Bag of Bones (both retired)
* Stencil - Hearts & Stars (retired)
* Ink - Tuxedo Black (Memento), Granny Apple Green, Berry Burst; Stampin’ Blends - Natural Tones #1000, Bubble Bath, Cajun Craze, Darling Duckling, Berry Burst, Daffodil Delight, Gray Granite, Purple Posey (retired), Parakeet Party (retired)
* Neon Glossy Gel - Cerise (Lisa Horton Crafts)
* Adhesive, dimensionals


HOCUS POCUS CARD


HOW IT LOOKS IN THE DARK


SUPPLIES I USED
* Cardstock - Garden Green Basic Black, Basic White
* Stamps - Bewitching, Potions & Spells (both retired)
* Stencil - Twinkle (Tim Holtz, Stampers Anonymous)
* Punch - Witch Hat Builder (retired)
* Die - Fifty States (Honey Bee Stamps)
* Ink - Tuxedo Black (Memento)
* Neon Glossy Gel - Apple (Lisa Horton Crafts)
* Embellishments - Shimmer Star Foamm Stickers
* Adhesive and dimensionals

KIND OF CREEPY


HOW IT LOOKS IN THE DARK


SUPPLIES I USED
* Cardstock - Soft Succulent (retired), Basic Gray, Basic White
* Stamps - Boo To You (retired)
* Stencil - Dots (?)
* Neon Glossy Gel - Malachite (Lisa Horton Crafts)
* Inks - Tuxedo Black (Memento), Basic Gray; Stampin’ Blends - Smoky Slate, Night of Navy, Cloud Cover, Soft Sea Foam, Lemon Lolly
* Dies - Nested Essentials
* Punch - 1/2” circle
* Adhesive and dimensionals


THREE GHOSTS 


HOW IT LOOKS IN THE DARK


SUPPLIES I USED
* Cardstock - Basic Black, Basic White, Iridescent Glimmer (retired)
* Dies - Tricks & Treats (retired)
* Stencil - ? (retired)
* Stamps - Potions & Spells (retired)
* Ink - Tuxedo Black (Memento)
* Neon Glossy Gel - Marmalade (Lisa Horton Crafts)
* Adhesive & dimensionals

TOIL & TROUBLE


HOW IT LOOKS IN THE DARK


SUPPLIES I USED
* Cardstock - Basic Black, Basic White, Basic Gray
* Patterned Paper - (retired)
* Stamps - Potions & Spells and dies (retired)
* Ink - Tuxedo Black (Memento); Stampin’ Blends - Basic Black, Smoky Slate, Daffodil Delight, Pumpkin Pie, Timid Tiger, Ivory
* Neon Glossy Gel - Marmalade (Lisa Horton Crafts)
* Dies - Essential Nesting Dies
* Adhesive and dimensionals

GHOSTLY GREETINGS


HOW IT LOOKS IN THE DARK


SUPPLIES I USED
* Cardstock- Basic Black, Basic White, Glow In the Dark Specialty Paper (retired)
* Stamps - Cutest Halloween & punch (retired)
* Dies - Word Wishes (retired)
* Punch - Witch Hat Builder (retired)
* Neon Glossy Gels - Blossom, Lemon Peel, Apple, Summer Sky, Lilac (Lisa Horton Crafts)
* Adhesive and dimensionals

GLOW IN THE DARK CARDS

I had so much fun using these Neon Glossy Gels to create fun Halloween cards.i think the gels are great for Halloween cards, of course, and they add fun to kids’ birthday cards too. Honestly, they are a bright and fun addition to any card. 

TIPS
Here are a few tips and observations I have after using these Neon Glossy Neon Glossy Gels:
* The gels have an odor. It is not fumes, just a bit of an odor. It is noticeable, but not overwhelming.
* Cover your work area. Once the gel dries, there is a good chance it is not going anywhere.
* Have a  container of soapy water close by; these gels are similar to embossing paste. Place your stencils and palette knives in the water to soak until you can clean them properly.
* The gels work well with stencils, but also can be spread on cardstock, dry, stamp on it (I used my heat tool to make sure the ink was dry), die cut, etc. 
* I allowed the backgrounds and other pieces to air dry several hours. As stated above I did use my heat tool to dry a couple of pieces. 
* The colors will appear a bit different on white cardstock than on black or dark colored cardstock.  

That is all for today. Thank you for dropping in for the Stamp Happy Halloween presentation.  Until next time . . .
Stamp Happy!

Kim

NOTE - As always, I use mostly Stampin’ Up!®️ products, many are retired, and are noted as such. Products from other companies are also noted as such. In general I urge you to use what you have to create your own versions of the sample cards. Some of you may have some theNeon Glossy Gels in your stash, but I would guess most of you do not. I am sharing the product, because I have had a ball using it, and maybe you will too. 

Friday, September 27, 2024

TRICK OR TREAT LET’S MAKE A BOX FOR SOMETHING SWEET! A STAMP HAPPY HALLOWEEN POST

Hi Stampers!

Today I am going to share a box you can use as a starting point for Halloween treat holders. This box is 3” long x 2” tall x 1” wide. The box can be decorated directly, or sandwich the box between decorative two panels. Let’s take a look at my sample projects:


This what the box looks like:


VIDEO
TRICK OR TREAT!
LET’S MAKE A BOX FOR SOMETHING SWEET!


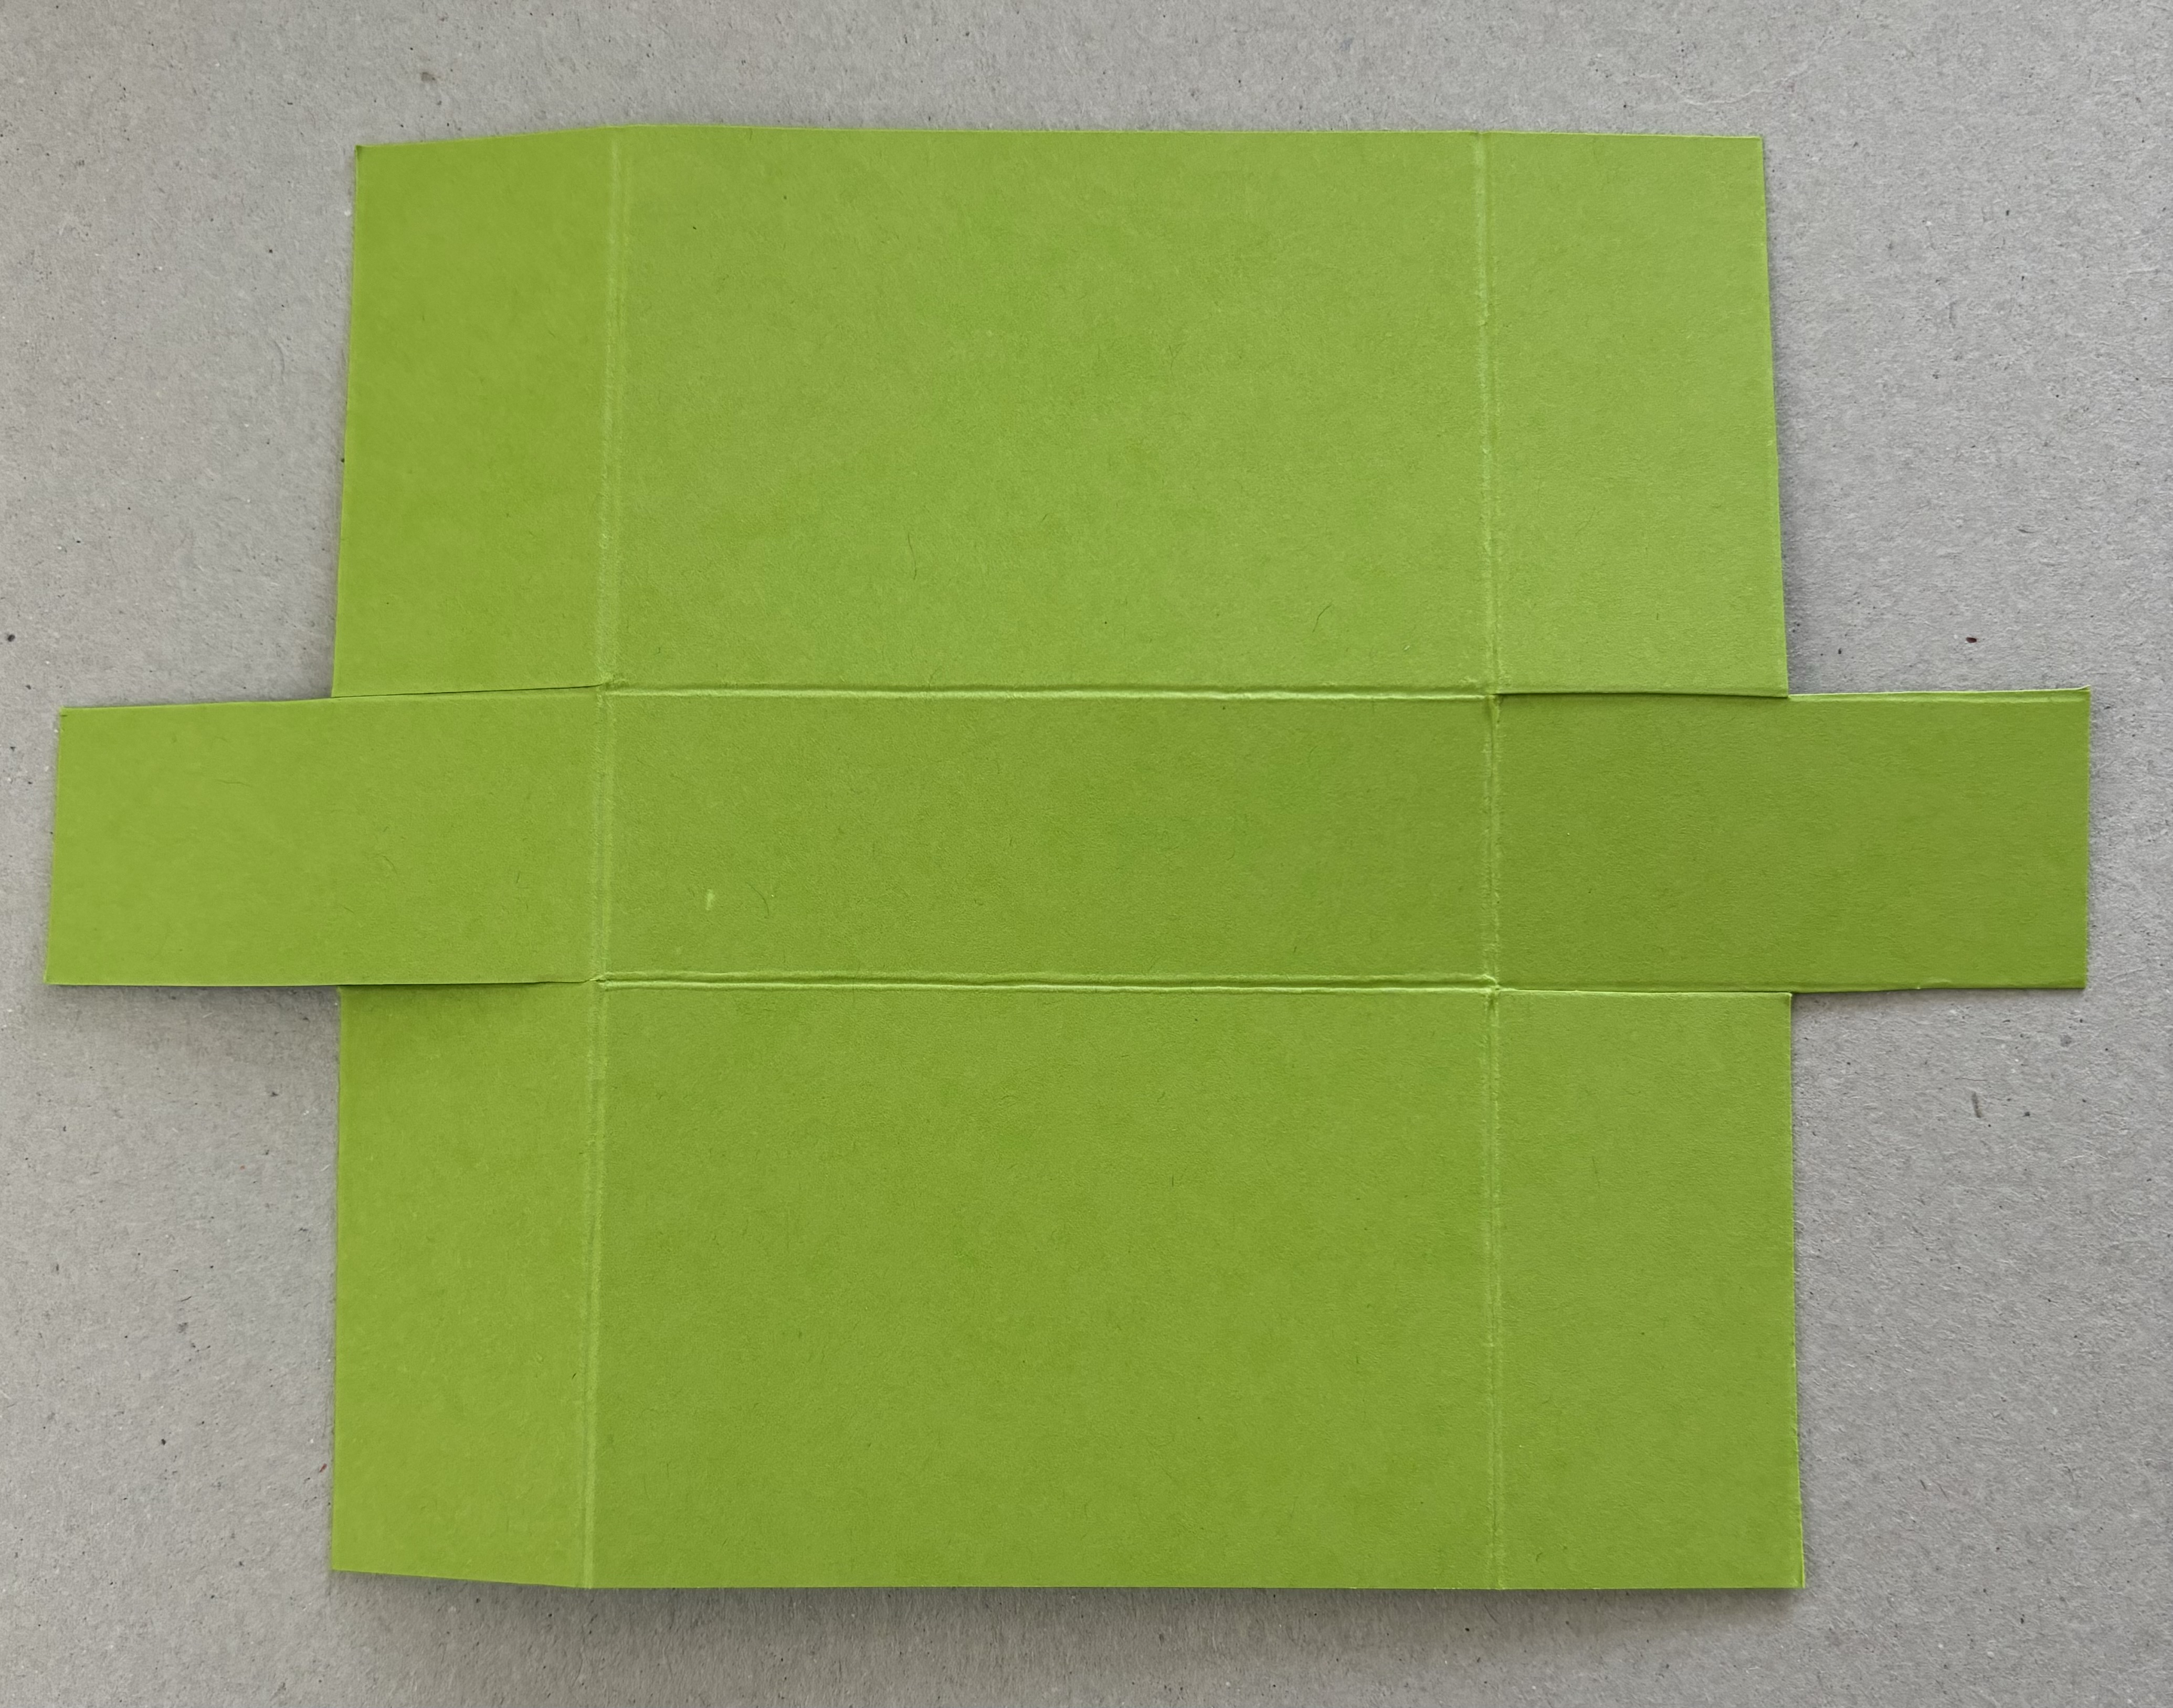
TO MAKE THE BOX

STEP 1


* Cut cardstock at 7” x 5”.
* Along the 7” side score at 2” and 5”.
* Along the 5” side score at 2” and 3”

STEP 2


* Along the 7” side, score at 1” down to the horizontal score line. Do the same at the 6” mark.
* Repeat the process on the other 7” side.

STEP 3


* Cut away the areas indicated on the diagram above.

STEP 4


* Finish cutting the flaps apart.
* Fold score lines and burnish with bone folder.
* Place adhesive on the top side of the two longest flaps and on the back sides of the two short bottom strips on the bottom side. 
* Put the box together.
* Your box should resemble the box below.


STEP 5


* Decorate the box with a front panel, and / or a back panel (see below) if you like. 


SUPPLIES
* Cardstock for box - green (Granny Apple Green)
* Other cardstock - black, white (Basic Black, Basic White)
* Ink - Memento Tuxedo Black; Stampin’ Blends (alcohol markers) - Smoky Slate, Basic Black, Lemon Lime Twist
* Stamp set - Trick Or Tweet (Stampin’ Up! - retired)
* Dies - squares - (Stylish Shapes - Stampin’ Up! - current)
* Adhesive

CANDY CORN TREAT HOLDER


To create this treat holder I used PRIMITIVE CANY CORN DIES from WHIMSY STAMPS. (See photo below.) This die is currently available from Whimsy Stamps. See it HERE. I purchased it from Simon Says Stamp. See it HERE

OTHER SUPPLIES
* Cardstock for box - orange (Pumpkin Pie)
* Cardstock for candy panels - Orange, yellow, white (Pumpkin Pie, Daffodil Delight, and Basic White)
* Star embellishments - yellow and orange
* Sentiment and black ink for back side of treat holder.
* Adhesive


CAULDRON TREAT HOLDER


To create this treat holder I used the POTIONS & SPELLS STAMP SET AND DIES from Stampin’ Up!®️. These products are currently available from the STAMPIN’ UP! ONLINE STORE.  (See photo below)

OTHER SUPPLIES
* Cardstock for box - lavender (Fresh Freesia ) 
* Other cardstock - black (Basic Black), glitter cardstock - purple
* Ink - Versa Mark (embossing ink), white embossing powder
* Adhesive


CAT MUMMY TREAT HOLDER


For this version I stamped a spooky cute image on a die cut circle.  The circle die cut on the back side has the stamped greeting.  Substitute a square or rectangle cut with a paper trimmer, or shapes made using punches for no die cut options. A mat can be added to the shapes for more colorful creations.

SUPPLIES
* Cardstock for box - black (Basic Black)
* Cardstock for die cuts - white (Basic White)
* Stamps for images and greetings (Trick Or Tweet - Stampin’ Up! - retired)
* Inks - Memento Tuxedo Black, Pumpkin Pie; Stampin’ Blends (alcohol markers) - Pumpkin Pie, Peach Pie, Daffodil Delight, Pretty In Pink, Smoky Slate, Pool Party
* Dies - circles (Stylish Shapes - Stampin’ Up!)
* Adhesive


SPOOKY FUN TREAT HOLDERS


This box is easy to make. It can be used as a treat holder for any occasion. When I need party favors or need something to hold little gifts and treats for co-workers, teachers, or anyone, this box is my go to starting point. It holds quite a bit of fun-sized candies, small toys and trinkets, lip balm, smaller tubes of lotion, travel sized toiletry items, etc. Yes, I have been known to fill these boxes with a small tube of toothpaste and a travel toothbrush along with a few sweet treats. This box can be dressed up a lot, but when I make them to hand out for Trick or Treating, I kept them simple - let’s be real - the box will soon be in the trash. When I create these as party favors or to pass out to groups, like co-workers, a church group, a school class, and the like - I add a bit of bling. Many times I put the decorated and filled box inside a small clear cellophane bag and tie a ribbon around it.

That’s all for today and this wraps up my Stamp Happy Halloween series for 2024. Thank you so much for joining me. Until next time . . .
Stamp Happy!

Kim

NOTE
When possible I provide sources and availability information on products I use for my projects. This information is provided as a resource only. I am not affiliated with nor am I endorsed or compensated by any company. 

CARDSTOCK - All is from Stampin’ Up! All colors used are current 

INK - Memento (Tuxedo Black), Stampin’ Up! (Pumpkin Pie) - current; Stampin’ Blends (alcohol markers from Stampin’ Up!) All colors are current.

STAMPS & DIES - As stated with each project


Thursday, September 19, 2024

STAMP SCRAPPY CARDS FOR HALLOWEEN - A STAMP HAPPY HALLOWEEN POST

Hi Stampers! 

I have a lot of paper scraps. I have mentioned this before, and you might have even seen some of my envelopes or boxes of scraps. I use my scraps whenever I can. For today’s cards I pulled out my scraps of Halloween themed papers and paired them with three tried and true scrap techniques. Let’s take a look;


VIDEO
STAMP SCRAPPY HALLOWEEN CARDS


DIAGONALLY CUT STRIPS LAYOUT

 
For this card I used strips of paper cut 4” long x 3/4” wide.  I cut each strip in half diagonally by placing one 3/4” end of the strip in the trimmer at 1/2” and the other end at 1/4” then cut. Adhere to mat alternating wider end of strip and narrow end of strip at top of mat panel. Leave a bit of a gap between the strips as you work your way across the card.

NOTE - For a portrait version of the card cut the strips 5 1/4” long x 3/4” wide. Then follow directions above for cutting and adhering to mat panel. 

SUPPLIES 
* Card base - black cardstock cut at 8 1/2” x 5 1/2” scored and folded at 4 1/4”
* Mat - orange cardstock cut at 5 1/4” x 4”
* Patterned paper strips - about 6 pieces (different patterns) cut at 4” x 3/4” then cut in half diagonally as described above.
* For greeting - orange cardstock 5 1/4” x 1 3/4” patterned paper 5 1/4” x 1 1/2”  Happy Halloween die cut (alternate - a stamped greeting on light colored cardstock)
* Inside panel - white cardstock cut at 5 1/4” x 4” and black ink for sentiment
* Adhesive of choice and dimensionals for greeting


HALLOWEEN HERRINGBONE TECHNIQUE


The herringbone technique is an easy way to arrange strips of scraps into an eye-catching pattern. There is no specific measurement for placement of your strips, and the strips do not need to be the same length. I find it easier to cut the strips the same same length, and as I place them on the panel, trim them periodically. What is trimmed away can be used to cover other areas of the card. I cut my strips 1/2” wide x 7” long. Why 7”, because the diagonal of an A-2 card base is about 6.95” (yes, I did the math - just for fun), but if you measure with a ruler you’ll see it is almost 7”. That is where I get the 7” measurement. I cut about 10-12 strips to get a good variety of patterns.

SUPPLIES I USED
* Card base - black - 8 1/2” x 5 1/2” scored and folded at 4 1/4”
* Pattern base - white cardstock (any color will be fine as it will be covered up) cut at 5 1/2” x 4 1/4” this piece will be cut down to 5 1/4” x 4” later)
* Patterned paper _10 - 12 strips cut at 7” x 1/2”
* For images - Mini Cat Die (scrapbook.com), word bubble die (Stampin’ Up!®️), black, white, pink, green, gray, and yellow cardstock, black ink, and white gel pen
* Inside panel - white cardstock -5 1/4” x 4”
* Adhesive sheets cut at 5 1/2” x 4 1/4”, dimensionals

ASSEMBLY
* Place the adhesive sheet on the pattern base cardstock
* Place 1 strip of patterned paper diagonally across the cardstock. Place the 3/4” end of a strip of paper against the center strip, place it closer to the top of the card than the bottom. Do the same on the opposite side of the center strip, only place it closer to the bottom than the top. This creates 4 sections to fill with the remaining strips. Trim the excess paper periodically.
* Once the panel is covered with patterned paper, trim it to 5 1/4” x 4”
* Place the piece inside an embossing folder of choice. Embossing adds texture and really pushes the strips into the adhesive. Adhere this to card base. Adhere inside panel in place.
* Add die cuts

FOUR RECTANGLES TECHNIQUES


This is an easy, yet visually appealing technique. Simply cut 4 rectangles of patterned paper and adhere to a panel. The rectangles are 2 1/2” x 1 7/8” each. I used two different patterns, but one pattern, two patterns or all different patterns! Adhere these rectangles to a panel and a card base. Add focal images and a greeting.

SUPPLIES I USED
* Card base -black cardstock cut at 8 1/2” x 5 1/2” scored and folded at 4 1/4”
* Mat panel - Orange cardstock - 5 1/4” x 4”
* Patterned paper - 4 pieces each cut at 2 1/2” x 1 7/8”
* Orange cardstock and layering circle dies, black ink, and “Trick or Treat” word stamp. Mask stamp to allow for stamping each word individually with the black ink, then use circle dies to die cut greeting.
* Cat dies - Mischievous (Tim Holtz)
* Inside panel - white cardstock cut at 5 1/4” x 4”
* Adhesive and dimensionals

STAMP SCRAPPY HALLOWEEN CARDS


MORE SAMPLE CARDS


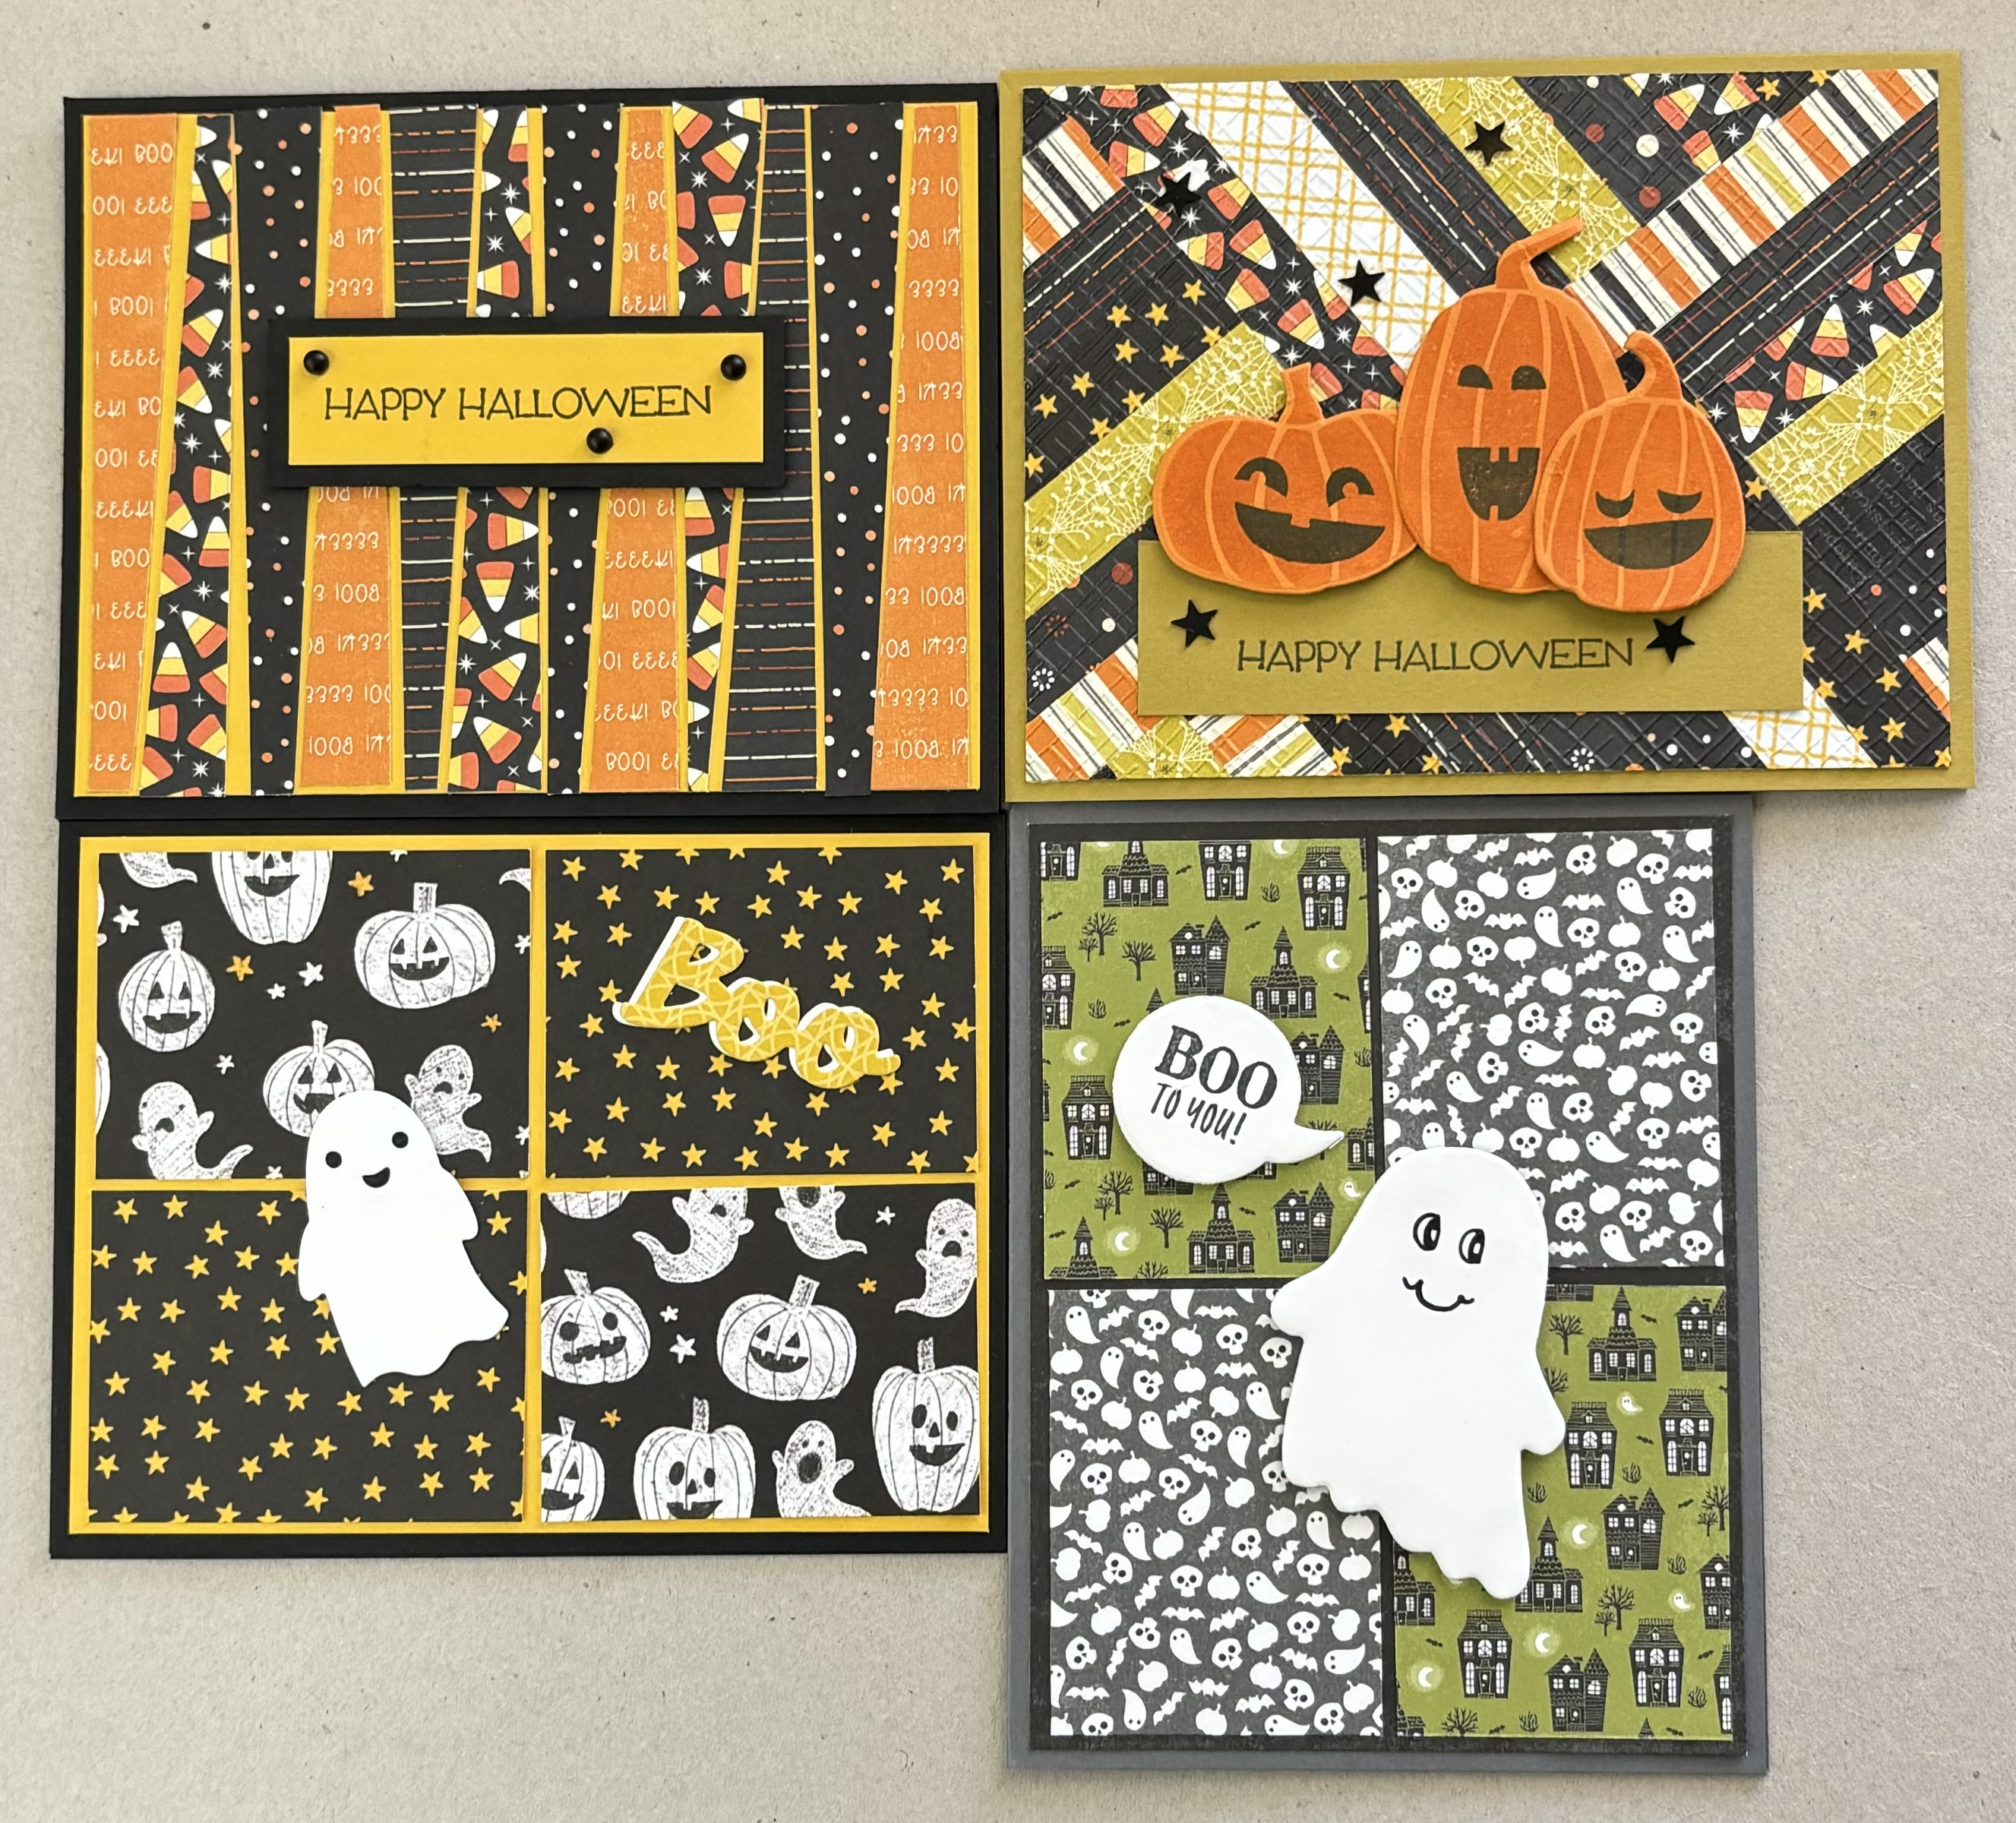
Here is a look at 3 cards I worked on in the video and one extra I made (bottom right), but did not use in the video. 

I hope these ideas inspire you to cut up those scraps and put them to use! These simple techniques make creating Halloween cards terrifyingly easy! Of course you can use these scrap techniques on cards for any occasion! Give these a try, you’ll find these techniques are quite addictive!!! Your scraps will disappear in no time!

Thanks for stopping by. Until next time . . .
Stamp Happy!

Kim

SUPPLY SOURCES

Cardstock - Stampin’ Up!
Basic Black, Basic White, Basic Gray, Pumpkin Pie, Lemon Lolly, Bubble Bath, Granny Apple Green (all are current colors)

Stamp Sets - ©️1990-2024 Stampin’ Up!©️
Best of Halloween (retired)
Tricks & Treats (retired)

Dies (currently available)
Mini Cat Die - Scrapbook.com
Mischievous - Tim Holtz