Showing posts with label Spiral Dye. Show all posts

Wednesday, July 19, 2023

BACKGROUND INFORMATION - IDEAS FOR USING BACKGROUND STAMPS

Hi Stampers!

Do you have background stamps just sitting on your shelf waiting to be inked? You love the design on the stamps, but you just are not sure what to do with them? Well, I have background stamps on my shelf, and I love the designs, but I tend to resist using them for some reason. Not today, I dusted off those stamps. I am putting them to use, and I am sharing my ideas.

Let’s look at the cards:


And here are the background stamps I used:


From left to right BERRY HARVEST, SPIRAL DYE, IT’S IN THE STARS, and RAYS OF LIGHT. These stamps can be found on pages 118-119 of the STAMPIN’ UP! ®️2023-2024 ANNUAL CATALOG or in my online store HERE. Search “background stamps.”

 VIDEO
BACKGROUND INFORMATION
IDEAS FOR USING BACKGROUND STAMPS


STAMP, COLOR, & BLEND

BERRY HARVEST BIRTHDAY


This is a very basic way to use a background stamp. Just stamp and add color.

* I created the background panel by stamping the image on Basic White cardstock using Early Espresso ink. (Yes. It will be okay, even when I use alcohol markers to color in the images.)  
* Next I colored the berries and leaves with Stampin’ Blends alcohol inks. 
* Then I used a blending brush and Azure Afternoon ink to add color to the background areas of the stamped image. Just apply the ink right over the colored images. Believe me, it will be okay. 
* I trimmed the panel to 5” x 3 3/4”, added a mat, and adhered to a card base.
* For the greeting I used a blending brush and Azure Afternoon ink to color a small piece of Basic White cardstock. I stamped the greeting with Blackberry Bliss ink. Die cut with the stitched oval Dies from the Mini Pocket Envelope Dies. I adhered it to a scrap of Old Olive cardstock and fussy cut around leaving a bit of an Old Olive border. I repeated the process with a scrap of Blackberry Bliss cardstock. I adhered the greeting to card front with dimensionals. 
* I repeated the same “stamp, color, blend” process on the flap of an envelope to create a matching envelope.

SUPPLIES FOR THIS CARD
* Berry Harvest Stamp Set; Inked & Tiled stamp set (greeting)
* Old Olive card base - 8 1/2” x 5 1/2” scored and folded at 4 1/4”
* Mat - Blackberry Bliss cardstock cut at 5 1/4” x 4”
* Focal Panel - Basic White - 5 1/2” x 4 1/4” and later cut to 5” x 3 3/4”
* Greeting - Scraps of Blackberry Bliss, Old Olive, and Basic White
* Inks - Early Espresso, Blackberry Bliss, Azure Afternoon; Stampin’ Blends - Blackberry Bliss (light & dark). Old Olive (light & dark), Crumb Cake (light& dark). 
* Blending Brush
* Dies - Mini Pocket Envelope Dies (found in my online store as an online exclusive) - oval 
* Adhesive and dimensionals 


SPOTLIGHT TECHNIQUE

BERRY HARVEST SPOTLIGHT BIRTHDAY


For this card I used a variation of the spotlight technique. This technique is quick and easy. 
* I simply stamped the image on a piece of 5 1/2” x 4 1/4” Basic White cardstock with Blackberry Bliss ink. 
* Then I die cut a piece from the stamped image using the Stylish Shapes Dies - circle, 2nd largest.  I cut mine centered and about 3/4”-1” from the top of the panel. 
* Next I use the same die plus the largest circle die in the set to cut a frame from Blackberry Bliss ink. I also cut two more circles; a Blackberry Bliss one using the 3rd largest die and a Basic White one using the next smaller circle die - these are for the greeting. 
* I used Stampin’ Blends to color in the part of the image I die cut from the panel. 
* I cut down the panel to 5 1/4” x 4” and adhered it to a Blackberry Bliss Card base. 
* I used liquid glue to adhere the frame around the die cut area. 
* I used dimensionals to adhere the colored part of the image inside the boundaries of the frame. 
* I used Blackberry Bliss ink to stamp the greeting on the Basic White die cut circle. I adhered this to the Blackberry Bliss mat, and added it to the cardbase using liquid glue along the top and dimensionals along the bottom.
* I used a Blackberry Bliss Stampin’ Blend (dark) to color 5 rhinestones, and adhered them to the greeting.
* For the envelope, I simply stamped the image on the flap using the Blackberry Bliss ink.

SUPPLIES
* Berry Harvest stamp and Pansy Patch stamp set (greeting)
* Card base - BlackBerry Bliss cardstock 5 1/2” x 8 1/2” scored and folded at 4 1/4”
* Focal Panel - Basic White cardstock 5 1/2 x 4 1/4”, later cut down to 5 1/4” x 4”
* BlackBerry Bliss cardstock for frame and greeting mat
* Basic White cardstock for greeting
* Inks - Blackberry Bliss; Stampin’ Blends - Blackberry Bliss (light & dark). Old Olive (light & dark), Crumb Cake (light & dark)
* Dies - Stylish Shapes - circles
* Rhinestones Basic Jewels - 5, color with Blackberry Bliss (dark) Stampin’ Blend
* Adhesive, liquid glue, dimensionals 

BLENDED BACKGROUND

IT’S IN THE STARS STELLAR BIRTHDAY


Another super easy way to use background stamps, just stamp the image and use inks and blending brushes to add color.

* Stamp the image on a 5 1/2” x 4 1/4” piece of Basic White cardstock. And I used Memento Tuxedo Black ink to stamp the image.
* I used blending brushes and Pool Party, Lost Lagoon, and Pretty Peacock ink to add color to the background. I went from left to right - top to bottom as I added the ink.
* I trimmed my background piece to 4 3/4 x 3 1/2” and matted it on a 5” x 3 3/4” piece of Basic Black cardstock.
* Next I moved onto creating the planets. I used the Reach For the Stars Die (circles) to die cut the planets, and other dies in the set to cut rings, and stars. 
 - Use Silver Foil (online store) or the Holographic Trio specialty paper and both stars dies to die cut the stars.
- Use the Holographic Trio specialty paper to die cut the rings for the planet (use smallest rings die).
* For the planets
 - Daffodil Delight planet - Daffodil Delight cardstock, 2nd largest circle die, use Daffodil Delight ink and sponge dauber and Inked & Tiled stamp set (brush stroke image) to create a design on the planet. Adhere to focal panel with dimensionals.
 - Cajun Craze planet - use 3rd smallest circle die - Cajun Craze cardstock; Use Cajun Craze ink and a sponge dauber to add shadow and depth to the planet. Slip into rings die cut and adhere it to the planet on the back side of the planet. Adhere to focal panel with dimensionals.
 - Calypso Coral planet - Calypso Coral cardstock die cut with 2nd to smallest circle die. Use
Calypso Coral ink and the “dots” stamp from Nested Friends stamp set (or any one you have) to add a design to the planet. Use the ink and a sponge dauber to add shadow and depth to the planet. Use adhesive to attach to the focal panel.
* Stamp the greeting on Calypso Coral cardstock using Memento Tuxedo Black ink. Trim the cardstock down to fit the greeting. Adhere the greeting to the card base.
* Adhere the matted focal panel to the card base. 
* Use liquid glue to adhere the die cut stars to the focal panel
* For the envelope I simply stamped the image on the flap using the black ink.

SUPPLIES FOR CARD ABOVE
* It’s In the Stars, Reach For the Stars (greeting), Inked & Tiled, and Nested Friends stamp sets
* Card base - Lost Lagoon cardstock - 5 1/2” x 8 1/2” scored and folded at 4 1/4”
* Mat - Basic Black cardstock cut at 5” x 3 3/4”
* Focal Panel - Basic White cardstock x 5 1/2” x 4 1/4” (later cut down to 4 3/4” x 3 1/2”)
* Other cardstock - Daffodil Delight, Cajun Craze, Calypso Coral, Silver Foil. Holographic Trio Specialty Paper
* Inks - Memento Tuxedo Black, Lost Lagoon, Pretty Peacocl, Pool Party, Daffodil Delight, Calypso Coral, Cajun Craze
* Reach for the Stars Dies
* Adhesive and dimensionals


EMBOSS RESIST TECHNIQUE

IT’S IN THE STARS THANK YOU


This is another quick and easy technique, and this card goes together in no time!

* Using a 5 1/2”x 4 1/4” piece of Basic White cardstock go over it with an embossing buddy or sock containing cornstarch or baby powder. This will reduce static and ensure the embossing powder goes only where we want it to go! 
* Stamp the image with Versa Mark ink and cover with clear embossing powder. Heat set with heat tool.
* Go over the panel with a blending brush and Starry Sky ink. 
* Use a towel or paper towel and gently wipe over the panel just to remove any residual ink from the image.
* Trim this panel to 5” x 3 3/4” and adhere to a Basic White (thick) card base. 
* Stamp the greeting (from Reach for the Stars stamp set) on Basic White cardstock sim Starry Sky ink.
* Die cut with the Countryside Corners dies - select the die that fits best around the greeting.
* Adhere the greeting to center of the card using dimensionals.
* For the envelope I once again just stamped the image on the envelope flap. This time I used the Starry Sky ink.

SUPPLIES
* IT’S IN THE STARS and REACH FOR THE STARS stamp sets
* Card base - Basic White (thick) 8 1/2” x 5 1/2” scored and folded at 4 1/4”
* Focal Panel - Basic White cardstock - 5 1/2” x 4 1/4” (later cut to 5” x 3 3/4”
* Greeting Basic White cardstock scrap
* Inks - Versa Mark, Starry Sky; Clear Embossing Powder
* Blending brush
* Countryside Corners Dies
* Embossing Buddy, Heat Tool, Piece of paper towel
* Adhesive and dimensionals 

STAMP & BLEND & DIE CUT GREETING

SPIRAL DIE HAPPY BIRTHDAY


The most difficult part of making this card is die cutting all those letters! And that is not hard at all! For this technique you have options. You can stamp the spiral image, then use the blending brushes and other ink colors to color in the white areas of the cardstock OR use the blending brushes to to Add color first, then stamp the image. I chose the first option.

* I used a scrap strip of Basic Black cardstock, measured it, and cut an adhesive sheet to fit. I placed the adhesive sheet on the back side of the cardstock. 
* I placed the cardstock right side up on the cutting plate of my die cut machine and placed the  Alphabet Ala Mode letter dies I needed on the cardstock, and ran them through the die cut machine. My letters are ready when I need them!
* On a piece of 5 1/2” x 4 1/4’ Basic White cardstock, stamp the image with Poppy Parade ink.
* Use Daffodil Delight and Pumpkin Pie inks and blending brushes to color in the white spaces of the background piece, if you did not do so prior to stamping. 
* Cut this piece down tom3 3/4” x 5” and mat on a 5 1/4” x 4” piece of Basic Black cardstock.
* Remove the backing from your die cut layers and adhere to the card front.
*Place foam adhesive strips on the backside of the focal panel along the sides and in the middle of the piece, and adhere to a Pumpkin Pie card base.
* For the envelope flap I used the same pro chess I used when stamping the image for the card.

SUPPLIES
* Spiral Dye stamp
* Card base - Pumpkin Pie Cardstock -8 1/2” x 5 1/5” scored & folded at 4 1/4”
* Mat - Basic Black Cardstock - 5 1/4” x 4 “
* Focal panel - Basic White cardstock 5 1/2” x 4 1/4” - later cut down to 5” x 3 3/4”
* Strip of Basic Black cardstock backed with Adhesive Sheets
* Inks - Poppy Parade, Pumpkin Pie, Daffodil Delight
*Blending Brushes
* Adhesive and Adhesive Foam Strips

ELEGANT EMBOSSING

ELEGANT SPIRAL DYE BIRTHDAY


For this card I used the Spiral Dye stamp to create a card that is a bit more elegant. I really like the black and gold combination.

* Use an embossing buddy on a 5 1/2” x 4 1/4”, then stamp the image with Versa Mark, cover with gold embossing powder, and heat set. Cut panel down to 5” x 3 3/4”.
* Adhere panel to Basic Black mat cut at 5 1/4” x 4” and adhere this piece to a Basic White (thick) card base.
* Cut a piece of Basic Black cardstock at 1 1/4” x 5”. Stamp greeting on it with Versa Mark, cover with gold embossing powder, and heat set. Adhere to card with dimensionals.
* Add 5 gold pearls to the card (Festive Pearls)
* I did not decorate an envelope for this card - yet!

SUPPLIES
* Spiral Dye and Biggest Wish (sentiment) stamp sets 
* Card base - Basic White (thick) 8 1/2” x 5 1/2” scored and folded at 4 1/4”
* Mat - Basic Black 5 1/4” x 4”
* Focal panel - Basic White 5 1/2” x 4 1/4” (later cut down to 5” x 3 3/4”
* Greeting - Basic Black cardstock - 1 1/4” x 5” for greeting
* Inks - Versa Mark, gold embossing powder
* Festive Pearls - gold - 5
* Adhesive and dimensionals 

STAMP AND DIE CUTS

RISE & SHINE RAYS OF LIGHT


This card is similar to the Stamp & Blend & Die Cut Greeting card, except there is no blending - just stamping and adding die cuts.

* Stamp the image on Basic White cardstock using Crushed Curry ink.
* Die cut a circle from a scrap of Crushed Curry cardstock using the Stylish Shapes Dies - 2nd smallest circle.
* Place adhesive sheets on the back of a 5” x 3” piece of Basic Black cardstock.
* Use the Alphabet Ala Mode Dies to die cut the needed letters for the greeting.
* Use dimensionals to attach the circle die cut to the card panel.
* Place the letters on the card front.
* Adhere the panel to a Basic Black card base.
* To create a matching envelope I simple stampe the image on the envelope flap with the Crushed Curry ink.

SUPPLIES
* Rays of Light stamp set
* Card base - Basic Black 8 1/2” x 5 1/2” scored and folded at 4 1/4”
* Card panel - Basic White 5 1/2” x 4 1/4” (later cut down to 5 1/4” to 4”)
* Scrap of Crushed Curry cardstock to die cut circle
* Greeting - Basic Black cardstock 5” x 3” backed with Adhesive Sheets to die cut letters
* Ink - Crushed Curry
* Alphabet Ala Mode Dies and Sylish Shapes Dies
* Adhesive and dimensionals 

The following two cards were created using one stamped panel.

CUT A STRIP 

HAPPY BIRTHDAY RAYS


This card incorporates the background stamp image and designer series paper. Using a strip of the stamped panel leaves enough of the image to use on another card.

* Stamp the Rays of Light image using Lost Lagoon ink on a piece of 5 1/2” x 4 1/4” piece of Basic White cardstock, Cut a 1 1/2” strip from the left side of the panel. Cut the length of the strip to 5 1/4” long. This is what will b3 used on this card. Save what is leftover to make the next card. Cut the length 
* Cut a piece of DSP from the Inked Botanicals DSP (Lost Lagoon) that is 4” wide  x 5 1/4” long, paying attention to the direction of the pattern on the DSP.
* Adhere the stamped strip to the DSP. Attach a piece of Lost Lagoon ribbon about 2” from the top of the panel. Secure each end of the ribbon on the back of the panel.
* Adhere the panel to the card base.
* Use the Stylish Shapes Dies to die cut a Lost Lagoon square (mat) and a Basic White square for the greeting. Stamp the greeting on the Basic White square with Lost Lagoon ink.
* Add 3 of the Festive Pearls to the greeting (green).
* Adhere the greeting with dimensionals. 
* The envelope for this card was decorated just like the previous card.

SUPPLIES
* Rays of Light and Inked & Tiled (greeting) stamp sets
* Card base - Basic White cardstock (thick) 11” x 4 1/4” scored and folded at 5 1/2”
* Focal panel - Basic White cardstock - 5 1/2” x 4 1/4”
* DSP - Inked Botanicals - Lost Lagoon cut at 5 1/4” x 4”
* Scraps of  Basic White and Lost Lagoon fo greeting
* Ink - Lost Lagoon
* Stylish Shapes Dies - squares, 3rd and 4th smallest
* Lost Lagoon Ribbon - about 5”
* Festive Pearls - green - 3
* Adhesive and dimensionals 

BONUS CARD

RAYS OF LIGHT WITH INKED & TILED BIRTHDAY


For this card I used the leftover stamped panel leftover from the previous card.

* Cut a piece o Basic White cardstock to 2” x 5 1/2”.
* Stamp the large floral image from the Inked & Tiled stamp set with black ink
* Stamp the greeting below the greeting.
* Adhere the floral panel centered on the Lost Lagoon stamped panel.
* Adhere this panel to a Basic Black card base.
* Use a Basic Black (dark) Stampin’ blend to color 3 rhinestones.
* Attach the rhinestones to the floral panel.

SUPPLIES
 * Inked & Tiled stamp set
* Card base - Basic Black cardstock 11” x 4 1/4” scored and folded at 5 1/2”
* Reserved stamped panel from above (for mat)
* Basic White cardstock 2” x 5 1/2” 
* Ink - Basic Black and Stampin’ Blend - Basic Black (dark)
* Rhinestones Basic Jewels - 3, colored with Black stampi’ Blend
* Adhesive
* For the envelope I used the black ink and stamped the upper portion of the floral image on the envelope flap and on the lower left portion of the front of the envelope.

That is all for today! I hope I have inspired you to dig out your background stamps and use them to create some great cards! Until Next time . . .
Stamp Happy!

Kim

All stamps and stamped images ©️1990-2023 Stampin’ Up! ®️

COMING WEDNESDAY, 19 JULY 2023 FOR 24 HOURS ONLY


All stamps in the 2023-2024 Annual Catalog will be 15% off  Wednesday 19 July ONLY. THERE IS NO LIMIT TO THE NUMBER OF STAMP SETS YOU CAN PURCHASE,
NO COUPONS REQUIRED!
DISCOUNT IS TAKEN OFF AT CHECKOUT.

Friday, September 3, 2021

CUTEST HALLOWEEN MEETS SPIRAL DYE = FUN HALLOWEEN CARDS!

 Hi Stampers!

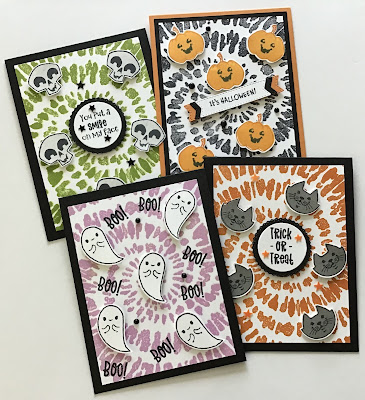
I had some fun creating Halloween cards with the CUTEST HALLOWEEN BUNDLE and the SPIRAL DYE stamp. The cards reminded me of the intro to an episode of The Twilight Zone! I suppose that is appropriate for Halloween cards.😁 Here is a look at the cards:


CUTEST HALLOWEEN BUNDLE


SPIRAL DYE BACKGROUND STAMP


These cards were very easy to make. The most difficult task was selecting colors for the SPIRAL DYE image. The cat, jack-o-lantern, and ghost images were all cut using the HALLOWEEN PUNCH. The skull images were stamped then fussy cut. All card bases are 11” x 4 1/4” scored and folded at 5 1/2”. The SPIRAL DYE panels are all on Basic White cut at 5” x 3 3/4”. The jack-o-lantern card has a mat for the focal panel of Basic Black cut at 5 1/4” x 4”.

CAT CARD


SUPPLIES FOR CAT CARD
* Basic Black card base and Basic White focal panel as stated above.
* Basic White for stamping greeting and the cats (5 images) plus a scrap of Basic Black die cut with a Tasteful Labels Die.
* Inks - Pumpkin Pie for the spiral image, Memento Tuxedo Black and Basic Gray for the cat images, Tuxedo Black for the greeting.
* Five CUTE STARS SEQUINS - Pumpkin Pie.
* Adhesive and dimensionals

SKULL CARD
 

SUPPLIES FOR SKULL CARD
* This card is basically the cat card. The cardstock and adhesive supplies are the same.
* Inks - Granny Apple Green for the spiral image, Tuxedo Black and Sahara Sand (stamped off) for the skulls, and Tuxedo Black for the greeting.
* The CUTE STARS SEQUINS for this card are the Shimmery Black ones.

JACK-O-LANTERN CARD


SUPPLIES FOR JACK-O-LANTERN CARD
* Pumpkin Pie card base, Basic Black cardstock mat, Basic White cardstock for focal panel.
* Basic White cardstock for stamping the jack-o-lanterns; scraps of Basic White, Basic Black, and Pumpkin Pie for the greeting.
* Inks - Pumpkin Pie, Mango Melody, and Tuxedo Black
* Matte Black Dots - 5.
* Adhesive and dimensionals
* Tasteful Labels Dies - the banner die.
** The greeting is from the CLEVER CATS stamp set. Stamp the greeting on Basic White, die cut with the banner die. Cut two more of the banner die images; one Basic Black and one Pumpkin Pie. Cut the Basic Black and Pumpkin Pie banners in half. Adhere one piece of the Basic Black pieces on each end of the Basic White greeting piece. Do the same with the Pumpkin Pie banner.

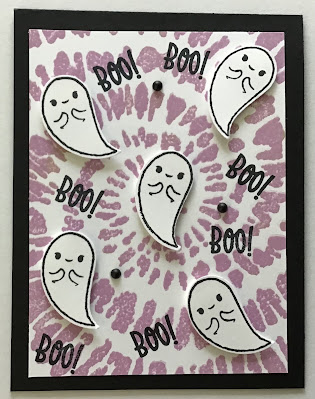
GHOST CARD


SUPPLIES FOR GHOST CARD
* Basic White cardstock for the ghosts
* Inks - Fresh Freesia and Tuxedo Black
* Matte Black Dots - 3
** This card is just a bit different as I stamped the “greeting(s)” directly on the focal panel. The BOO! Is from the CUTEST HALLOWEEN stamp set. I simply cut the “Hey, Boo!” stamp apart. If the thought of cutting stamps apart sends chills up your spine, not to worry there is an alternative - or two. 
 1. The words on this stamp are spaced in such a way you can have great success just inking the “BOO!” end of the stamp … or
2. Use washi tape, painter’s tape, or sticky note to mask the “Hey,” part of the stamp. Ink the stamp, remove the mask, and stamp the image.

There you go, that is how I made my Twilight Zone-like Halloween cards. 

CUTEST HALLOWEEN & SPIRAL DYE CARDS


Thank you for stopping by today. Until next time…
Stamp Happy!
Kim

All stamps and stamped images ©️1990-2021 Stampin’ Up!®️

Monday, May 10, 2021

SPIRALING OUT OF CONTROL WITH THE SPIRAL DYE BACKGROUND STAMP!

 Hi Stampers,

Today I have 9 cards to share with you! Each card features a background stamped with the SPIRAL DYE background stamp (page 118 in the Stampin’ Up!®️ 2021-2022 Annual Catalog). Here is a look at the stamp.

SPIRAL DYE


The easiest way to stamp with this background stamp is to use the STAMPARATUS (Annual Catalog pg. 144), however good results can also be achieved by placing the stamp on CLEAR BLOCK F. Ink the stamp, and with the stamp facing up place your cardstock on the inked stamp. Put a piece of scrap paper over the top of the cardstock and rub gently to transfer the ink to the cardstock.


For the first three cards I used the NOTHING’S BETTER THAN stamp set (pg. 87 Annual Catalog), and one of my favorite color combinations - Early Espresso and Cherry Cobbler! These cards are great for encouragement or just to say hello to friends or family.


For this background I stamped the image with Soft Suede ink on Crumb Cake cardstock. I turned my cardstock 180 degrees, inked the cleaned stamp with Early Espresso.


The background for this card was stamped using the same process as for the card above. The background cardstock is Basic White, stamped first with Crumb Cake ink, then Stamped with Early Espresso ink.


The background for this card is the product of one mistake after the other, but I like the result! First I stamped Basic White cardstock with Early Espresso ink. My cardstock stuck to the stamp. I removed it, and thought I had turned it 180 degrees. I hadn’t. I stamped the second time, but I forgot to clean off or reink my stamp, and apparently I had put my cardstock just a tad below my guideline. The result - the stamped image was a second generation of the ink, and the image was just a tad below the original. This left a bit more white area on the background . 


For the next three cards I used the BACK ON YOUR FEET stamp set (Annual Catalog pg 85). These are get well / thinking of you cards.


To create this background I used sponge dauber to apply ink to the stamp. (Inks - Poppy Parade, Pumpkin Pie, Daffodil Delight, Granny Apple Green, Pacific Point, and Gorgeous Grape. Before stamping on the Basic White cardstock, I spritzed the stamp with water using a Stampin’ Spritzer (pg. 129 Annual Catalog) before stamping. I only stamped the image once. The background piece and the Granny Apple Green mat are slightly tilted on a Pumpkin Pie card base. The greetings were stamped on Granny Apple Green cardstock and cut out by hand. They are mounded on the cards with dimensionals.  The turtle was stamped with Memento Tuxedo Black ink and colored in with Stampin’ Blends, then fussy cut. The image is attached to the card with my homemade “wobble spring.” (See my 24 February post for instructions.)


The background for this card is yet another happy accident! It appears the colors I used were Mango Melody and Garden Green , but that is incorrect? I used Mango Melody and Coastal Cabana! Apparently when you stamp Coastal Cabana over Mango Melody you get Garden Green! (And yes, I forgot to turn my cardstock!) After a few sighs, good griefs, and what was I thinkings, I turned my cardstock 180 degrees and stamped on Mango Melody. The background piece was matted on Mango Melody. The card base is Garden Green.  The sentiments were stamped with Memento Tuxedo Black ink on Mango Melody cardstock, and cut out by hand. The sloth was colored with Stampin’ Blends, and fussy cut. The sloth and the sentiments were adhered to the card with dimensionals.


This background is Early Espresso and Soft Suede on Basic White cardstock. It is mounted on a piece of Crumb Cake cardstock. The card base is Soft Suede. The giraffe was stamped with Early Espresso ink, and colored with Stampin’ Blends, then fussy cut. The sentiments were stamped with Early Espresso ink on Daffodil Delight cardstock. The were cut with the Layering Circles Dies. The giraffe and sentiments were attached with dimensionals.
 

The final three cards cards were created using three different stamp sets, and three different techniques.


For this card I used the PARTY PUFFINS stamp set (Annual Catalog pg. 67). The background panel is another one where I applied ink to the stamp using sponge daubers and lightly spritzed it with water before stamping. The background is mounted on a Pacific Point mat. The card base is Poppy Parade. The puffin was stamped with Memento Tuxedo Black, color was added with Stampin’ Blends, and the image was fussy cut. The sentiments were stamped on Basic White with Pacific Point ink. They are matted on Poppy Parade mats.  I used my paper snips to cut out the sentiments and the mats.


This card’s background was created using four colors of ink - Pool Party, Coastal Cabana, Bermuda Bay, and Just Jade. I made a mask from printer paper that was the same size as the Basic White cardstock. I cut the mask in half diagonally. I inked one side with Pool Party and stamped. I cleaned the stamp, and masked the side I previously inked. I inked the stamp with Bermuda Bay, and stamped. I turned the cardstock 180 degrees, and repeated the process using the Coastal Cabana and Just Jade ink. This process adds a little extra dimension to the card.  The background is mounted on Bermuda Bay. The card base is Pool Party. The Shark image and sentiment are from SHARK FRENZY stamp set (Mini Catalog pg. 46). The shark is die cut with the SHARK DIES.  The sentiments are stamped with Bermuda Bay ink, and mounted on Bermuda Bay mats. I cut out the sentiments and mats with my paper snips.


This card features the SNAILED IT stamp set (Mini Catalog pg. 55). The background was created with a baby wipe. I put a baby wipe on a silicone craft sheet and applied diagonal lines of Real Red, Pacific Point, Daffodil Delight, and Garden Green. I inked the stamp with the baby wipe and stamped the image on Basic White cardstock. The background image was adhered to a Daffodil Delight mat. The card base is Pacific Point. The sentiment was stamped on Basic White with Pacific Point. It was cut out with paper snips, and mounted on Daffodil Delight, and cut out with paper snips again. Then I mounted it on Pacific Point, and cut it out with paper snips one final time. The snail image was die cut with the Snail Dies and adhered to a Pacific Point circle cut with the Layering Circle Dies. The sentiment and focal image were attached to the card with dimensionals.


Here is another look at the three sets of cards.


As you can see, I sort of lost control making cards with the SPIRAL DYE background stamp. Why not give this stamp a try. Once you start stamping with it you might discover yourself spiraling out of control too! Not to worry! You will end up with a nice stack of great cards!

That is all for today. Thank you for stopping by. Until next time...

Stamp Happy!

Kim

All stamps and stamped images ©️1990-2021 Stampin’ Up!®️


Wednesday, April 14, 2021

STAMPIN’ UP! ®️ PREVIEW - SPIRAL DYE

 Hi Stampers,

In just under three weeks the brand new STAMPIN’ UP’ 2021-2022 ANNUAL CATALOG sales period begins! This catalog has sooooooo much to offer stampers of all skill levels! I cannot wait to see what everyone creates with the stamps, inks, and papers in this catalog! 

Today I am continuing the catalog preview with a focus on the SPIRAL DYE background stamp! This stamp is more versatile than what you might think! To me, the image is very retro! It takes me right back to when I was a kid in the 70’s wearing tie dye tees and bell bottom jeans! I’ve had some fun experimenting with this stamp. I will share some of the results today, and save some for on down the road!

SPIRAL DYE


Here is a look at 5 cards I created with the stamp. The two cards on top I featured in 9 April post.


To create this card I simply inked the stamp with Memento Tuxedo Black ink, and stamped it on a 5 1/2” x 4 1/4” piece of Basic White cardstock. I cut the stamped cardstock  down to 3 3/4” x 5”, matted it on a piece of Poppy Parade cardstock, and adhered the piece to a Basic Black card base. Super easy! For this card I placed the stamp on CLEAR BLOCK F,  inked it, placed my cardstock on the stamp, placed scrap paper on top, and rubbed over the scrap paper to help transfer the ink to the cardstock.


For this card card I used Mango Melody and Bermuda Bay inks to create the background. I believe it is possible to achieve this result using CLEAR BLOCK F, but I used the STAMPARATUS.  Page 118 of the new catalog gives simple instructions for creating this effect. Place cardstock in the STAMPARATUS, ink up the stamp (for my card I used the Mango Melody ink first), and stamp the image. Clean the stamp. Ink it up with a second color (I used Bermuda Bay), turn the cardstock 180 degrees, and stamp! It is so easy!


The next two cards were made the same way as the previous card, I just used different color combinations. The first card was stamped using Coastal Cabana and stamped again using Bermuda Bay. This combination results in a monochromatic color scheme.


The card below was first inked using the new IN COLOR, FRESH FREESIA, and stamped again using Magenta Madness ink. 


This card was a little time consuming, but I like the results. I pulled out some STAMPIN’ WRITE MARKERS. I put the stamp on my STAMPARATUS, put my cardstock in place, and began adding color in the center of the stamp with a marker. Then I stamped. I did not clean off the stamp, I took the next marker and added color, stamped, and continued this process until I had filled the cardstock with color. If you would rather not use markers this look can be achieved using sponge daubers.


There are so many creative possibilities with this background stamp! I cannot wait to see all the creative and fun cards you all come up with using this stamp!


That is it for today! Until next time...
Stamp Happy!
Kim

All stamps and stamped images ©️1990-2021 STAMPIN’ UP!®️

Friday, April 9, 2021

STAMPIN’ UP!®️ 2021- 2022 ANNUAL CATALOG PREVIEW

 Hi Stampers,

We are about 3 1/2 weeks away from the premier of the Stampin’ Up! 2021 - 2022 Annual Catalog! 


This new catalog cover is beautiful, and wait until you see what is inside! There is so much to choose from! Open the cover and you will discover returning favorites and brand new offerings!

Whether you prefer elegance, simplicity, whimsy, or humor; this catalog has you covered! Looking for stamp sets to create feminine cards, masculine cards, kid cards, baby cards? This catalog has you covered! Are you looking for florals, botanicals, trees, birds, butterflies, dragonflies, animals? This catalog has you covered! Do you prefer the beach, the ocean, the mountains, the jungle or down on the farm? This catalog has you covered!  Do you prefer the sun...the moon... the stars? This catalog has you covered!

This catalog is full of color, texture, prints, and patterns! It is brimming with shiny embellishments, beautiful ribbon, terrific trims, gorgeous Designer Series Papers, fantastic specialty papers, and creative new packing products! 

If all of that is not enough, how about a brand new Christmas Suite and two new Holiday sets? And.... believe it or not... there is even more! Let’s take a peek at a little bit of what the new catalog has to offer!

THE 2021 - 2023 IN COLORS


POLISHED PINK, PALE PAPAYA, FRESH FREESIA, EVENING EVERGREEN, SOFT SUCCULENT


Aren’t these new In Colors beautiful? I love each and every one of them! What great additions to last year’s In Colors and the other four Stampin’ Up! color families. As always, the new In Colors can be found in Classic Stampin’ Pads, Stampin’ Write Markers, Ink Refills, Stampin’ Blends, cardstock, DSP, ribbon, and embellishments! 

Now, let’s take a look at a few stamp sets premiering in the new annual catalog. First up - SPIRAL DYE,

SPIRAL DYE


I was excited to see this great background stamp! It reminds me of the tie dyed t-shirt we would make when I was growing up in the 70’s! Immediately card ideas began streaming through my head!  I have two sample cards to share with you today. 

For this first card I simply stamped the image on Basic White cardstock using Memento Tuxedo Black ink. I trimmed the piece down to 3 /4” x 5”, and mounted it on a 5 1/4” x 4” piece of Poppy Parade cardstock, then mounted the entire piece on a Basic Black card base. The greeting is from the LOVELY YOU stamp set, which is carrying over into this new catalog. I used the DOUBLE OVAL PUNCH to cut out the greeting and for the Poppy Parade mat. This punch is in the current mini catalog, and is also featured in the new annual catalog.


Another thing that excited me about this background stamp was I knew there had to be a way to stamp more than one color of the image on the same piece of cardstock - and there sure is! This tip is found right in the new catalog. It is so easy! Using the Stamparatus, ink up the stamp and stamp the image on cardstock. Now - turn the cardstock 180 degrees. (In other words make the top side the bottom side and vice-Versa.) Ink up the stamp in the second color and stamp. The resulting image is a fun image for card backgrounds. Below is a card I made using this technique.


I think the background makes this such a fun card! First I stamped the image in Mango Melody on Basic White cardstock. Next I stamped the image using Bermuda Bay. This panel was mounted on Basic Black cardstock, the put on a Bermuda Bay card base.The greeting is from another new stamp set called PARTY PUFFINS.

PARRY PUFFINS


I love the Zany Zebras stamp set in the current annual catalog! I’ve made a lot of fun cards using that set. This year along comes the PARTY PUFFINS stamp set! It is just adorable, and the set contains some great sentiments. I look forward to creating lots and lots of fun cards with this set! Let’ take a peek at two cards I made using Party Puffins.


This card was really easy to make. The card base is Pumpkin Pie. I stamped the greeting directly onto the card base using Memento Tuxedo BlCk ink. I stamped the puffins on Basic White cardstock, added some color with Stampin’ Blends, and used the Layering Circle Dies to cut them out. I matted them on other circles die cut from Daffodil Delight, Bermuda Bay, and Granny Apple Green cardstock. 


Here is one more Puffins card I made. I stamped the images on Basic White cardstock, added color with Stampin’ Blends, and fussy cut the images. The card base is Mango Melody. The DSP is the 6” x 6” Designer Series Paper - Brights Collection. This is a retiring item from the current annual catalog.

Let’s move on to a pretty floral stamp set, PANSY PATCH. It is absolutely beautiful. The stamp set can be purchased in a bundle with the coordinating PANSY DIES. (You can also purchase the items separately.) This bundle is also a part of a suite that includes DSP and little bee embellishments.

PANSY PATCH


PANSY DIES

The dies allow you to cut out your stamped pansy and leaf images. Other dies cut out images from cardstock so you can build your own pansy. The coordinating 12 x 12 DSP features designs that can be die cut with the outline dies.

Here is the first card I made using the PANSY PATCH stamp set. The FRESH FREESIA gingham DSP is from the coordinating PANSY PETALS DSP.


This card features another design from the PANSY PETALS DSP. The card base is the new SOFT SUCCULENT IN COLOR. The mat for the DSP is the new IN COLOR, EVENING EVERGREEN.


CATALOG PREVIEW - THE VIDEO


THE STAMPIN’ UP! 2021 - 2022 ANNUAL CATALOG SALES PERIOD BEGINS 4 MAY 2021!


That’s it for today! Until next time...

Stamp Happy!
Kim

All stamps and stamped images ©️1990 - 2021 Stampin’ Up!®️