Showing posts with label Pansy Patch. Show all posts

Sunday, June 11, 2023

LET’S MAKE AN ENVELOPE FLAPS FUN FOLD CARD - 3 WAYS

Hi Stampers!

Today I thought we would create an “envelope flaps card” and I will show you three different ways to vary the card. Let’s take a look at my samples:


VIDEO
ENVELOPE FLAPS FUN FOLD CARD


HOW TO MAKE THE CARD BASE


* Start with a piece of cardstock  that is 11” x 5 1/2”.
* Along the 11” side, score the cardstock at 3 3/8” and 7 5/8”.
* On both 5 1/2” sides of the card base measure and mark with a pencil 1” up from the bottom and 1” down from the top. (See diagram above.)
* Place the card base in a trimmer lining up the pencil mark and score line on the cutting line, then cut. Repeat three more times.  (See diagram above.)
* Each end of your card base should resemble an envelope flap. 
* Fold the right flap inward and fold the left flap over the right. The card base is finished.

HOW TO MAKE THE LAYERS FOR THE CARD BASE


* You will need two pieces of DSP (patterned paper) cut at 3 1/8” x 5 1/8”. Make sure patterns are oriented the direction you want them to be on the card.
* Place the two pieces of paper side by side. The inside edges will go along the outer edge of the card base flaps and the outer edges will line up along the folded edges of the card base. (See diagram above.)
* Using a pencil, mark the “inside edge of each piece 1” down from the top and 1” down from the bottom.
* Place the paper in the trimmer and line up the pencil mark with the opposite corner on the cutting line and cut. Repeat on opposite end and repeat on the other piece of DSP. (See diagram above.)
* These pieces will layer on the two flaps of the card base allowing the cardstock to form a border around the DSP.

MAKING THE CARDS

FOR EACH CARD YOU WILL NEED

* Card base - 11” x5 1/2” scored at 3 3/8” and 7 5/8” and marked and cut according to directions above, then folded on score lines toward center of card.
* Two pieces of DSP that are 3 1/8” x 5 1/8” marked and cut according to directions above.
* Inside panel - Basic White cardstock cut at 5 1/4” x 4”

WITH ALL YOUR HEART CARD


This version of the “envelope flaps” card features a belly band on which the greeting has been adhered.

SUPPLIES FOR THIS CARD

* Stamp sets - Courage & Faith and Hope & Prayer
* Card base - Boho Blue
* DSP - 2023-2025 In Color 6” x 6” DSP x Boho Blue, heart pattern
* Belly Band - Boho Blue cardstock cut at 1” x 9”
* Greeting - Basic White  cardstock cut at 1 1/4” x 2 5/8”
* Greeting mat - 1 1/2” x 2 7/8”
* Ink - Boho Blue
* Embellishment - 2023-2025 In Color Dots, Boho Blue - 3
* Adhesive

NOTE
* For belly band - simply wrap cardstock around the card and adhere ends together. Cover the “seam” with the greeting.

PANSY BIRTHDAY CARD


This is the portrait version of the fun fold that features pretty pansies on the front flap, a Birthday greeting on the second flap, and another greeting inside the card.

SUPPLIES FOR THIS CARD

* Pansy Patch Stamp set and coordinating dies
* Card base - Berry Burst
* DSP - Glorious Gingham - Berry Burst
* Basis White cardstock for stamping
* Inks - for pansies: Lemon Lolly, Daffodil Delight, Berry Burst, Gorgeous Grape, Tuxedo Black
for the leaves - Lemon Lime Twist and Granny Apple Green; Stampin’ Blends marker - Berry Burst (dark)
* Embellishment Rhinestones Basic Jewels - 5 
* Adhesive and dimensionals (for top two pansies)

ASSEMBLY NOTE

* Color the rhinestones with the Stampin’ Blends marker.


THE LORD BLESS YOU CARD


This is the landscape version of the card. The greeting has been adhered to hang a bit below the front flap of the card.

SUPPLIES FOR THIS CARD

* Stamp sets - Courage & Faith an Hope & Prayer
* Card base - Pebbled Path
* DSP - 2023 - 2025 6” x 6” Designer series Paper - Pebbled Path 
* Greeting - Basic White cardstock  and Pebbled Path, each about 3” x 3”
* Ink - Pebbled Path
* Dies - Stitched Shapes - squares  that cut shapes about 2 3/4” square for mat and about  2 3/8” square for greeting
* Embellishments - 2023-2025 In Color Dots - 3 - Pebbled Path
* Adhesive
 

ENVELOPE FLAPS FUN FOLD CARDS


That is all for today. Thanks for stopping by. Until next time . . . 
Stamp Happy!

Kim


NOW THROUGH 30 JUNE 2023


Monday, June 13, 2022

SOMETHING OLD AND LOTS OF NEW! LET’S TAKE A LOOK AT A FEW NEW PRODUCTS FROM STAMPIN’ UP!®️

 Hi Stampers!

I decided to dust off a few stamp sets and dies I have not used in a while. My sample cards were created using the Daisy Garden background stamp, the Pansy Patch stamp set, and the Brilliant Wings dies. I chose to use black and white paired with bright colors for the color theme. I heat embossed the images. Let’s take a look at the cards.


To make the embossing process go smoothly I used the brand new EMBOSSINGS ADDITIONS TOOL KIT. Yes, the Embossing Buddy is back, and he brought a few friends with him! The tool kit includes the Embossing Buddy, Powder Pal, Crafting Tweezers, and a Crafting Brush. This kit will be available 1 July 2022 in the Stampin’ Up! July - December 2022 Mini Catalog! Here is a look at the kit:


For a peek at more items included in the July -December Mini, and the July - August Sale-A-Bration Brochure, be sure to page down to view the sneak peek video.

ORCHID OASIS BUTTERFLIES WITH BLACK AND WHITE


SUPPLIES
* Daisy Garden and Pansy Patch stamp set
* Brilliant Wings dies - cut 2 butterfly die cuts from the Glimmer Paper
* Basic Black cards base 8 1/2” x 5 1/2” scored and folded at 4 1/4”
* Basic Black cardstock cut at 3 3/4” x 5”
* 2022-2024 In Color 6” x 6” Glimmer Paper - Orchid Oasis
* Versa Mark, white embossing powder
* Adhesive & dimensionals 

BLACK & WHITE AND POLISHED PINK


SUPPLIES

* Daisy Garden and Pansy Patch stamp sets
* Polished Pink card base 5 1/2” x 8 1/2” scored and folded at 4 1/4”; and small scrap for greeting
* Basic Black cardstock 3 1/2” x 3 3/4
* Memento Tuxedo Black ink, Versa Mark, white embossing powder
* Black & White Gingham Ribbon - about 17 inches
* Adhesive, glue dot (for ribbon) and dimensionals

REAL RED WITH BLACK & WHITE

 
SUPPLIES

* Daisy Garden and Pansy Patch stamp sets
* Basic Black card base 8 1/2” x 5 1/2” scored and folded at 4 1/4”
* Real Red cardstock 5 1/4” x 4”  - embossed with Hive 3-D embossing folder
* Basic White cardstock cut at 5” x 3 3/4”
* Real Red ink, Versa Mark, black embossing powder
* Real Red Ribbon - about 17”
* Adhesive & dimensionals


STAMPIN’ UP! JULY- DECEMBER 2022 MINI CATALOG & SALE-A-BRATION BROCHURE SNEAK PEEK VIDEO


COMING 1 July 2022


The STAMPIN’ UP! JULY - DECEMBER 2022 MINI CATALOG goes live 1 July 2022! This catalog includes festive Christmas themed stamp sets, gorgeous autumn themed sets, and fun Halloween sets. The catalog also features stamp sets appropriate for occasions year round.  The catalog includes 8 product suites, lots of bundles, Designer Series Paper, embellishments, and so much more!

SALE-A-BRATION COMING 1 JULY 2022


Stampin’ Up!’s second round of Sale-A-Bration for this year begins 1 July and runs through 31 August. As always you can choose free items from the Sale-A-Bration Brochure with your Stampin’ Up! product purchases of $50 or more (excluding tax and shipping). There are 6 items to choose from that require a $50 purchase, and 3 items that require a $100 purchase. Plus, orders that total $300 or more (individual or workshop) will receive the Perfect Pomegranate stamp set, plus the usual Stampin’ Rewards, and Sale-A-Bration choices!!!

That’s all for today. I hope you enjoyed a small sample of new Stampin’ Up! products that will b3 available 1 July 2022. Thanks for stopping by. Until next time…
Stamp Happy!

Kim

All stamps and stamped images ©️1990 - 2022 Stampin’ Up!®️

Thursday, August 12, 2021

CREATE PRETTY NO LAYER CARDS WITH THE PANSY PATCH STAMP SET

 Hi Stampers!

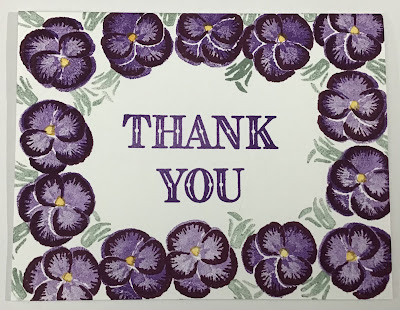
Some days I just want to stamp, and today was one of those days, so I created a quick and easy no layer card using the PANSY PATCH stamp set. This is one of my favorite stamp sets in the Annual Catalog. It is a Two-Step stamp set. The Two-Step stamping helps add depth and dimension making this stamp set perfect for a no layer card.  

PANSY PATCH STAMP SET


Here is my card:


SUPPLIES
* Basic White cardstock 8 1/2” x 5 1/2” scored and folded at 4 1/4”
* Inks - Gorgeous Grape, Rich Razzleberry, Mango Melody, and Soft Succulent
* Ornate Thanks stamp set for greeting

Here is another version of the card:


This version might not technically be a no layer card as the sentiment was stamped on a separate piece of cardstock and die cut with one of the Stitched So Sweetly Dies. There is a messy little secret underneath that sentiment!😉

SUPPLIES:
* Basic White cardstock 8 1/2” x 5 1/2” scored and folded at 4 1/4”
* Inks - Polished Pink, Mango Melody, and Soft Succulent
* Ornate Thanks stamp set
* Stitched So Sweetly Dies

HOW TO
To create the card select an ink color (or two) for the pansies and a color for the leaves and flower center.
* If using one color of ink, ink up the stamp, and stamp off once then stamp on the cardstock. Ink up the detail stamp and stamp on flower image. If using two colors of ink, stamp the floral image in the lighter color, and the details in the darker color. Stamp the pansy center with the Mango Melody or color of choice.


* Continue the process around the outer edges of the card.


* Stamp leaf images near the flowers with Soft Succulent ink, or color of choice.


* Stamp the greeting in the center of the card. This greeting is from the ORNATE THANKS stamp set. The greeting is actually one horizontal stamp, but I wanted the “thank you” to be a two line greeting, so I carefully cut the words apart. (This is is photopolymer stamp set)


What if you stamp the greeting and drop your stamp? No problem… just cover it up! Problem solved!


* On a scrap of Basic White cardstock stamp the greeting. Die cut the greeting with the Stitched So Sweetly Dies, and adhere it to the card base with dimensionals.

Here are both versions of my no layer card - well, a no layer card, and a sort of no layer card!


That is all for today. Thank you for stopping by. Until next time…

Stamp Happy!

Kim

All stamps and stamped images b©️1990 - 2021 Stampin’ Up!®️


Sunday, April 25, 2021

A CARD LAYOUT WITH OPTIONS & THE STAMPIN’ UP!®️ 2021-2023 IN COLORS

Hi Stampers, 

Today’s cards feature the Stampin’ Up! 2021-2023 In Colors, Polished Pink, Fresh Freesia, Pale Papaya, Evening Evergreen, and Soft Succulent. I used the In Color cardstock, DSP, and ink on all of the cards. Some of the cards are embellished with the 2021-2023 Gems. Other items available in all the new In Colors include, ink refills, Stampin’ Write Markers, Stampin’ Blends, and very pretty open weave ribbon. 

2021- 2023 IN COLOR CARDSTOCK

POLISHED PINK, PALE PAPAYA, FRESH FREESIA, EVENING EVERGREEN, SOFT SUCCULENT

Here is a look at the 2021 - 2023 IN COLOR DSP.  The package contains 40 sheets - you get 4 each of 2 double-sided designs in 5 colors.


Here are the cards I made with the In Color cardstock and the In Color DSP.


The basic card layout is a card base, a long rectangular piece of DSP on a cardstock mat, and a greeting. Die cut (or fussy cut) images and a few gems finish off the card. Change the length, width, or both to your liking. The placement of the matted DSP can also be adjusted more toward the center, just below the center, or just above it. The placement of the greeting is also flexible. That is what I like about this layout - lots of options!

Let’s take a look at each card individually.

POLISHED PINK:
This card is a CASE from the Stampin’ Up! 2021-22 Annual Catalog on page 21. I used different cardstock and different DSP. I also used an extra flower, and different gems.

SUPPLIES:
Stamp Set - Timeless Tropical plus he coordinating In the Tropics Dies
Card Base - Polished Pink 8 1/2” x 5 1/2” scored and folded at 4 1/4”
DSP - Polished Pink cut at 4 3/4” x 1 1/2” matted on a piece of Basic White cut at 4 3/4” x 1 3/4”
For the Greeting - Basic White cut at 2 1/4” x 1 1/4”
Scrap of Old Olive cardstock, and scrap of Basic White cardstock
Inks - Polished Pink and Old Olive
Embellishments - 2021-2023 In Color Gems
Dimensionals

FRESH FREESIA:
This card’s DSP layer is the same with as the previous card but I changed the length so that it runs the entire with of card.


Stamp Set - Pansy Patch and the coordinating Pansy Dies
Card Base - Fresh Freesia 11” x 4 1/4” scored and folded at 5 1/2”
DSP- Fresh Freesia 1 1/2” x 5 1/2” matted on a piece of Basic White that is 1 3/4” x 5 1/2”
For the Greeting -  Basic White 2 1/2” x 1 1/4”
Basic White cardstock to stamp pansies and leaves
Inks - Fresh Freesia, Polished Pink, Pale Papaya
Embellishments - 2021- 2023 In Color Gems
Dimensionals

PALE PAPAYA:
For this card I made the DSP panel a bit narrower. The image is one larger die cut, as opposed to several smaller ones.


Stamp Set - Hand - Penned Petals and coordinating Penned Flower Dies
Card Base - Pale Papaya 11” x 4 1/4” scored and folded at 5 1/2”
DSP - Pale Papaya 5 1/2” x 1 1/4” matted on Basic White cut at 5 1/2” x 1 1/2”
Greeting- Basic White 2 1/2” x 1 1/4”
Basic White cardstock to stamp image
Inks - Momento Tuxedo Black, Pale Papaya, Polished Pink, Soft Succilent
Embellishments - 2021-2023 In Color Gems
Dimensionals

EVENING EVERGREEN:
I paired Evening Evergreen with Crumb Cake to create this card. I stamped two of the feathers on Crumb Cake. For the third feather I used the “Reverse Stamping Technique.” See my 15 January 2021 post for instructions. I fussy cut the feathers as there are no dies for this image.


Stamp Set - Tasteful Touches, Greeting - Enjoy the Moment
Card Base - 8 1/2” x 5 1/2” scored and folded at 4 1/4”
DSP - Evening Evergreen 5 1/2” x 1 1/4” matted on Crumb Cake 5 1/2” x 1 1/2”
Greeting - Crumb Cake 3 1/2” x 3/4”
Crumb Cake cardstock for stamping the feather images 
Ink - Evening Evergreen
Embellishments - Gilded Gems
Dimensionals 

SOFT SUCCULENT:
To get multiple colors on the palm trees I used Stampin’ Write Markers ( Soft Succulent & Early Espresso) to ink my stamp. Once the image was stamped I used two more Stampin’ Write Markers (Soft Suede & Just Jade) to fill in white spaces and to add depth.


Stamp Set - Timeless Tropics; greeting - Pansy Patch
Card Base - Soft Succulent 8 1/2 x 5 1/2” scored and folded at 4 1/4”
DSP - Soft Succulent 5 1/2” x 1 1/4” on a Basic White Mat 5 1/2” x 1 1/2”
Greeting - Basic White 1 3/4” x 1”
Basic White cardstock to stamp trees
Inks - Soft Succulent, Stampin’ Write Markers - Soft Succulent, Early Espresso, Just Jade, Soft Suede
Embellishments - Metallic Pearls (silver)
Dimensionals

I really like all 5 new In Colors! They are fresh and can stand on their own or look great together. These new colors also work well with the 45 other Stampin’ Up! colors! I know you are going to love working with these great colors - the inks, the ink refills, the Stampin’ Write Markers, the Blends, the cardstock, the DSP, the gems, and the ribbon!  Perfect coordination!


The STAMPIN’ UP! 2021-2022 ANNUAL CATALOG goes live on Tuesday 4 May 2021. That is one week from Tuesday!


That is all for today. Thanks so much for stopping by. Until next time...
Stamp Happy!
Kim


All stamps and stamped images ©️1991-2021 Stampin’ Up!®️

If you do not have a Stampin’ Up! Demonstrator, I would love to be your demonstrator. I can help you order Stampin’ Up! products,  keep you informed about sales and special promotions, answer questions about products, and provide you with card making ideas. Just click on one of the catalogs in the right column of this post. It will take you to my Stampin’ Up website. Click shop, and you will be shopping with me!


Friday, April 9, 2021

STAMPIN’ UP!®️ 2021- 2022 ANNUAL CATALOG PREVIEW

 Hi Stampers,

We are about 3 1/2 weeks away from the premier of the Stampin’ Up! 2021 - 2022 Annual Catalog! 


This new catalog cover is beautiful, and wait until you see what is inside! There is so much to choose from! Open the cover and you will discover returning favorites and brand new offerings!

Whether you prefer elegance, simplicity, whimsy, or humor; this catalog has you covered! Looking for stamp sets to create feminine cards, masculine cards, kid cards, baby cards? This catalog has you covered! Are you looking for florals, botanicals, trees, birds, butterflies, dragonflies, animals? This catalog has you covered! Do you prefer the beach, the ocean, the mountains, the jungle or down on the farm? This catalog has you covered!  Do you prefer the sun...the moon... the stars? This catalog has you covered!

This catalog is full of color, texture, prints, and patterns! It is brimming with shiny embellishments, beautiful ribbon, terrific trims, gorgeous Designer Series Papers, fantastic specialty papers, and creative new packing products! 

If all of that is not enough, how about a brand new Christmas Suite and two new Holiday sets? And.... believe it or not... there is even more! Let’s take a peek at a little bit of what the new catalog has to offer!

THE 2021 - 2023 IN COLORS


POLISHED PINK, PALE PAPAYA, FRESH FREESIA, EVENING EVERGREEN, SOFT SUCCULENT


Aren’t these new In Colors beautiful? I love each and every one of them! What great additions to last year’s In Colors and the other four Stampin’ Up! color families. As always, the new In Colors can be found in Classic Stampin’ Pads, Stampin’ Write Markers, Ink Refills, Stampin’ Blends, cardstock, DSP, ribbon, and embellishments! 

Now, let’s take a look at a few stamp sets premiering in the new annual catalog. First up - SPIRAL DYE,

SPIRAL DYE


I was excited to see this great background stamp! It reminds me of the tie dyed t-shirt we would make when I was growing up in the 70’s! Immediately card ideas began streaming through my head!  I have two sample cards to share with you today. 

For this first card I simply stamped the image on Basic White cardstock using Memento Tuxedo Black ink. I trimmed the piece down to 3 /4” x 5”, and mounted it on a 5 1/4” x 4” piece of Poppy Parade cardstock, then mounted the entire piece on a Basic Black card base. The greeting is from the LOVELY YOU stamp set, which is carrying over into this new catalog. I used the DOUBLE OVAL PUNCH to cut out the greeting and for the Poppy Parade mat. This punch is in the current mini catalog, and is also featured in the new annual catalog.


Another thing that excited me about this background stamp was I knew there had to be a way to stamp more than one color of the image on the same piece of cardstock - and there sure is! This tip is found right in the new catalog. It is so easy! Using the Stamparatus, ink up the stamp and stamp the image on cardstock. Now - turn the cardstock 180 degrees. (In other words make the top side the bottom side and vice-Versa.) Ink up the stamp in the second color and stamp. The resulting image is a fun image for card backgrounds. Below is a card I made using this technique.


I think the background makes this such a fun card! First I stamped the image in Mango Melody on Basic White cardstock. Next I stamped the image using Bermuda Bay. This panel was mounted on Basic Black cardstock, the put on a Bermuda Bay card base.The greeting is from another new stamp set called PARTY PUFFINS.

PARRY PUFFINS


I love the Zany Zebras stamp set in the current annual catalog! I’ve made a lot of fun cards using that set. This year along comes the PARTY PUFFINS stamp set! It is just adorable, and the set contains some great sentiments. I look forward to creating lots and lots of fun cards with this set! Let’ take a peek at two cards I made using Party Puffins.


This card was really easy to make. The card base is Pumpkin Pie. I stamped the greeting directly onto the card base using Memento Tuxedo BlCk ink. I stamped the puffins on Basic White cardstock, added some color with Stampin’ Blends, and used the Layering Circle Dies to cut them out. I matted them on other circles die cut from Daffodil Delight, Bermuda Bay, and Granny Apple Green cardstock. 


Here is one more Puffins card I made. I stamped the images on Basic White cardstock, added color with Stampin’ Blends, and fussy cut the images. The card base is Mango Melody. The DSP is the 6” x 6” Designer Series Paper - Brights Collection. This is a retiring item from the current annual catalog.

Let’s move on to a pretty floral stamp set, PANSY PATCH. It is absolutely beautiful. The stamp set can be purchased in a bundle with the coordinating PANSY DIES. (You can also purchase the items separately.) This bundle is also a part of a suite that includes DSP and little bee embellishments.

PANSY PATCH


PANSY DIES

The dies allow you to cut out your stamped pansy and leaf images. Other dies cut out images from cardstock so you can build your own pansy. The coordinating 12 x 12 DSP features designs that can be die cut with the outline dies.

Here is the first card I made using the PANSY PATCH stamp set. The FRESH FREESIA gingham DSP is from the coordinating PANSY PETALS DSP.


This card features another design from the PANSY PETALS DSP. The card base is the new SOFT SUCCULENT IN COLOR. The mat for the DSP is the new IN COLOR, EVENING EVERGREEN.


CATALOG PREVIEW - THE VIDEO


THE STAMPIN’ UP! 2021 - 2022 ANNUAL CATALOG SALES PERIOD BEGINS 4 MAY 2021!


That’s it for today! Until next time...

Stamp Happy!
Kim

All stamps and stamped images ©️1990 - 2021 Stampin’ Up!®️