Showing posts with label Die Cutting. Show all posts

Saturday, October 5, 2024

IT’S WORLD CARD MAKING DAY - LET’S MAKE A MULTI- WINDOW CARD TO CELEBRATE!

Hi Stampers!

Today is the first Saturday in October, and that means today is World Card Making Day! I thought we’d celebrate by creating a multi-window card. It’s easy. Let’s take a look at the sample cards:


Multi-window cards are easy to make and are very versatile. There are dies available that cut out multiple windows, but you can get the same or similar look with basic shaped dies or even punches. I chose 3 windows of the same size for each card, but more windows can be added and the sizes can be different. The images and sentiment chosen will help determine the sizes of the windows. Remember, it is okay to use just part of an image.

The circles I die cut from the focal panel were placed back in the windows either popped up on dimensionals, or adhered to the card base with the focal panel popped up. The die cut pieces can be omitted if you like.  Frames around the windows can add that little extra something to the card. Simply place the die used for the window on the cardstock and place a die that is 1/4” larger in diameter around it, and cut. Punches can be used in the same way. Punch the smaller shape first, then place the larger punch around the hold, and punch again to create the frame.

VIDEO
LET’S MAKE A MULTI-WONDOW CARD


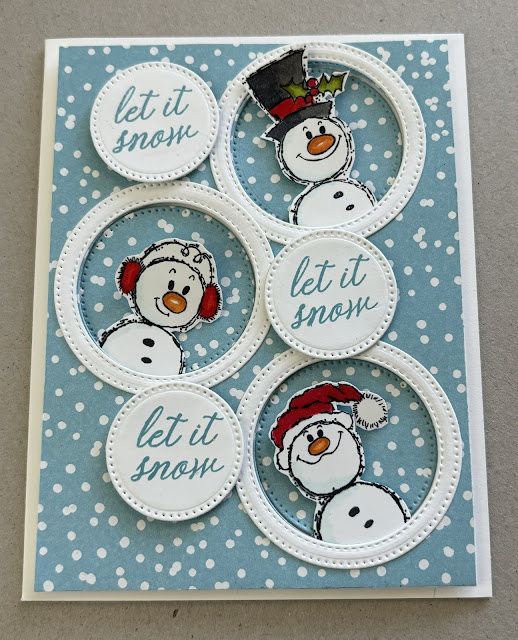
LET IT SNOW CARD


SUPPLIES I USED
* Stamps - Bubble Snowmen (Woodware Craft Collection). SparklingSnowflakes (Stampin’ Up!®️ - retired); Holiday Cheer (Waffle Flower)
* Card base - white cardstock (Basic White - thick) 8 1/2” x 5 1/2” scored and folded at 4 1/4”
* Focal panel - white cardstock (Basic White) and blue (Balmy Blue) patterned paper with snow-like pattern - use what you have, cut at 5 1/4” x 4”; put adhesive along the edges of the white cardstock and place the blue patterned paper on top.
* Other cardstock - white for frames, sentiments, and for stamping images
* Dies - Stylish Shapes (Stampin’ Up!) - circle dies - 1 3/4” diameter for windows; 2” + 1 3/4” diameter for frames, and 1 1/4” for sentiment
* Inks - Memento Tuxedo Black, Balmy Blue; Stampin’ Blends - Real Red, Poppy Parade, Old Olive, Granny Apple Green, Pumpkin Pie, Smoky Slate, Badic Black, Pool Party
* Temporary adhesive, liquid glue or adhesive of choice, and dimensionals

ASSEMBLY
* Cut 3 windows from the focal panel save the die cut patterned paper circles
* Die cut or punch out the frames and the circles for the sentiments
* Prepare the images and stamp sentiments.
* Put temporary adhesive on the focal panel, center it on the card front, and press.
* Place adhesive on back of die cut patterned paper and put these pieces in the windows.
* Remove panel, add frames to panel, put dimensionals on the back of panel, Arrange and attach snowmen to panel putting dimentionals behind each snowman head;  adhere this to card front.
* Adhere sentiments.
* Stamp inside the card

MAGICAL BIRTHDAY CARD


SUPPLIES I USED
* Stamps - Majestic Unicorn and dies (Trinity Stamps), Pirates & Mermaids (Stampin’ Up! - retired)
* Card base - Teal-blue cardstock (Tahitian Tide - retired) 8 1/2” x 5 1/2” scored and folded at 4 1/4”
* Focal panel - white cardstock cut at 5” x 3 3/4”
* Inside panel - white cardstock cut at 5” x 3 3/4”
* Other cardstock - white for stamping images
* Inks - Distress Oxide - Picked Raspberry, Salty Ocean, Squeezed Lemonade, Twisted Citron; Memento Tuxedo Black; Stampin’ Blends - various colors
* Blending tool of choice
* Circle Die - 1 3/4” diameter (Stylish Shapes- Stampin’ Up!)
* Adhesives and dimensionals

NOTES
* Use the Distress Oxide inks and blending tool to add color to the focal panel.
* This card is assembled as the previous card, except the only dimensionals used were for the back of the sentiment.

VIDEO CARD


SUPPLIES I USED
* Stamps - Silly Santas and dies (Simon Hurley) and Holiday Cheer (Waffle Flower)
* Card base - red (Poppy Parade) - 8 1/2” x 5 1/2” scored and folded at 4 1/4”
* Focal panel and inside panel - white cardstock, both cut at 5 1/4” x 4”
* Other cardstock - white and red for stamping and die cutting
* Circle dies - 1 1/4”  diameter
* Embossing folder - Snowflake Sky (Stampin’ Up!)
* Adhesives and dimensionals 

NOTE
* For focal panel - cut windows, then put panel and die cut circles in embossing folder and emboss.
* Assemble in same manner as snowmen card.

AUGMENTED VIDEO CARD


I added frames to the card. I think the frames add a lot of definition and dimension. For the frames I used a 1 1/4” an 1 1/2” diameter circle dies (Stylish Frames - Stampin’ Up!).

MULTI-WINDOW CARDS

Thank you for stopping by today. I hope you have the opportunity to create at least one card today to celebrate World Card Making Day! Until next time . . .

Stamp Happy!

Kim

SUPPLY SOURCES
I list supply sources as a resource only. I am not affiliated with nor do I receive compensation from any company or other entity.

CARDSTOCK
* I use Stampin’ Up! cardstock. All colors used are current unless otherwise noted in supply lists.

INKS
* I use mostly Stampin’ Up! inks. All colors are current unless otherwise noted.
* For one card in today’s cards I used Distress Oxide inks. They are readily available from a number of online sites and craft stores.

STAMPS
* Stampin’ Up!   Current stamps can be viewed HERE
* Bubble Snowmen (Woodware Craft Collection); Holiday Cheer (Waffle Flower), Silly Santas (Simon Hurley), Majestic Unicorn (Trinity Stamps) - all were purchased through Scrapbook.com HERE. These products are also available through other online outlets.


Tuesday, September 10, 2024

THE JOY OF SCRAPS FOR HOLIDAY CARDS - A STAMP HAPPY HOLIDAYS POST

Hi Stampers!

Many of you know, I have a lot of scraps. I have fewer now than I did a few months back, but I still have a lot of scraps! I decided to make a dent in my scrap specialty paper folder and my cardstock scrap folder . Most of my specialty paper scraps were smaller, so I decided to pair these scraps with alphabet dies.I cut multiple letters (J, O, &Y’s) from the specialty paper and the cardstock. The result? I have 6 more Christmas cards for my stash! Let’s take a look at the cards:


VIDEO
THE JOY OF SCRAPS FOR HOLIDAY CARDS


JOY SQUARED


Each of these cards is 4 1/4” square. My letters are just over 2” tall. Each card is similar yet very different.
I am listing supplies and cutting measurements, but your measurements will vary depending on the height of your die cuts, and I encourage you to use supplies you have on hand.

If you do not have alphabet dies you could substitute die cut or punched images such as bells, ornaments, reindeer (silhouettes), trees, etc. 

NOTE - If you have a die cut machine or plan to purchase one, consider investing in an alphabet die set. I believe classic alphabet die sets and basic shapes nesting dies give you a lot of options and versatility, as opposed to stamp set specific dies.

Look through your specialty papers, and see what you might have! I found nice scraps of foiled papers, lots of metallic, glimmer papers, even some velvet paper, wood grained paper, cork, etc. For these cards I decided to select all things shiny.

CARD BASE & INSIDE PANEL
For each of these cards the base measures 8 1/2” X 4 1/4” scored and folded at 4 1/4”. The inside panels are cut from white cardstock at 4” x 4”.

STACK THE DIE CUTS
* For 4 of the cards dimension was added by cutting out multiples of each letter - 1 of the specialty paper and 3-4 from cardstock. I glued the cardstock die cuts together, then glued the specialty die cut letter on top. The stacked letters were adhered to the card. 

JOY SWIRLS


SUPPLIES I USED
* Card base - green cardstock (Shaded Spruce)
* Inside panel - white cardstock (Basic White)
* Alphabet die cuts - foil paper (Real Red) and red cardstock (Cherry Cobbler) - stack the die cuts of each letter
* Stamp set - (any “swirl” stamp will work) I used Stylish Christmas (retired)
* Ink - Versa Mark or other embossing ink; gold embossing powder
* Alphabet dies - mine are just a bit over 2” tall (Large Alphabet Dies)
* Gems - Red - 5
* Liquid adhesive

SHAKER JOY


SUPPLIES I USED
* Card base - white (Basic White - thick)
* Gold foil cardstock- 4 1/4” x 2 3/4” for focal panel
* Green foil cardstock (Granny Apple Green) for letters
* Green cardstock (Granny Apple Green) for letters
* Window sheet (acetate) - small piece to trace outside of the letter “O” and cut out two
* Sequins - silver and gold
* Liquid adhesive

FOR SHAKER “O” - glue one piece of the window sheet to the back of a cardstock  “O”. Trim any excess window sheet. Next add another two “O” die cuts. Place a few sequins in the center of the “O” then adhere the other piece of window sheet to the back of the die cut stack. Turn the stack over and add the green foil die cut. This creates a micro-mini shaker element for the card.

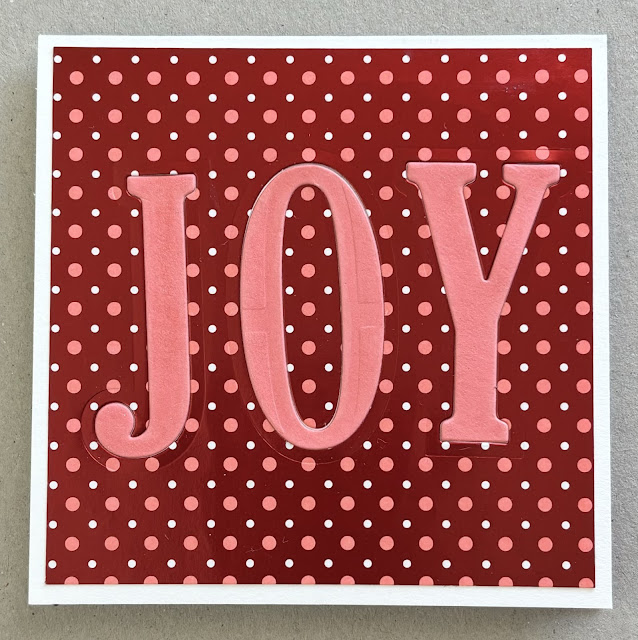
INLAID JOY


For this card I used a negative die cut, and used die cut letters for an “inlaid” look. The negative die cut serves as a mat layer, and believe it or not it was a scrap. The piece I cut it from was 12” x 5” and I was so happy to use it for this card and another card in this group. I am learning to enjoy using up paper. Once upon a time I felt I had to save it forever or use it sparsely! Why???😁

SUPPLIES I USED
* Card base - white (Basic White -thick)
* Mat layer - Red patterned foiled paper 4” x 4” - die cut the word “JOY” from the paper, keep the center of the “O”, center the dies from left to right and top and bottom. Adhere this piece to the card base
* Cardstock for letters - coral-pink color (Flirty Flamingo). Adhere the die cut letters in play on the card, adhere the center of the “O”.
* Adhesive
* Wink of Stella (clear) -brush on die cut layers.

A-2 SIZED JOY


CARD BASES FOR THESE CARDS - 8 1/2” x 5 1/2” scored and folded at 4 1/4”
INSIDE PANELS - white cardstock (Basic White) cut at 5 1/4” x 4”

TEXTURED JOY


SUPPLIES I USED
* Card base - coral pink color (Flirty Flamingo)
* Red patterned foiled paper - 5 1/4” x 4” - along 4” side score on back side of paper at 1/4”, 1/2”and 3/4”, 2 3/4”, 3”, 3 1/4”, 3 1/2”, and 3 3/4”.
* Mat - Flirty Flamingo cardstock cut at 3 1/2” x 2 1/4”. On the right side of the cardstock, score along 
2 1/4” side at 1/4”. 1/2”, 3/4”, 1”  1 1/4”, 1 1/2”, 1 3/4”, and 2”. (Every 1/4”)
* Letters - cut 1 each from patterned foil paper, cut 3-4 of each letter from Flirty Flamingo cardstock. Stack the letters.
* Center the stacked letters on the mat. Adhere to,panel with dimensionals. Adhere this panel between the two sets of score lines.

NEGATIVE JOY


Black is not a color we usually go to for Christmas cards, but the color can add a very elegant or a bold look to a card. I was not certain how I felt about this card at first. It is growing on me. In -lace of black, navy blue or a deep red or deep green would all look pretty too. The shimmer paper scrap was actually cut with the corners rounded. I am not sure what I had planned to use it for, but I am glad I saved it for this card, and the die cut letters were used for the next card you’ll see.

SUPPLIES I USED
* Card base - black (Basic Black)
* Focal piece - white iridescent shimmer paper 4” x 3” round corners, center “JOY” dies on paper and cut. Save center of “O” for card. Use die cut letters for another card
* Stamp Set - (Joy to the World) from Stars Are Shining 9retired
* Ink - Versa Mark or other embossing ink and white embossing powder
* Place the JOY panel on the card base to gauge where to emboss the sentiment. Emboss the sentiment, then adhere the panel. Remember to add the center to the “O”.

SHIMMER JOY


SUPPLIES I USED
* Card base - royal blue (Starry Night)
* Saved die cut letters from card above plus 4 of each cut from white cardstock for stacking
* Embossing Folder - Snowflake Sky
*Iridescent snowflake embellishments -11
* Adhesive
NOTE - Emboss the card front by placing the card front in the embossing folder right to the scored center fold and emboss.


JOYFUL SCRAP CARDS


Today’s cards are simple, but festive. The shine and glimmer give them a celebratory feel! It is hard to believe all this JOY came from scraps! I truly believe as card makers we need to put our supplies to use - including our scraps! No more collecting, it’s time for creating! So, look through your stashes, and be amazed at JOY you might find!

Thank you so much for checking in today. Until next time . . .
Stamp Happy!

Kim

I list supplies and resources for reference only.

Supplies for today’s cards are from Stampin’ Up!®️
* Cardstock colors are current with the exception of Starry Sky
* Specialty Papers - Gold Foil is still available as is silver. Various colors of shimmer paper are available, including red, several shades of green, and white.
* Large Alphabet Dies - retired
* Stamp sets - Stylish Christmas and Stars Are Shining - retired. ©️1990-2024 Stampin’ Up! ®️

Where to find 2” Alphabet Dies
Sizzix - Tim Holtz, Alphanumeric - Bulletin

There are several other sources offering 1 1/2” alphabet dies by several different manufacturers.


Wednesday, June 26, 2024

LET’S MAKE WAVES! SIMPLE WAYS TO CREATE AN OCEAN ON CARDS

Hi Stampers!

Summer is officially here, and it’s beach time!!! One of my favorite places to be is a beach! I enjoy sitting in the sand just watching the ocean. Once upon a time a trip to the beach was an almost daily occurrence. My husband was in the Air Force and received an assignment at Hickam Air Force Base in Hawaii. Our son was two years old when we moved to Honolulu. When my husband was reassigned to a base located on the plains of Texas our son was a bit perplexed. He thought trips to the beach were a normal part of everyone's life. So, what does any of this have to do with card making? Not a lot, but it is part of the inspiration for today’s cards.

Today’s cards all feature a depiction of the ocean created using 5 different methods. You likely have the supplies and tools needed to create an ocean scene with at least one of these methods. Let’s take a look at the cards:


NOTE - At the end of this post you will find links to some of the products I used to create my cards.

VIDEO
LET’S MAKE WAVES! 
SIMPLE WAYS TO CREATE AN OCEAN ON CARDS


USE A STAMP AND INK


WHAT YOU NEED
* INK - 2 colors blues, greens, etc. - whatever color you want your ocean, and the sky
* TOOLS - blending brush / brushes or sponge daubers /sponges
* STAMP - a stamp that resembles waves - scallop design or other design that resembles a rolling wave - look through your stamps especially sets that are ocean or beach themed, boat or ship themed, fish or sea creature themed.
* FOCAL IMAGE - I chose this image from the Sunny Fun stamp set from Stampin’ Up! (retired). Other ideas - a sail boat, dolphin / porpoise, whale, swimmers, etc.
* SENTIMENT
* OTHER - Markers, water colors, colored pencils, etc to add color to your image, die cuts (I added clouds), embellishments, etc
* CARD BASE - A-2
* MAT - 5 1/4” x 4”
* FOCAL PANEL - white cardstock  5” x 3 3/4”
* INSIDE PANEL - white or light colored cardstock 5 1/4” x 4”


TRY MASKING WITH INK BLENDING


WHAT YOU NEED
* INK - a color for the beach, 2-3 colors for the water, and a color for the sky; white gel pen, colored pencil, chalk marker, etc; 
* TOOLS - blending brushes or sponge daubers / sponges (use a very light touch)
* STAMP - sand stamp - little dots; stamps with this image are included in a variety of stamp sets I bet you have at least one, and most likely more than one!
* OTHER - masking paper or scrap paper with temporary adhesive or tape
* FOCAL IMAGE - I used Beach Girls from Rubbernecker Stamps. This stamp is no longer available. I found one on eBay, but it was sold. However, I found one similar that also has coordinating dies. You can find the link at the very bottom of this post.
NOTE - stamp focal image (s) first, then mask before creating the beach and water if images are stamped directly to the panel.
* OTHER STAMPS - other images you want to add to your beach scene
* CARD BASE - A-2
* FOCAL PANEL - white cardstock 5 1/4” x 4”
* INSIDE PANEL - white or light colored cardstock 5 1/4” x 4”

I had so much fun making the beach girls card, I made two more. Here they are:


USE PATTERNED PAPER FOR A QUICK AND EASY OCEAN


WHAT YOU NEED
* PATTERNED PAPER - look through your papers - hombre patterns, scallop patterns, wavy patterns, marbled look papers, color blocked papers, etc. I was surprised at all the “ocean-like” designs I found in my stash. 
* IMAGES - die cut or fussy cut images to build your scene
* STAMPS - for images and sentiment
* INKS
* CARD BASE - A-2 
* PATTERN PAPER - 5 1/4” x 4”
* INSIDE PANEL - white or light colored cardstock 5 1/4” x 4”

CREATE WAVES WITH BORDER DIES


WHAT YOU NEED
* OCEAN WAVES - I used 3 pieces that are 4 1/2” x 1” and a border die that can mimic waves
* STAMPS -for focal image and sentiment
* CARD BASE - A-2 
* CROSS PIECE - contrasting cardstock  5 1/2” x 2 1/2”
* FOCAL MAT - darker color 5” x 3 3/5”
*  FOCAL PANEL -  4 1/2” x 3 1/4”
* INSIDE PANEL - white or light colored cardstock 5 1/4” x 4”
NOTE - place border die along the top of the 4 1/2” side of one piece of cardstock, repeat with other two pieces of cardstock. Start with the top piece.laying face up on work surface. Put adhesive along the top of another die cut piece. Adhere it toward the bottom of the first die cut. Repeat process with third die cut. Adhere to card focal panel. You might need to die cut more strips of cardstock depending on how much “ocean” you need.  

USE AN EMBOSSING FOLDER FOR STAND OUT WAVES


WHAT YOU NEED
* PAPER - patterned paper or cardstock 3 3/4” x 2 3/4” (for my card)
* EMBOSSING FOLDER - any folder that gives the illusion of water, waves, etc. I used Beach Wave by Darice. Page down to end of post to view source for this product.
* OTHER - stamps, inks, etc needed to complete your card
* CARD BASE - A-2
* FOCAL PANEL - printer paper 5” x 3 3/4” adhere to this embossed piece 3 3/4” x 2 3/4” and a piece for sand - 3 3/4” x 2 1/4”
* STRIP - patterned paper 2 1/2” x 3/4”
* INSIDE PANEL 5 1/4” x 4”

MAKING WAVES CARDS


There you have it, five ways I make waves for ocean and beach scenes! I encourage you to go through your tools and supplies and finds items you own you can use to make your own versions of  these sample cards.

Thank you so much for stopping by. Until next time . . .
Stamp Happy!

Kim

Most supplies I used to create my cards are from Stampin’ Up! ®️ Many are retired. 

Current Stampin’ Up! stamp sets used for these cards:

BEACH WAVES EMBOSSING FOLDER by Darice is available HERE

BEACH GIRLS STAMP by Rubbernecker (Now Brass & Bliss Craft Co.)
This stamp is no longer available, but a similar set and coordinating dies are available from Brass & Bliss.
View it HERE

You can find Tombow Removable Adhesive HERE

Thursday, April 6, 2023

USING NEGATIVES FOR POSITIVELY GREAT CARDS WITH NESTED FRIENDS

Hi Stampers!

Today we are going to use die cuts and their corresponding negatives (the cardstock from which the image is die cut) to create cards. This is a great way to use cardstock that you might usually toss. So . . . let’s take a look at these positively negative cards:


I used Stampin’ Blends to color the images on the cards. Normally when using Stampin’ Blends I use Memento Tuxedo Black ink as it works best with Stampin’ Blends (alcohol markers). There are several Stampin’ Inks that work equally as well when using blends to add color, Early Espresso is one of them. Stamping the image in Early Espresso gives a softer feel than stamping the image with the Memento Tuxedo Black.

NESTED FRIENDS STAMP SET


NESTED FRIENDS DIES


VIDEO
USING NEGATIVES FOR POSITIVELY GREAT CARDS


NESTED FRIENDS PETAL PINK


SUPPLIES FOR THIS CARD
* Nested Friends Bundle
* Card base - Early Espresso 8 1/2” x 5 1/2” scored and folded at 4 1/4”
* Focal image - Basic White cardstock 3 3/4” x 5”
* Scraps of Basic White and Early Espresso for sentiment and Pool Party for eggs
* Inks - Early Espresso, Petal Pink, Pool Party; Stampin’ Blends - Crumb Cake (light & dark), Old Olive (light & dark), So Saffron (dark); Stampin’ Write Marker - Early Espresso
* Blending Brush, sponge dauber, old toothbrush 
* Cane Weave 3D embossing folder
* Dies - Deckled Rectangles (3rd largest) and Stylish Shapes (smallest circle), Layering Circles Dies (2nd smallest)
* Linen Thread - about 30” to wrap around background an 14” for double bow
* Elegant Faceted Gems - 5, Petal Pink
* Adhesive, Dimensionals, glue dots, tape


NESTED FRIENDS GARDEN GREEN


SUPPLIES FOR THIS CARD
(Measurements for this card are the same as the card above.)
* Nested Friends Bundle
* Card base - Garden Green
* Basic White cardstock 5” x 3 3/4”
* Scraps of Pool Party and Garden Green for sentiment
* Inks - Early Espresso, Pool Party, Garden Green; Stampin’ Blends - Crumb Cake (light & dark), Old Olive (light & dark), So Saffron (dark); Stampin’ Write Marker - Early Espresso
* Blending Brush, sponge dauber, old toothbrush 
* Embossing Folder - Metal Plate 3D (I used the Time Worn Type EF for the card made in the video)
* Enamel Dots Essentials -   Crumb Cake -5
* Dies - same as fro previous card
* Baker’s Twine - Garden Green - about 30” plus about 14” for double bow
* Adhesive, dimensionals, glue dots, tape

NESTED FRIENDS MOSSY MEADOW


SUPPLIES FOR THIS CARD
* Nested Friends Bundle
* Card base - Mossy Meadow
* Basic White - 5” x 3 3/4”
* Scrap of Basic White to stamp and die cut bird
* Inks - Early Espresso, Pool Party; Stampin’ Blends - Crumb Cake (light & dark), Gray Granite (light & dark), Old Olive (light & dark), So Saffron (dark); Stampin’ Write Marker - Early Espresso
* Blending Brush, sponge dauber, old toothbrush 
* Rustic Metal Adhesive Dots - 5
* Adhesive, dimensionals

Thanks for stopping by! Look below for Stampin’ Up News. 
Until next time. . .
Stamp Happy!

Kim


COMING 2 MAY 2023, THE STAMPIN’ UP! 2023-2024 ANNUAL CATALOG!


The STAMPIN’ UP! 2023-2024 ANNUAL CATALOG will feature some brand new CORE COLORS as well as some returning favorites! Of course, with the addition of new colors, that means it is time to say good-bye to some colors. There is still time to stock up on inks, cardstock, and more in your favorite retiring colors - but hurry these items tend to go fast! Once they are gone, they are gone!

RETIRING COLORS

BRIGHTS                        REGALS                             2021-2023 IN COLORS
Mango Melody                Rich Razzleberry                 Polished Pink
Bermuda Bay                                                                Pale Papaya
Pacific Point                                                                  Evening Evergreen
                                                                                      Soft Succulent
NEUTRALS                    SUBTLES
Merry Merlot                   Blushing Bride
Soft Suede                        So Saffron
Sahara Sand                      Pear Pizzazz
                                          Mint Macaron


RETURNING COLORS          BRAND NEW COLORS
Lemon Lime Twist                    Azure Afternoon
Berry Burst                                Pecan Pie
Misty Moonlight                        Lemon Lolly
Pretty Peacock                           Bubble Bath                       
Blueberry Bushel  
Lost Lagoon
Fresh Freesia


New IN COLORS (from left to right) MOODY MAUVE, WILD WHEAT, BOHO BLUE, COPPER CLAY, & PEBBLED PATH.

*The STAMPIN’ UP! 2022-2023 ANNUAL CATALOG and the STAMPIN’ UP! JANUARY - APRIL 2023 MINI CATALOG retire on 1 MAY 2023. Below you will find links to PDFs of the retiring lists and sale prices. Savings on select items are up to 60%! 

LAST CHANCE (RETIRING) PRODUCTS SALE BEGINS 4 APRIL 2023


LINKS TO LISTS OF LAST CHANCE  (RETIRING) PRODUCTS LISTS