Showing posts with label Holiday Cheer. Show all posts

Monday, October 14, 2024

CREATING A BRIDGE FOLD CARD & CHANGING IT A BIT - A STAMP HAPPY HOLIDAYS POST

Hi Stampers!

It has been a while since I made a bridge fold card, so I thought I’d create a couple for today’s post. This fun fold card is easy to create. The bridge portion of the card can be placed at the top, bottom, or center of the card. It can be changed up a bit by angling the top of the card. The card can be all dressed up, but is a great fold for keeping things simple too. This card sits up on its own, so it is perfect for display. Best of all this card fits perfectly inside an A-2 sized envelope, so it is a perfect fun fold for Christmas cards! Let’s take a look at my sample cards:


VIDEO
CREATING A BRIDGE FOLD CARD 
AND CHANGING IT A BIT


BASIC BRIDGE FOLD CARD


CARD BASE
* Cardstock for card base - 8” x 4 1/4” scored along the 8” side at 1 1/4”, 2 1/2”, 5 1/2”, and 6 3/4”
* Cardstock for bridge - 5 1/2” x 1” - you can alter this a bit by changing the width from 1” 
to 3/4” or  1 1/4”

MEASUREMENTS FOR PATTERNED PAPER PIECES
* I cut my patterned paper for side panels to cover from top to bottom and left a small border on each side, so the panels are 4 1/4”x 1”. (For a border all around cut at 4 x 1”)
* I chose to cover the entire center panel with patterned paper. The paper is 4 1/4” x 2 7/8” (the space is 3” wide, but it fits better in the space by cutting off that 1/8”. (If you want a border around all sides cut at 4” x 2 3/4”.)
* For bridge, cut paper at 5 1/2” x 3/4” for a small border along top and bottom of bridge, or for border all around cut at 5 1/4” x 3/4”.

MEASUREMENTS FOR BACK PANEL
* This panel is for adding another greeting and room for signing your name.
* Cardstock - white or light color, cut at 4 1/4” x 3” to cover entire space, or 4” x 2 3/4” to leave a border

ASSEMBLY
* Fold on score lines - mountain, valley, valley, mountain.
* Adhere patterned papers and back panel.
* On back side of bridge, measure over 1 1/4” from the end and mark- do this on both sides
* Attach the bridge by placing adhesive from the edges of the bridge inwards, but going no farther than the 1 1/4” mark.
* Lay card flat, place left side of bridge on the base lined up with the lower left side and bottom of the card.
* Keep right side of bridge up off of card, push on left side of card down, hold in place. Line up right side of bridge along right side and bottom of card. The bridge is formed.
* Add focal image(s) and greeting.
* Add embellishments.


WARM & COZY BASIC BRIDGE FOLD CARD


SUPPLIES I USED FOR THIS CARD
* Card base and bridge - cardstock, Pool Party (Stampin’ Up!)
* Back panel _ Cardstockock - Basic White (Stampin’ Up!)
* Other cardstock - Pool Party and Basic White for greeting and focal image, scraps of Pool Party or white for die cutting to stack focal image and greeting.
* Patterned paper - Snow Pine Lodge (Simple Stories)
* Stamp - Snowmen (Crafter’s Companion) and coordinating die; Holiday Cheer (Waffle Flower) and coordinating die
* Ink - Tuxedo Black (Memento), Pool Party (Stampin’ Up), Versa Mark (Tsukineko); White Embossing Powder; Various  Stampin’ Blends (Stampin’ Up!) alcohol markers
* Embellishments - Loose White Snowflakes -7 (Stampin’ Up!)
* Adhesive - liquid glue

ANGLED TOP BRIDGE FOLD CARD


CARD BASE
* This is the only portion of the card that changes for the angled top version.
* Cut and score card base as directed for the Basic Bridge Fold Card.
* Along the 8” side of the card base on the left hand side measure down 1 1/4” and mark wit pencil.
* Do the same on the right hand side.
* Use a paper trimmer with a scoring blade and line up one of the pencil marks and the second score line in the cutting track. Cut. Do the same on the other side of the card.
* The top of the card should now be angled on the left and the right.
* Assemble the card as directed.

FAITHFUL ANGLED TOP BRIDGE FOLD CARD


SUPPLIES I USED FOR THIS CARD
* Card base and bridge - cardstock - Orchid Oasis (Stampin’ Up! - retired)
* Other cardstock - Basic White (Stampin’ Up) for back panel and to stamp focal images; scrap of Orchid Oasis for greeting; silver for star
* Patterned paper - see note below
* Stamps - All Ye Faithful (Stampin’ Up! - retired). Hope & Peace (Stampin’ Up! - retired) for greeting on back
* Star - punch or die
* Inks - Tuxedo Black (Memento), Smoky Slate (Stampin’ Up!) for greeting on back; Versa Mark (Tsukineko). Silver embossing powder; Alcohol markers - various colors (Stampin’ Blends)
* Embellishments - Tiny pearls - 7
* Adhesive and dimensionals

NOTE
I created my patterned paper. Here are the supplies I used:
* Basic White cardstock - just plain white cardstock 1/4 sheet cardstock (5 1/2” x4 1/4”)
* Distress Oxide inks (Tim Holtz/Ranger) Uncharted Mariner and Villainous Potion; Tuxedo Black (Memento)
* Blending sponges or blending brushes
* Spritzer filled with water
* Shimmer mist of choice - I used a mister and add 1/8 tsp or so of Perfect Pearls, the fill the mister with isopropyl alcohol (it dries faster and does not interact with the oxide ink) or water.

METHOD
* I used blending sponges and applied each color of the Distress Oxide inks randomly all over the cardstock. Add some of the black ink here and there. Yes, it is okay to mix the inks. Add more of the oxide inks if need be.  Lightly spritzed the ink covered paper with water. It doesn’t take a lot. Put the piece aside to dry or use heat tool to dry it. Spritz with the shimmer spray. If the paper curls there are a couple things to do about it. Put it under some weight for a while, like a stack of books or other object with a bit of weight. Or run the piece through a die cut machine. My paper did not curl, but I was very stingy with the amount of water I used. I just used enough to get a few spots to resemble far off stars in the night sky.

BRIDGE FOLD CARDS


Thank you so much for stopping by today. Until next time . . .
Stamp Happy!

Kim

Wednesday, October 2, 2024

STUCK FOR A CARD IDEA? GIVE THIS A TRY - A STAMP HAPPY HOLIDAYS POST

Hi Stampers!

Have you ever reached a point where you just cannot come up with an idea for a Christmas card (or any card) no matter how hard you try?  I have, many times! When I experience this challenge there is a strategy I use, and I am sharing that strategy today. I tried to come up with a snappy name or acronym, but was unsuccessful. It’s a simple 4 step strategy to help focus creativity by starting with a basic card layout  So, let’s get started. Here is a peek at my sample cards:


VIDEO
STUCK FOR A CARD IDEA? GIVE THIS A Try


MY 4 STEP STRATEGY

STEP 1 - KEEP IT SIMPLE

Start with a very basic layout. I chose this one for today’s cards.


This layout is for an A-2 size card (8 1/2” x 5 1/2” scored and folded at 4 1/4”). There is one panel (layer) that is 5 1/2” x 2 3/4” and centered on the card front. The card can be portrait oriented (above) or landscape oriented (below).


Instead of centering the panel, it can be placed closer to the top of the card (see photo below). This configuration leaves space for a greeting along the bottom of the card. This version of the layout can be turned to make it a portrait oriented card as well.


STEP 2 -USE YOUR FAVORITES

Select colors and images that are your favorites. These are colors and images are familiar and you feel comfortable with them.  Using them will help you relax and allow ideas to start coming to mind.

STEP 3 - DRESS IT UP

It’s time to focus on the panel. You can use cardstock, patterned paper, specialty paper, etc. This is also a good time to pull out those backgrounds you created but haven’t used. 

Add a bit more pizzazz
* Add texture with an embossing folder
* Spritz, sprinkle or spatter color 
* Stamp on it
* Blending brushes can be used to add soft color or color with no harsh lines
* Sponges and ink create definition and dimension by adding color along the edges of a panel 
* Add a border on each 5 1/2” side - for “how to” see SNOWMAN CHEER card 

STEP 4 -PUT IT ALL TOGETHER

Favorite color card base (yes, it can be white) + dressed up panel + favorite image (stamped or die cut, matted, etc) + greeting = a great card

MOOSE HOLIDAY CARD


INSIDE


SUPPLIES
* Card base - blue cardstock (Azure Afternoon) cut at 11” x 4 1/4” scored and folded at 5 1/2”
* Inside panel - white cardstock (Basic White) cut at 5 1/4” x 4”
* Panel - white cardstock cut at 5 1/2” x 2 3/4”
* Embossing folder - Snowflake Sky (Stampin’ Up!®️)
* Other cardstock blue and white for stamping and die cutting
* Stamp set - Christmas Friends ©️ Stampin’ Up! and coordinating dies
* Ink - Memento Tuxedo Black, Azure Afternoon; Stampin’ Blends - Azure Afternoon, Tahitian Tide (retired), Pecan Pie, Smoky Slate, Ivory
* Sentiment - Christmas Sentiments l from Scrapbook.com
* Die cut snowflakes -3 (can use punched ones)
* Adhesive and dimensionals

NOTE
* Color and die cut moose. Die cut 3-4 more moose shapes, stack them and adhere together. Adhere with glue or other adhesive to card front. 
* Adhere greeting to card with dimensionals.

SNOWMAN CHEER CARD


INSIDE


SUPPLIES
* Card base - Red cardstock (Real Red) cut at 8 1/2” x 5 1/2” scored and folded at 4 1/4”
* Inside panel - white cardstock cut at 5 1/4” x 4”
* Panel - green cardstock (Granny Apple Green) cut at 5 1/2” x 2 1/2” plus 1 strip of gold cardstock or gold foil paper cut at 5 1/2” x 3/4”. (See note)
* Sentiment cardstock - green cardstock cut at 2” x 1 3/4” gold cardstock cut at 2 1/4” x 2”
* Ink - Memento Tuxedo Black; Versa Mark, gold embossing powder; Stampin’ Blends - Pool Party, Pumpkin Pie, Old Olive, Real Red, Poppy Parade, Smoky Slate, Basic Black
* Stamps - Bubble Snowmen from  Woodware Craft Collection for image, and Holiday Cheer from Waffle Flower for sentiment
* Adhesive and dimensionals

NOTE
* For background panel I cut down a piece of 5 1/2” x 4 1/4” green cardstock I’d sprayed with Distress Oxide Spray - Tumbled Glass and Shabby Shutters. 
* Cut down this panel to 5 1/2” x 2 1/2”
* Cut the gold paper at 5 1/2” x 3/4” - cut this piece in half long ways. You will have 2 pieces that are 5 1/2” x 3/8”
* Place 5 1/2” x 2 1/2” piece face down. Place adhesive along the 5 1/2” sides of the green cardstock, place gold paper pieces face down along the edges of the green cardstock. This will form the gold edges along the green panel.

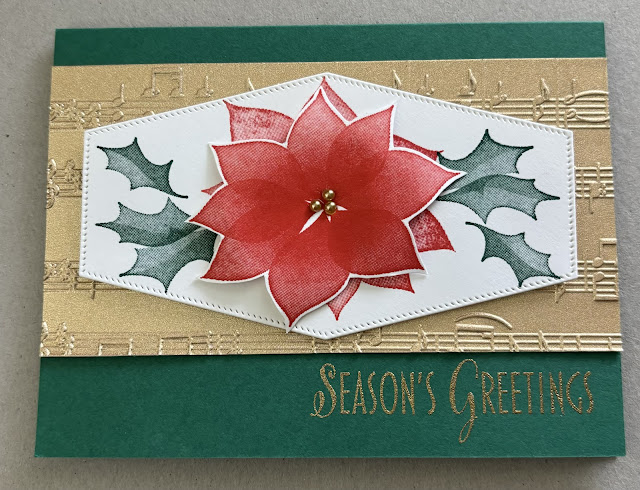
POINSETTIA GREETINGS CARD


INSIDE


SUPPLIES
* Card base - green cardstock (Shaded Spruce) cut at 8 1/2” x 5 1/2”scored and folded at 4 1/4”
* Inside panel - white cut at 5 1/4” x 4”
* Other cardstock - white for stamping and die cutting
* Panel - Shimmer paper - gold (or other gold paper) cut at 5 1/2” x 2 3/4”
* Embossing folder - Merry Melody (Stampin’ Up! - retired)
* Dies - Nested Essentials (Stampin’ Up!)
* Stamp Set - Stylish Christmas (Stampin’ Up! retired)
* Inks -Poppy Parade, Shaded Spruce, Wild Wheat, Versa Mark, gold embossing powder
* Embellishment - gold pearls, 3
* Ahesive and dimensionals


4 STEP CARDS


I hope this gives you a usable strategy for times when you are stuck for a card idea or design. For me this 4 step method is tried and true. Maybe it will become the same for you. Thank you so much for stopping by. Until next time . . .
Stamp Happy!

Kim

SUPPLY SOURCES
* I list supply sources as a resource for you. I am not affiliated nor do I receive compensation from any company or entity.

* Sources for stamps, dies, embossing folders, etc. are mentioned in the supply list for each card.

* Cardstock - I use Stampin’ Up! cardstock. All colors cited in supply lists are current 

* Inks - I use Stampin’ Up! inks and Memento Tuxedo Black. All colors cited in supply lists are current.

* Alcohol markers - I use Stampin’ Blends from Stampin’ Up! Colors cited in supply lists are current with the exception of Tahitian Tide. 


Tuesday, September 24, 2024

IT ALL STARTS WITH THREE - A STAMP HAPPY HOLIDAYS POST

Hi Stampers!

Have you ever run out of ideas for a card layout? I certainly do from time to time. One strategy I use to help me create a design is something I call “start with three.”  It is based on the rule of three.  This theory posits humans process information through pattern recognition, and 3 is the smallest number that allows for pattern recognition. We tend to see groups of 3 as pleasing to the eye and balanced. 

So, how do I practically apply this theory to my cards? Like I said, it starts with three - three images. They can be stamped or die cut, they can be the same image or different, whatever you want. The size of the images can help determine the card size. For example if the images are smaller they can be placed on a 4 1/2” square card, or a mini slimline cards. Larger images look better on A-2 cards or even a regular slimline card. Without using adhesive, place the images on the card to get an idea of what to use as a background. This also helps  to determine if other image might be added for balance and what sentiment to use. Before long the card layout is completed and you’ll find yourself wanting to make more cards!

Let’s take a look at my sample cards:


VIDEO
IT ALL STARTS WITH THREE 
A STRATEGY FOR CARD LAYOUTS


THREE BUBBLE SNOWMEN CARD


SUPPLIES I USED
* Card base Azure Afternoon cardstock 8 1/2” x 4 1/4” scored and folder at 4 1/4”
* Focal panel and inside panel - Basic White cardstock each cut at 4” x 4”
* Basic white cardstock for stamping and fussy cutting
* Inks - Distress Oxide - Tumbled Glass, Memento Tuxedo Black; Stampin’ Blends - Pumpkin Pie (light), Poppy Parade (light & dark), Lemon Lime Twist (light and dark), Smoky Slate (light and dark)
* Blending brush or sponge
* Stamp Sets - Bubble Snowmen, Holiday Cheer (sentiment)
* Embellishment - White Loose Snowflakes
* Adhesive. liquid glue, and dimensionals

ASSEMBLY
* Focal panel - use the Tumbled Glass ink and blending brush to add a bit of color to the center of the panel
* Inside panel - Use the Memento ink to stamp the sentiment and a snowman head. Color snowman’s nose with Pumpkin Pie Stampin’ Blend. Adhere to inside card
* On white cardstock stamp three snowmen, color with Stampin’ Blends, fussy cut and place dimensionals on back side. Adhere in place.
* With Memento ink, stamp the greeting.
* Adhere panel to front of card.
* Use small drops of glue to adhere snowflake embellishments to card front

HO HO HO! SILLY SANTA CARD


SUPPLIES I USED
* Card base - Poppy Parade cut at 8 1/2” x 4 1/4” scored and folded at 4 1/4”
* Focal panel and inside panel - Basic White cardstock 4” x 4” each
* Embossing folder - Snowflake Sky
* Basic White cardstock for stamping and die cutting, Poppy Parade cardstock for die cutting
* Ink - Poppy Parade
* Stamps set Silly Santa’s with coordinating dies
* Adhesive and dimensionals

ASSEMBLY
* Stamp the Santa image and sentiment on inside panel with Poppy Parade ink 
* Adhere inside panel to inside of card
* Emboss focal panel with embossing folder.
* Die cut Santa and Ho, Ho, Ho and background. Adhere the Ho Ho Ho to backgrounds with glue
* Adhere Santa and sentiment -pieces to focal panel with dimensionals
* Adhere card front to card base

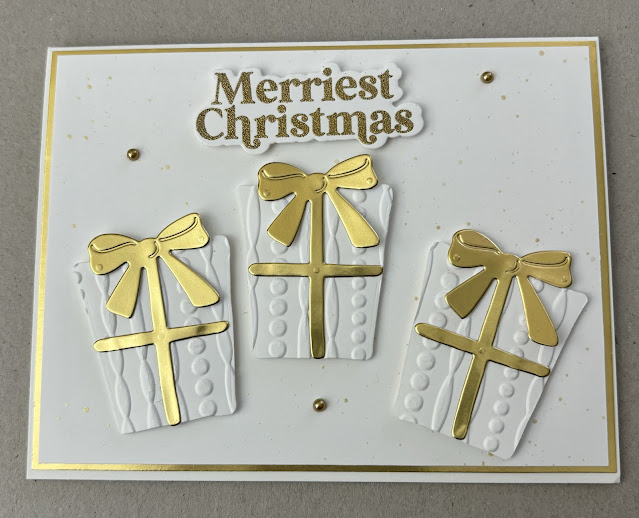
THREE GIFTS CARD


SUPPLIES I USED
* Card base - Basic White (thick) cardstock cut at 8 1/2” x 5 1/2” scored and folded at 4 1/4”
* Mat - Gold foil cut at 5 3/8” x 4 1/8”
* Folcal panel - Basic White cardstock cut at 5 1/4” x 4”
* Basic White cardstock and gold foil for stamping and die cutting
* Ink - Versa Mark, gold embossing powder, metallic gold watercolor
* Paint brush
* Stamps - Holiday Cheer and dies
* Other dies - Sending Cheer
* Embossing folder - no idea the name of this one, I’ve had it for a really long time. It is from Sizzix.
* Embellishments - Gold pearls -3
* Adhesive and dimensionals

ASSEMBLY
* For focal panel - use some water on paintbrush with gold metallic watercolor paint - ta- on paint brush with bone folder, pencil, or finger to create gold spatters on the white cardstock.
* If you like use a die to cut out center area of gold foil, then adhere focal panel to cover cut away area of gold foil.
* Stamp greeting with Versa Mark, cover with embossing powder, heat set.
* Die cut greeting, the gifts, and bows.
* Adhere bows to gifts.
* Use dimensionals to adhere gifts and greeting to card front.
* Add three gold pearls to card.


IT STARTS WITH THREE CARDS


The next time you are stumped for a card layout idea, remember - it all starts with three! Page down to find resource list for products used to create today’s cards. Thank you so much for stopping by today. Until next time . . .
Stamp Happy!

Kim

SUPPLY RESOURCES

STAMPIN’ UP!
* All Cardstock and Gold Foil (all colors are current)
* Stampin’ Blends (all colors are current)
* Poppy Parade Ink (current)
* Sending Cheer Dies (retired)
* Snowflake Sky Embossing Folder (current)
* White Loose Snowflakes (current)

SIMON HURLEY
* Silly Santa’s Stamp Set & Dies (current)

WAFFLE FLOWER
* Holiday Cheer Stamp Set & Dies (current)

WOODWARE CRAFT COLLECTION
* Bubble Snowmen Stamp Set (current)