Hi Stampers!
I have another Z Fold card for you today. It is called a Z Fold Panel Card, at least that is what I call it. The card has a look similar to last week’s Z Fold with a Band version, but is created a little differently. If you like layering and having plenty of areas to stamp on and decorate, this card is for you. If those things are not your favorite, this card can still be for you. Remember, it is always okay to take a card fold or design and do it your way! The card base is easy to create, but the card base measurements and scoring are not standard, and the design requires one 4 1/2” cut near the bottom of the card. It sounds scary, but it is not. We’ll walk through it together. Who knows? This just might become your favorite Z Fold! Let’s take a look at the sample cards:

VIDEO
Z FOLD PANEL CARD - LET’S GIVE IT A TRY
SUPPLIES NEEDED
* Cardstock for main card base, back panel, and back panel layer (white or light color)
* Cardstock and / or patterned paper to decorate card
* Stamps, ink, embellishments, ribbon, adhesives , etc.
* Trimmer with scoring blade (or stylish) or a scoring board and a bone folder or reasonable facsimile
MEASUREMENTS
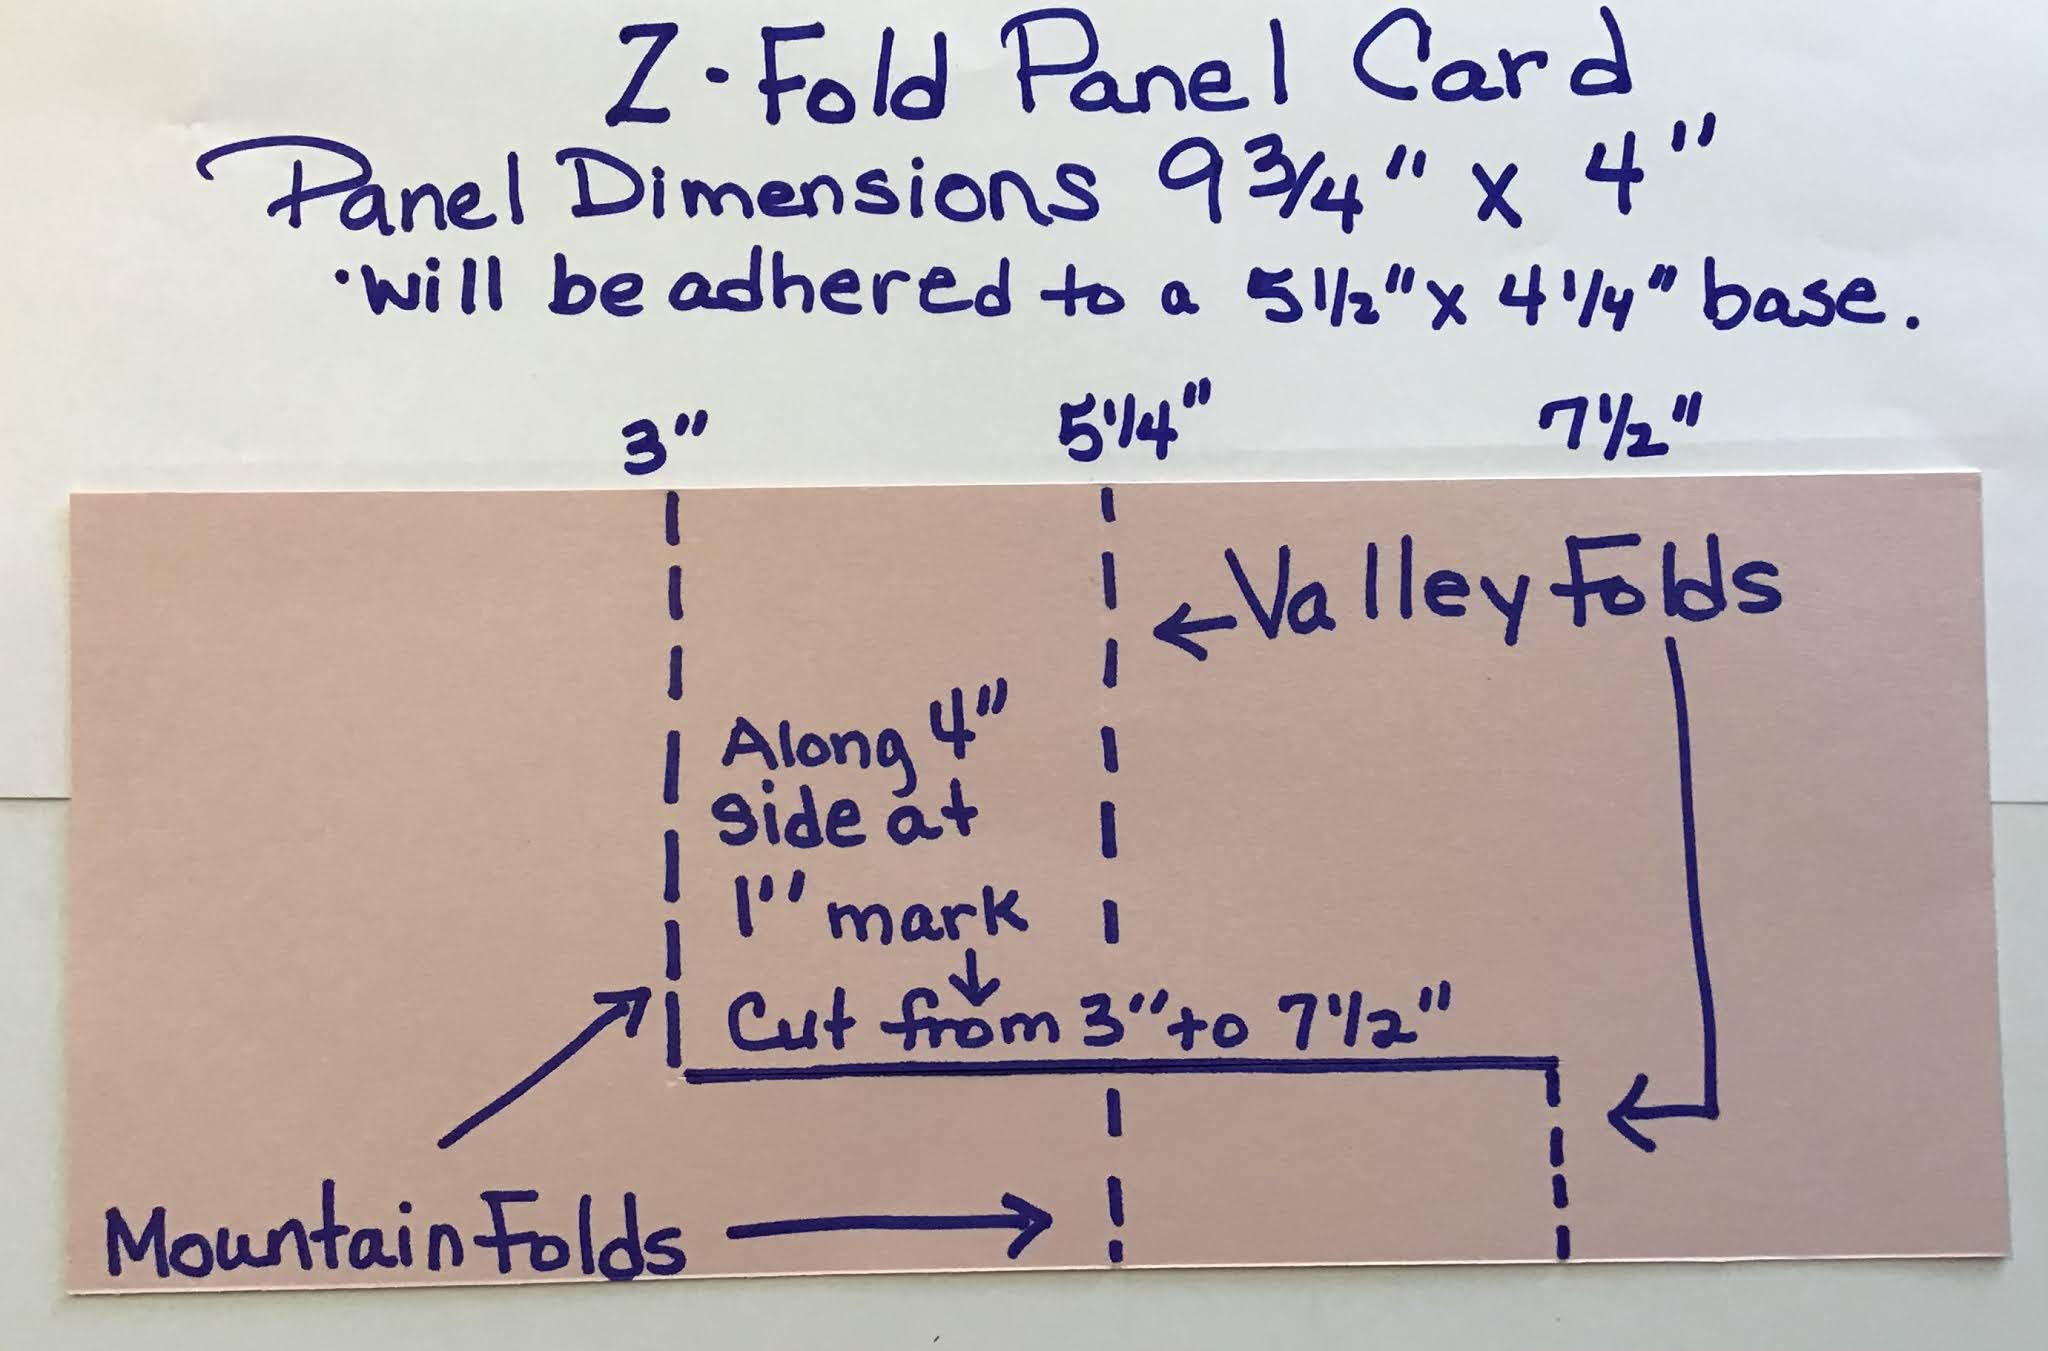
* Main Card Base - cut cardstock at 9 3/4” x 4”. See chart below for cutting and scoring instructions. I find it easier to make the cut first, then do the scoring.
* Back Panel - cut cardstock at 5 1/2” x 4 1/4” - this cardstock can be the same color as the main panel or use a contrasting color.
* Layer for Back Panel - white or light color cardstock cut at 5” x 3 3/4” (you can change to 5 1/4” x 4 if you like)
* Layers for Panel and Strip Areas of Card- the measurements for these pieces are listed in a chart below. I used a mat layer of cardstock (Layer 1 in the chart). topped with a layer of patterned paper ( Layer 2 on in the chart). There are several other options:
- Use only the cardstock - Layer 1
- Use only the pattern paper layer - Layer 2
- Use patterned paper only, but cut as for Layer 1
- Use cardstock only, but cut as for Layer 2
- Use cardstock for both layers (if you have some not so heavy cardstock layers is a great way to use it)
- Use patterned paper for both layers
- Use white or light colored cardstock for top layer - this option allows you to stamp directly onto the layer, color images, etc.
SCORING AND CUTTING DIAGRAM FOR MAIN CARD BASE


HAPPY BIRD-DAY Z FOLD PANEL CARD

* Card Base - Bermuda Bay cardstock (retired)
* Back Panel - Basic White cardstock
* Patterned Paper - (retired)
* Other cardstock - Coastal Cabana
* Stamps - Country Birdhouse and dies
* Ink - Bermuda Bay (retired); Blends - Pool Party, Summer Splash, and Bermuda Bay (retired)
* Embellishments - Heartstrings Glitter Enamel Dots (Simple Stories)
* Adhesive, dimensionals
BACK OF CARD

BUTTERFLY BIRTHDAY Z FOLD PANEL CARD

* Card Base - Basic White cardstock
* Back Panel - Petal Pink and Basic White cardstock
* Patterned Paper - (retired)
* Other cardstock - Basic White and Petal Pink
* Stamps - Beautiful Butterflies and dies, Birthday Wishes and dies (Waffle Flower)
* Ink - Petal Pink
* Adhesive and dimensionals
BACK OF CARD

CHRISTMAS WISHES FROM OUR HOME Z FOLD PANEL CARD

* Card Base - Pool Party cardstock
* Back Panel - Purples Smooth Cardstock (Scrapbook.com); Basic White
* Other Cardstock - Purples Smooth Cardstock (Scrapbook.com), Basic White
* Patterned Paper - Snow Much Fun (Doodlebug Design)
* Stamps - Farmhouse Christmas (retired), Star Snowflake Sentiments (Waffle Flower)
* Ink - Gorgeous Grape
* Ribbon - Gorgeous Grape Sheer Ribbon (retired)
* Embellishments - Crafty Things Glitter Enamel Dots (Simple Stories)
* Adhesive and dimensionals
BACK OF CARD

VIDEO CARD
BIRTHDAY TURTLE Z FOLD PANEL CARD

SUPPLIES
* Card Base - Pool Party cardstock
* Back Panel - Pool Party and Basic White
* Other Cardstock - Basic White
* Stamps - Sea Turtle, Happiest of Birthdays (retired), Birthday Wishes (Waffle Flower)
* Ink - Crumb Cake, Old Olive, Wild Wheat
* Adhesive and dimensionals
Z FOLD PANEL CARDS

That’s all for today. Thank you for checking in. Until next time . . .
Stamp Happy!
Kim
NOTE - Supplies are from Stampin’ Up!®️ unless noted otherwise.