Hi Stampers!
It is September! I cannot believe how quickly the summer went by! It is time to turn my attention to all things fall, and that means it is time to begin creating Halloween cards.This month I will share some Halloween card ideas in my STAMP HAPPY HALLOWEEN blog and video series. I will continue with my Stamp Happy Holidays Christmas card series as well.
As for Halloween cards, I do send them to several people, and I usually include a card with treat bags I hand out to my favorite “boos and ghouls.” So, let’s get started! Today I am sharing some stenciled backgrounds I created for some not so spooky Halloween cards. Let’s take a look;
VIDEO
STENCILING BACKGROUNDS FOR FUN HALLOWEEN CARDS
SPOOKY FORESTS CARDS
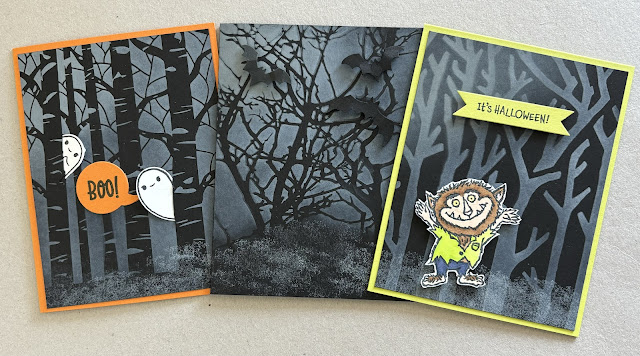
I used black cardstock and a gray ink (Weathered Wood - Distress Oxide) along with stencils to create spooky forest backgrounds for these cards. Technically I used “masks” to create the background for the cards on the left and the middle. The masked area remained the same color of the cardstock and created the image. The ink created the spooky darkness around the trees. I used a stencil for the card on the right. The trees were inked and the cardstock color was masked providing the darkness to surround the trees. Whether it is called a mask, stencil, or another name, you can get great results. Just be aware of what areas will be colored by the ink so you will be sure to get the results you are hoping for.
SPOOKY WOODS WITH BATS CARD
* Card base - Black cardstock (Basic Black) - cut at 8 1/2” x 5 1/2” scored and folded at 4 1/4”
* Focal panel - Black cardstock (Basic Black) - cut at 5 1/2” x 4 1/4”
NOTE - I adhered this panel to the front of the card base. If you’d rather, you can stencil the images directly onto the card front.
* Inside panel - White cardstock (Basic White) - cut at 5” x 3 3/4”
* Ink - Gray shade (Distress Oxide - Weathered Wood; Black ink and sentiment for inside
* Something to apply the ink - blending brushes, sponges, etc.
* Bat punch or dies and scraps of black cardstock - I used 3 bats
* Texture stamp to create the ground or you can use a sponge and “pounce”on the ink
* Stencil - Branches (Crafter’s Workshop)
* Adhesive and dimensionals
HAUNTED WOODS CARD
* Card base - Orange (Pumpkin Pie) cut at 8 1/2” x 5 1/2” scored and folded at 4 1/4”
* Focal panel - Black (Basic Black) - 5 1/2” x 4 1/4” - once inked, cut down to 5 1/4” x4”
* Inside panel - White (Basic White) 5’ x 3 3/4”
* Ink - Gray shade (Distress Oxide - Weathered Wood); Black (Memento Tuxedo Black)
* Something to apply ink - blending brush, sponge, etc.
* Ghost images - 2; use a stamp and punch, dies, or cut free hand; scraps of white cardstock (I used the Cutest Halloween stamp set and punch)
* Sentiment - Stamp or die cut letters and place on orange word bubble
* Texture stamp or sponging for ground
* Stencil -Aspens (The Crafter’s Workshop)
* Adhesive and dimensionals
WEREWOLF IN THE WOODS
SUPPLIES
* Card base - Yellow-green cardstock (Lemon Lime Twist) 8 1/2” x 5 1/2” scored and folded at 4 1/4”
* Focal panel - Black cardstock (Basic Black) cut at 5 1/2” x 4 1/4”, stenciled, then cut to 5 1/4” x 4”
* Inside panel - White cardstock (Basic White) cut at 5” x 3 3/4”
* Ink - Gray shade (Distress Oxide - Weathered Wood); Memento Tuxedo Black, Stampin’ Blends - Lemon Lime Twist, Night of Navy, Pecan Pie, and Natural Tones #800
* Something to apply ink - blending brush, sponge, etc.
* Texture stamp or sponge to apply ink to form ground
* Werewolf image or other spooky creature- witch, ghost, etc (I used Boo to You stamp set)
* Stencil - Bare Trees (this might be an old Stampin’ Up!®️ stencil)
* Sentiment - Yellow-green cardstock scrap
* Adhesive and dimensionals
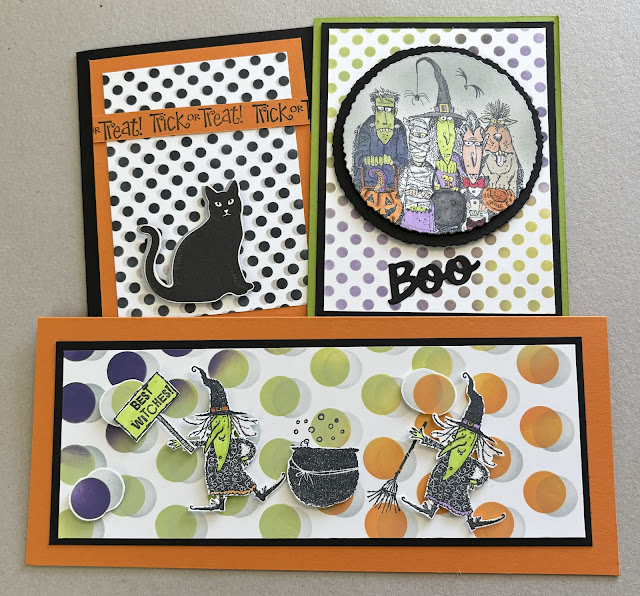
LOTS OF DOTS FOR HALLOWEEN
FRIGHTFULLY FUNNY POLKA DOTS CARD
* Card base - Green (Granny Apply Green) cut at 8 1/2” x 5 12” scored and folded at 4 1/4”
* Mat - Black (Basic Black) - 5 1/4” x 4”
* Focal panel - White (Basic White) - 5” x 3 3/4” - stencil this panel
* Inside panel - White (Basic White) - 5” x 3 3/4”
* Focal image mat - Black cardstock cut in 3 1/2” circle - scrap of cardstock for “BOO”
* Focal image - White cardstock, stamp and color, then cut into 3 1/4” circle; Stamp - Tableau of Terror
Note - for my circles I use the Deckled Circles Dies from Stampin’ Up!
* Inks - Memento Tuxedo Black; Gray Granite, Granny Apple Green, Gorgeous Grape; Silver gel pen; Stampin’ Blends - Night of Navy, Old Olive, Highland Heather, Pumpkin Pie, Smoky Slate, Parakeet Party, DAFFODIL delight, Basic Black, Real Red, Bubble Bath, Crumb Cake, Ivory, Natural Tones 900
* Blending brush, sponge, etc
* Stencil - Small circles or polka dots 1/4” diameter (mine is from Stampin’ Up!)
* Adhesives and dimensionals
DOTS AND WITCHES SLIM LINE CARD
* Card base - Orange (Pumpkin Pie) - cut at 9 1/4”x 8” scored and folded along the 8” side at 4”
* Mat - Black (Basic Black) - 8 1/2” x 3 1/4”
* Inside panel - White cardstock (Basic White) 9” x 3 3/4”
* Focal panel - White (Basic White) 8 1/4” x 3” Start with a piece larger than the panel. I started with an 8” x 8” piece of cardstock, stenciled it, then cut it down to the correct side. Then I cut out 3 of the “shadowed circles to use as embellishments.
* Inks - Memento Tuxedo Black, Gorgeous Grape, Granny Apple Green, Pumpkin Pie; Stampin’ Blends - Parakeet Party, Highland Heather, and Pumpkin Pie
* Images - Halloween Hoot stamp set, use images of your choice
* Stencil - large dots 5/8” diameter (Stampin’ Up!)
* Adhesive and dimensionals
* CARD BASE - Black cardstock (Basic Black) - 8 1/2” x 5 1/2” scored and folded at 4 1/4”
* Mat - Orange cardstock (Pumpkin Pie) - 5” x 3 3/4”
* Inside Panel - White cardstock (Basic White)
* Focal Panel - White cardstock (Basic White) -start with 5 1/4” x 4” piece, stencil, then cut down to 4 1/2” x 3 1/4”
* Cat image - I punched this image from patterned paper, then I punched the image from light gray cardstock (Smoky Slate) I adhered the gray piece off set behind the cat to form a shadow. Use an image of your choice. You can stamp an image on a die cut circle, then shadow it with a gray die cut circle of the same size.
* Greeting - Mine is from Best of Halloween and is stamped on a strip of orange cardstock (Pumpkin Pie) that is e 3/4” x 1/2”
* Ink - Memento Tuxedo Black, Smoky Slate
* Adhesive and dimensionals
HOW TO CREATE THE SHADOWS
1. Place the stencil on the cardstock, and secure it.
2. Use a lighter color ink and apply over the cardstock with a blending brush, sponge, etc.
3. Carefully move the stencil over to the right (or left) just a smidge. The stenciled circles should be partially seen through the opening in the stencil.
4. Now apply the other color(s) of ink to the panel.
5. Remove the stencil and the dots (or other image) will have a shadow.
SPOOKY HALLOWEEN STENCILING!
 |
That’s all for this first Stamp Happy Halloween episode. Join me next week and we’ll create a free standing fun fold card. Until next time . . .
Stamp Happy!
Kim
SUPPLY SOURCES
I provide this information as a resource only. I encourage you to use supplies you have on hand to create your own versions of these cards.
*All cardstock is from Stampin’ Up! And all colors are current.
* All inks, unless otherwise noted, are from Stampin’ Up! All colors except Parakeet Party, are current.
* Stamp sets used - all are Stampin’ Up! and are retired ©️1990-2024 Stampin’ Up!®️
* Stencils labeled as from Stampin’ Up! are retired.
*Stencils - Branches, Aspens are from The Crafter’s Workshop and are available at outlets such as Scrapbook.com
*Dots / circles Stencils - Dot stencils are offered by several manufacturers such as Tim Holtz (Layering Circles), Simon Hurley (Polka Dots), Altenew (Bubble Wrap)
* Distress Oxide Inks (specifically Weathered Wood) are readily available from various art supply, crafting, and scrapbooking vendors.


No comments:
Post a Comment