Hi Stampers!
Are you looking for an interesting background technique for your cards? Grab some Stampin’ Blends, a bit of isopropyl alcohol, and some vellum cardstock. That is all it takes to make a great background piece for your cards! Here are some cards I created using this technique:
Let’s walk through the process. I will focus on the Magenta Madness card.
*Magenta Madness card base
* Basic Black cardstock cut at 5 1/8” x 3 7/8” and 3 1/2” x 1 1/2”
* Magenta Madness cardstock cut at 5 1/4” x 4” and 3 1/4” x 1 1/4”
* Vellum cardstock cut at 5 1/4” x 4”
* Inks - Memento Tuxedo Black; Stampin’ Blends - Magenta Madness, Melon Mambo, Polished Pink, and Blackberry Bliss
* Matte Black Dots - 3
* Adhesive of choice; to adhere vellum to cardstock adhesive sheet or multipurpose glue and a piece of sponge
* Other - Alcohol, Stampin’ Spritzer and / Or a Water Painter (or paint brush), and small container for alcohol
Use the Stampin’ Spritzer to spray a bit of alcohol onto the colored vellum, or use the Water Painter to apply drops of alcohol to the vellum. The alcohol will begin moving the ink around. Allow the piece to dry, or dry it with a heat tool.
TO FINISH THE CARD:
* Adhere the vellum piece to the 5” x 3 3/4” piece of Magenta Madness cardstock using an adhesive sheet or multipurpose glue. Trim piece to 5” x 3 1/4. (I stead of Magenta Madness you can use Basic White. I found the Magenta Madness brought out the colors better.)
* Adhere this piece to the Basic Black cardstock
* Adhere this piece to the card base
* On the small piece of Magenta Madness stamp the greeting (the Happy Birthday is from the Sweet Ice Cream stamp set) Adhere this to the Basic Black mat, ad adhere this to the center of the card.
* Add the Matte Black Dots
* Daisy Lane stamp set and the medium Daisy Punch, and the Sweet Ice Cream stamp set for the greeting
* Daffodil Delight card base, one piece of Daffodil Delight cut at 3 1/2” x 1 1/2”
* Basic White cardstock (adhere to back of vellum), one piece cut at 3 1/4” x 1 1/4” for greeting, larger scrap for 3 Daisy shapes and flower stem
* Pale Papaya cut at 5” x 3 3/4”
* Inks - Daffidil Delight, Just Jade; Early Espresso Stampin’ Write Marker; Stampin’ Blends - Daffodil Delight, Pale Papaya, and Pumpkin Pie (all dark)
* Multipurpose glue and dimensionals
* Supplies to make alcohol background
* Biggest Wish stamp set, Sea Life Dies
* Night of Navy card base
* Shaded Spruce cardstock cut at 5” x 3 3/4”
* Vellum cardstock cut at 3” x 3” and small piece of Gold Shimmer Vellum
* Simply Elegant Trim (gold) about 26”
* Inks - Versa Mark and Gold embossing powder, Stampin’ Blends - Night of Navy, Shaded Spruce, and Balmy Blue
* Layering Circles Dies - 2 3/4” diameter
* Adhesive of choice; adhesive sheet for vellum
* Supplies to make alcohol background
Once I started making these backgrounds I just kept making more! I created two. Christmas cards using two more of the backgrounds I made. I used the Merry Snowflakes stamp set for the greeting on these cards. The snowflake was die cut using the Stitched Snowflakes Dies. Here are the cards:
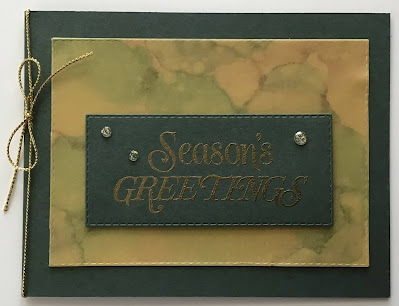
SEASON’S GREETINGS WITH GOLD SHIMMER VELLUM
SUPPLIES
* Evening Evergreen card base plus a piece of Evening Evergreen that is about 4” x 2” for the greeting - this will be die cut using the 3 3/4” x 1 5/8” Stitched Rectangles Die
* Vellum cardstock 5” x 3 3/4”, Basic White cardstock cut at 5” x 3 3/4”, and Gold Shommer Vellum cut at 5 x 3 3/4” - these will all be cut with the Stitched Rectangles Die that measures 4 3/4” x 3 1/2”
* Inks - Versa Mark and gold embossing powder; Evening Evergreen and Cherry Cobbler. Stampin’ Blends (dark)
* Simply Elegant Trim (gold) about 20”
* Wonderful Gems - clear with gold flecks - 3
* Multipurpose glue, dimensionals
* Supplies to make alcohol background
MERRY SNOWFLAKES GREETINGS
SUPPLIES
* Shaded Spruce card base and piece of Shaded Spruce cardbase cut at 3 3/8” x 2”
* Basic White cardstock that will be cut down to cut at 5 x 3 3/4” to back the vellum and one piece about 3 1/2” x 2 1/ 4 “ for the greeting. This will be die cut with the Stitched Rectangles Die that measures 3 1/4” x 1 7/8”
* Gold 6” x 6” Metallic Specialty Paper cut at 5 1/4” x 4” - cut the two snowflakes from the center of this piece
* Wonderful Gems - clear with gold flecks - 1
* Inks - Versa Mark and gold embossing powder; Stampin’ Blends - Night of Navy, Bermuda Bay, and Shaded Spruce (dark)
* Multipurpose glue
* Supplies to make alcohol background
Why not give this technique a try. Every background is a unique creation! Word of warning - this technique is addicting!
Stamp Happy!
Kim
All stamps and stamped images ©️1990-2021 Stampin’ Up! ®️


No comments:
Post a Comment