Hi Stampers!
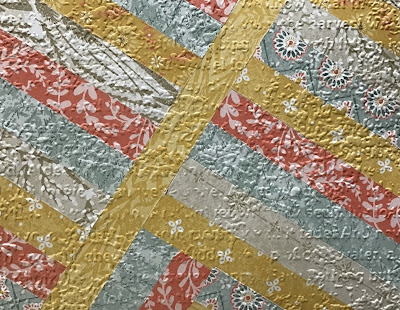
Can you believe August is nearing its end? Summer is flying by, and autumn days are right around the corner. The colors and images on today’s cards portray the summer to autumn transition. The beautiful Harvest Meadow DSP contains the perfect late summer /early fall palette. The floral image from the DELICATE DAHLIA stamp set makes a great companion for the DSP. The frame and background panel on the cards is a technique called the HERRINGBONE TECHNIQUE. The herringbone pattern appears on a few pieces of my fall wardrobe, so I thought the herringbone technique would work well with the DSP and stamp set. Let’s take a look at the cards:
And here is the stamp set:
The DELICATE DAHLIAS stamp set can be yours for free with a $100 Stampin’ Up!®️ product purchase during SALE-A-BRATION (going on now through 30 September 2021).
For these cards the first step is to make the herringbone background piece, die cut that piece with the Stitched Rectangles Dies, and finally emboss the piece with the Timeworn Type embossing folder.
(Page down for the technique video tutorial.) You will have a frame for one card and a panel for the other card.
* Frame piece from the herringbone technique project
* Crumb Cake card base plus Crumb Cake cardstock cut at 5 1/4” x 4”, and a 1 5/8” x 1 1/4” piece to mat the greeting
* Basic White or Very Vanilla scrap for stamping
* Harvest Meadow DSP - Crumb Cake
* Herringbone Technique Frame
* Timeworn Type Embossing Folder
* Stitched Rectangles Dies 1 3/4” x 1 1/4”
* Linen Thread
* Inks - Crumb Cake, Early Espresso, Bumblebee, Pear Pizzazz
* Adhesive, Dimensionals, Glue Dots
ASSEMBLY:
* On the scrap cardstock using Bumblebee ink, stamp the Dahlia image - first ink the “filler” image, stamp off, then stamp the image. Next ink up the outline stamp with Bumblebee, and stamp it over the other image.
* Stamp two of the leaf images with Pear Pizzazz ink using the same process as for the floral image.
* Stamp the greeting on a small piece of the Crumb Cake DSP with Early Espresso ink.
* Fussy cut the floral image and the leaves.
* Use the Stitched Rectangles Die to cut out the greeting.
* Emboss the 5 1/4” x 4” piece of Crumb Cake cardstock with the Timeworn Type embossing folder
* Adhere the Herringbone frame to the embossed Crumb Cake cardstock. Adhere this piece to the card base.
* Adhere the greeting to its mat, and put dimensionals on the back.
* Adhere the stem end of the leaves to the back side of the flower. Place dimensionals on the back of the flower and the leaves.
* Place the flower image in the upper left corner of the card, and place the greeting in the center of the embossed panel under the flower image.
* Use about 10” of linen thread, fold it in half, tie a bow, attach it to the left corner of the greeting with a glue dot. Trim the ends.
* Inner panel from herringbone technique
* Crumb Cake card base and scrap of Crumb Cake for greeting
* Diamond Weave Ribbon - 2 pieces, one about 5” long and one about 1 1/2” long
* Very Vanilla Twine - about 7” long
* Inks - Crumb Cake and Early Espresso
* Layering Circles Dies - 2 1/8” diameter
ASSEMBLY
* Use the Layering Circles Die and cut a circle from the scrap of Crumb Cake.
* Use the Dahlia outline stamp and Crumb Cake ink to stamp a background on the card base.
* Use Early Espresso ink to stamp the greeting on the die cut circle, then use Crumb Cake ink and stamp petals around the edge of the greeting. Put dimensionals on the back of this piece.
* Put a bit of adhesive on the back of the herringbone panel about 3/4” from the bottom of the panel and attach the longer piece of Diamond Weave Ribbon. Repeat this on the other side of the panel and attach the shorter piece of ribbon. Bring the longer piece across the front of the panel. Tie the twine around the two pieces of ribbon, and tie a bow. Trim the ends of then ribbon and the twine.
* Adhere the herringbone panel to the card base.
* Add the greeting - center it on the panel about 1/4” from the top of the panel.
HERRINGBONE PANEL
SUPPLIES FOR HERRINGBONE PANEL:
* Cardstock - it will be covered up, so color is not an issue, but I used Basic White - 5 1/4” x 4”
* Strips of Harvest Meadow DSP cut at 1/2” x 6”
* Adhesive sheet cut at 5 1/4” x 4”
* Timeworn Type embossing folder
* Stitched Rectangles Dies - 4 1/2” x 3”
HERRINGBONE TECHNIQUE TUTORIAL VIDEO
Here is the card I made using the panel created in the video.
SUPPLIES
* Herringbone Panel
* Soft Succulent card base
* Cork Paper 4” x3”
* Soft Succulent Open Weave Ribbon - about 16”
* Early Espresso ink
* Soft Succulent cardstock for greeting, cut with the Stitched Rectangles Die x 3” x 3/4”
* Stamp sets - greeting is from Sharing Sunshine; floral image is from Nature’s Harvest stamp set.
* Adhesive, dimensionals for greeting
Stamp Happy!
Kim
All stamps and stamped images ©️1990-2021 Stampin’ Up!®️


No comments:
Post a Comment