Showing posts with label Counting Sheep. Show all posts

Saturday, August 28, 2021

PENGUIN PLAYMATES & PEACEFUL PRINTS DSPS - THEY’RE NOT JUST FOR THE HOLIDAYS!

 Hi Stampers!

September arrives in a few days, and that means we are right in the middle of SALE-A-BRATION! Today I thought we would take another look at two collections of Designer Series Papers featured in the Sale-a-bration Brochure. You can select either one of these papers for free with a $50 Stampin’ Up!®️ product purchase now through 30 September 2021. The two collections of DSP I am focusing on today are PENGUIN PLAYMATES & PEACEFUL PRINTS. 

PENGUIN PLAYMATES


This DSP is wintry, whimsical, and festive! It coordinates with the PENGUIN PLACE BUNDLE (Penguin Place stamp set and Penguin Builder punch) found in the Stampin’ Up! July-August 2021 Mini Catalog. The paper is great for backgrounds, paper piecing, fussy cutting, and one of the penguin images coordinates with the Penguin Builder punch!

PEACEFUL PRINTS


This DSP is comfy and cozy and perfect for rustic, woodsy, and country looking Christmas cards. It coordinates with the PEACEFUL DEER BUNDLE (Peaceful Deer stamp set and Deer Builder punch) found in the Stampin’ Up! July - December 2021 Mini Catalog.  This DSP is great for layering, backgrounds, and more. The deer image coordinates with the deer builder punch. One of the deer images faces the opposite direction of the punch. To learn how to use the punch with that image see my 10 August 2021 post.

CHRISTMAS CARDS


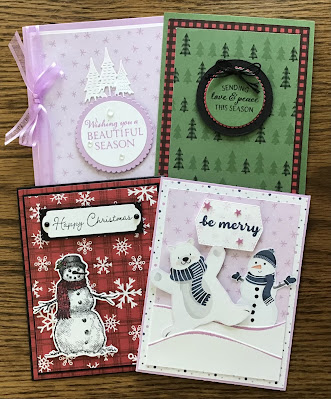
Here are four Christmas cards I created using the DSPS. These papers are great for Holiday cards, but they also can be used on cards for any occasion! Stampin’ Up!’s DSPs usually have a theme based print on one side and a more neutral / generic pattern on the other side. 

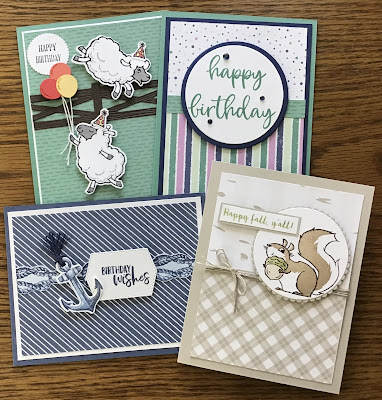
Here are some non- Christmas cards I made using the DSPs. I chose to make mostly birthday cards, but all the cards can easily be adapted for any occasion.

ALL OCCASION CARDS


HAPPY BIRTHDAY CARD WITH STRIPES, DOTS & DASHES

SUPPLIES
* Stamp set - Biggest Wish 
* Just Jade card base
* Night Of Navy cardstock cut at 5 1/4” x 4” to mat the focal layer, and use the Layering Circles Dies to cut a 3” diameter circle from the center to use as a mat for the greeting.
* Scrap of Basic White - use the Layering Circle Dies to cut a 2 5/8” circle for the greeting.
* Penguin Place DSP - striped pattern 3 3/4 x 2 1/2”, dot pattern 3 3/4” x 2 1/2”, dash pattern 3 3/4” x 1/2”
* Just Jade ink
* Holiday Rhinestones - 3, Night Of Navy
* Adhesive and dimensionals

SAILING HOME BIRTHDAY


SUPPLIES
* Sailing Home stamp set & Smooth Sailing dies; Garden Birdhouses stamp set; Tasteful Labels Dies
* Misty Moonlight card base
* Basic White cardstock cut at 5 1/4” x 5” and scraps for images and greeting
* Penguin Playmates - diagonal stripe pattern, cut at 5 x 3 3/4”
* Misty Moonlight ink & blender pen
* Baker’s twine
* Adhesive and dimensionals

COUNTING SHEEP BIRTHDAY


SUPPLIES
* Counting Sheep  and A Wish for Everything stamp sets, Sheep Dies, Layering Circles Dies
* Just Jade card base
* Basic White cardstock 5 1/4” x 4” for focal panel may. Use this piece to stamp and die cut the two sheep, party hats, and greeting. Keep the stamped images in the center.
* Penguin Playmates DSP - Just Jade with dash pattern, cut at 5” x 3 3/4”
* Small scraps of Poppy Parade, Calypso Coral, and Daffodil Delight cardstock for balloons.
* Scrap of Early Espresso for fence
* Inks - Tuxedo Black; Basic Gray (light & dark), Poppy Parade and Daffodil Delight Stampin’ Write Markers.
* Baker’s Twine
* Adhesive and dimensionals

HAPPY FALL SQUIRREL CARD

SUPPLIES
* Nuts About Sauirrels and Banner Year stamp sets, Layering Circles Dies
* Sahara Sand Card base, plus scraps for focal image and greeting mats.
* Scraps of Basic White for focal image and greeting
* Peaceful Prints DSP - birch bark & plaid patterns each cut at 3 3/4 x 2 1/2”
* Inks - Crumb Cake, Old Olive, and Tuxedo Black
* Linen Thread
* Adhesive & Dimensionals

BEAUTIFUL SEASON & WHIMSICAL TREES

SUPPLIES
* Amaryllis Abloom, Christmas Tree Dies, Layering Circles Dies
* Fresh Freesia card base and Scrap of Fresh Freesia cardstock for greeting mat
* Basic White cardstock cut at 5 1/8” x 3 7/8” for focal panel mat - cut the three tree images and piece for greeting from center.
* Penguin Playmates DSP cut at 5” x 3 3/4”
* Fresh Freesia Open Weave Ribbon - about 20”
* Elegant Faceted Gems - 3, clear
* Adhesive and dimensionals


PEACEFUL PRINTS - LOVE & PEACE

SUPPLIES
* Peaceful Deer stamp set
* Garden Green card base
* Scraps of Garden Green, Real Red, and Basic Black cardstock for greeting. These will be cut with the layering circles dies.
* Red & black checked DSP cut at 5 1/4” x 4” and the Garden Green with Trees cut at 4 3/4” long & x 3 1/2” wide. (Directional pattern)
* Memento Tuxedo Black ink.
* Basic Black Baker’s Twine, about 16”, doubled, tied in a bow, and ends trimmed.
* Adhesive, dimensionals, glue dot (for twine).

PEACEFUL PRINTS SNOW WONDER CARD


SUPPLIES
* Snow Wonder stamp set and Snow Time dies
* Basic Black card base and Basic Black cardstock cut at 5 1/8” x 3 7/8” for focal panel mat, and a 3” x 7/8” piece to mat greeting.
* Basic White for stamping image and greeting.
* Peaceful Prints DSP - Real Red,  Tattersall Pattern 5 3/8” x 4 1/8”; Real Red - Tattersall with Snowflakes pattern 5” x 3 3/4”.
* Inks - Memento Tuxedo Black; Stampin’ Blends - Real Red (light & dark), Old Olive (light & dark), Pumpkin apiece (dark), and Smoky Slate (dark).
* Matte Black Dots - 2
* Adhesive, dimensionals


BE MERRY PENGUIN PLAYMATES CARDS


SUPPLIES
* Penguin Place and Banner Year stamp sets and Tasteful Labels dies.
* Fresh Freesia card base
* Basic White scraps for the “snow” and greeting.
* Penguin Playmates DSP - Dots pattern -  5 3/8” x 4 1/8”; Snowflake pattern - 5” x 3 3/4”; Polar Bear and Snowman pattern (fussy cut).
* Inks - Fresh Freesia and Misty Moonlight
* Cute Stars Adhesive Backed Sequins - Highland Heather - 3.
* Adhesive and dimensionals.

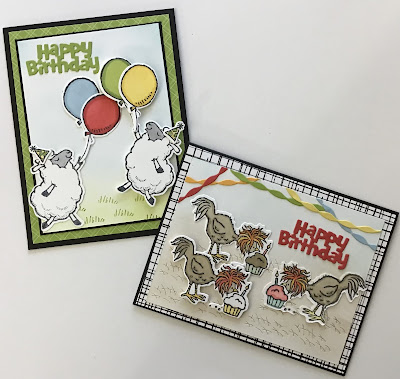
I had so much fun creating these cards, and I love how easy it is to use the DSP for all types of cards. As I mentioned earlier, the PENGUIN PLAYMATES  and the PEACEFUL PRINTS DSPs are each available to you free with a $50 Stampin’ Up! product purchase during SALE-A-BRATION! Remember - SALE-A-BRATION ends 30 September 2021. Here is one more look at today’s cards.

HOLIDAY CARDS


ANY DAY CARDS


Thank you so much for stopping by. For online shopping simply click one of the catalog pictures in the right column.  Questions? You can contact me at:  greatinkspirations@gmail.com

Until next time…

Stamp Happy!

Kim


All Stamps and stamped images ©️1990-2021 Stampin’ Up!®️


Tuesday, July 13, 2021

REVERSE DIE CUTTING - IT'S EASIER THAN YOU THINK!

Hi Stampers!

Today I have two techniques to share that go hand on hand. The Reverse Stamping Technique (See 15 January 2021 post) combined with the Reverse Die Cutting Technique allows you to change the orientation of outline image stamps and use a coordinating die to cut them in reverse. 

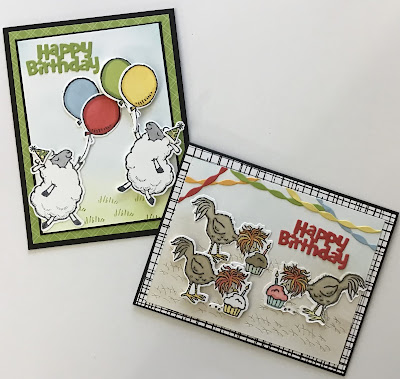
Here are the cards I made using these techniques:


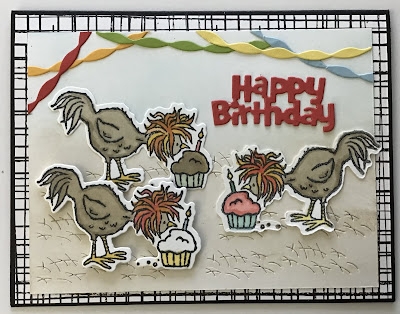
BIRTHDAY CHICKS CARD


SUPPLIES FOR THIS CARD:
* Basic Black card base - 8 1/2” x 5 1/2” scored and folded at 4 1/4”.
* Basic White cardstock - for card front cut it at 5” x 3 3/4”; for the inside of the card cut a piece that is 5 1/4” x 4”. Pieces of Basic White to stamp the chickens (I cut mine at 3 1/2” x 3”.)
* Multiple colors of scrap cardstock for the Happy Birthday and the streamers. (I used Poppy Parade, Mango Melody, Granny Apple Green, Daffodil Delight, and Balmy Blue.)
* DSP - Pattern Party cut at 5 1/4” x 4”.
* Inks - Memento Tuxedo Black, Crumb Cake, Balmy Blue; Stampin’ Blends - Crumb Cake (light and dark), Daffodil Delight (dark and light), Pumpkin Pie (dark and light), Poppy Parade (dark and light), Pool Party (dark and light), Soft Seafoam (dark and light).
* Blending Brushes
* Adhesive of choice and dimensionals.
* Hey Birthday Chick and Birthday Chick Dies (Stampin’ Up!®️ 2021-2022 Annual Catalog)

ASSEMBLY:
* Using blending brushes, the Crumb Cake and Balmy Blue inks apply color to the 5” x 3 3/4” piece of Basic White cardstock. Take the Crumb Cake ink from the bottom of the cardstock about 3/4 of the way up. Now add the Balmy Blue to cover the remainder of the cardstock.
* Stamp two of the chicken images on two of the 3 1/2” x 3” pieces of Basic White cardstock. 
* Use the Reverse Stamping Technique to stamp the third chicken.+
* Die cut the three chickens using the Reverse Die Cutting Technique for reversed stamped image.+
* Die cut the Happy Birthday and the streamers. Die cut the chicken scratches.
* Use liquid glue to attach the streamers, the Happy Birthday, and two of the chickens to the focal panel. Adhere the 3rd chicken with dimensionals.
* Adhere the DSP panel to the card front. 
* Adhere focal panel to card.
* Adhere inside panel to inside of card.
(+ See video for details.)

HEY BIRTHDAY CHICK


BIRTHDAY CHICK DIES


COUNTING SHEEP BIRTHDAY CARD


SUPPLIES FOR THIS CARD:
* Basic Black card base - 8 1/2” x 5 1/2” scored and folded at 4 1/4”.
* Basic White  cardstock 5” x 4 1/4” and one piece cut at 4 3/4” x 3 1/2” for front focal panel. Two pieces cut at 3 1/2” x 3” for the sheep, and scraps for the balloons and party hats.
* Basic Black cardstock cut at 4 7/8” x 3 5/8”.
* Scrap f Granny Apple Green cardstock for Happy Birthday
* DSP - 6” x 7” DSP Brights, Granny Apple Green cut at 5 1/4” x 4”.
* Inks - Tuxedo Memento Black, Balmy Blue, and Granny Apple Green; Stampin’ Blends - Granny Apple Green (dark and light), Poppy Parade (dark and light), Balmy Blue (dark and light), Daffodil Delight (dark and light), Smoky Slate (light), Basic Black (light).
* Blending Brushes
* Adhesive of choice and dimensionals.
* Counting Sheep stamp set and Sheep Dies; Hey Birthday Chick and Birthday Chick Dies. 
(The Counting Sheep stamp set and the coordinating Sheep Dies will be available beginning 3 August 2021 as Sale-a-bration offerings.)

ASSEMBLY:
* Use the blending brushes and the Granny Apple Green and Balmy Blue inks to add color to the Basic White focal panel. Stamp the grass image several times toward the bottom area of the focal panel. 
* Stamp the sheep - use the Reverse Stamping Technique for one sheep. Color the sheeps’ hooves and faces.
* Stamp and color the the balloons and party hats.
* Die cut the sheep, the balloons, the party hats, and the Happy Birthday.
* Adhere the DSP to the card base. 
* Adhere the focal panel to the Basic Black mat. Adhere this piece to the card.
* Adhere the greeting die cut and the die cut images to the card. The sheep on the right and it’s balloons are adhered with dimensionals.

COUNTING SHEEP


SHEEP DIES


REVERSE DIE CUTTING VIDEO


REVERSE STAMPING
+ For full tutorial video see my 15 January 2021 post.


To stamp the image in reverse, ink the stamp with the Memento Tuxedo Black. Stamp the image on a silicone craft sheet. Place the Basic White cardstock over the image and gentle rub over the back of the cardstock with your fingers to transfer the ink to the paper. Lift up the cardstock. You now have the image in reverse.

REVERSE DIE CUTTING
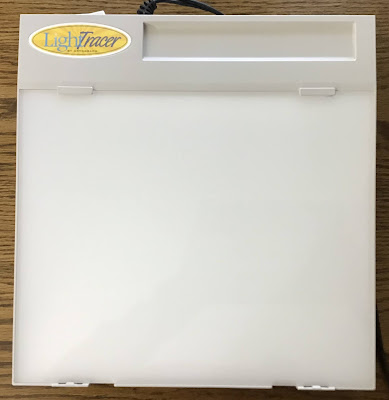
+ See the video above for reverse die cutting directions using a light box / tracing light. These lights are sold by Amazon, Walmart (on line), and many art supply outlets.


REVERSE DIE CUTTING WITHOUT A LIGHT BOX

An alternative to using the light box / tracing light is to use a window - during daylight hours, of course!
*Stamp the reversed image.
* Use Washi tape, painter’s tape or other low tack tape and tape the stamped image to the window making sure the image is facing he window.  I put tape on 2-3 corners. You should be able to see the image clearly.
* Line up the die around the image. Use two more pieces of tape to hold the die in place. 
* Remove the cardstock from the window taking care to keep the die on place.
* Run this through your die cutting machine. You now have a reversed die cut image. 

Below are two photos demonstrating how to tape the image to the window and how to align the die. (Yes, that is the view from my craft room - it is part of our back yard and part of a pasture.)


It is just that easy to die cut a reversed image to use on your cards and other paper crafting projects!


That’s all for today.  Thank you for stopping by. Until next time…
Stamp Happy!

Kim

All stamps and stamped images ©️1990 - 2021 Stampin’ Up!®️