Showing posts with label Nuts About Squirrels. Show all posts

Tuesday, October 4, 2022

PEEKABOO! IT’S A TREAT FOR YOU! - A STAMP HAPPY HOLIDAYS POST

Hi Stampers,

Today’s Stamp Happy Holiday’s project is super simple treat bags. The bags I am using for the project are the PEEKABOO TREAT BAGS found on page 140 of the Stampin’ Up!®️ 2022-2023 Annual Catalog or view in my ONLINE STORE.  

Each package contains 10 food safe treat bags; 5 kraft and 5 white.  The bags feature a ziplock type closure. They are ready for you to decorate and fill with a cookie or two, candies, nuts, or other treats. Let’s take a look at my samples:


To view Stampin’ Up!sample projects see pages 19 and 50 in the annual catalog and page 57 in the Stampin’ Up! July -December 2022 Mini Catalog.

I plan to use these bags as party favors for Halloween and I will put one at each place setting on Thanksgiving.

PEEKABOO TREAT BAGS


CREATING THE BACKGROUND ON THE BAGS

I added color to treat bags with a Stampin’ Spritzer that contained a mixture of isopropyl alcohol and re-inker. A mixture of water and re-inker will work as well, but the color will take longer to dry.


I used an cardboard box as a tray for my spritzing. This contained the mess. I placed paper towel in the box prior to spritzing each bag. This insured a clean surface for each bag, and kept any wet ink or pools of ink from coloring the back side of the bag. I also used a strip of scrap cardstock to cover the peekaboo window while spritzing the color onto the bag. The strip of cardstock should be cut at 1 3/8” wide. The bag is 4” across, so the length of the strip should be at least 5”  to cover the peekaboo window and give room on each end to maneuver the strip into place and remove it after spritzing. 

It is easy to mix the alcohol and ink in the spritzer. Fill the Stampin’ Spritzer 1/2 - 3/4 of the way with the alcohol. Add 6-10 drops of re-inker to the spritzer (more if you like). If you will be spritzing only a bag or two you can use less alcohol and less re-inker. Place the lid on the spritzer and give the spritzer a gentle shake or two to mix the ink with the alcohol. 
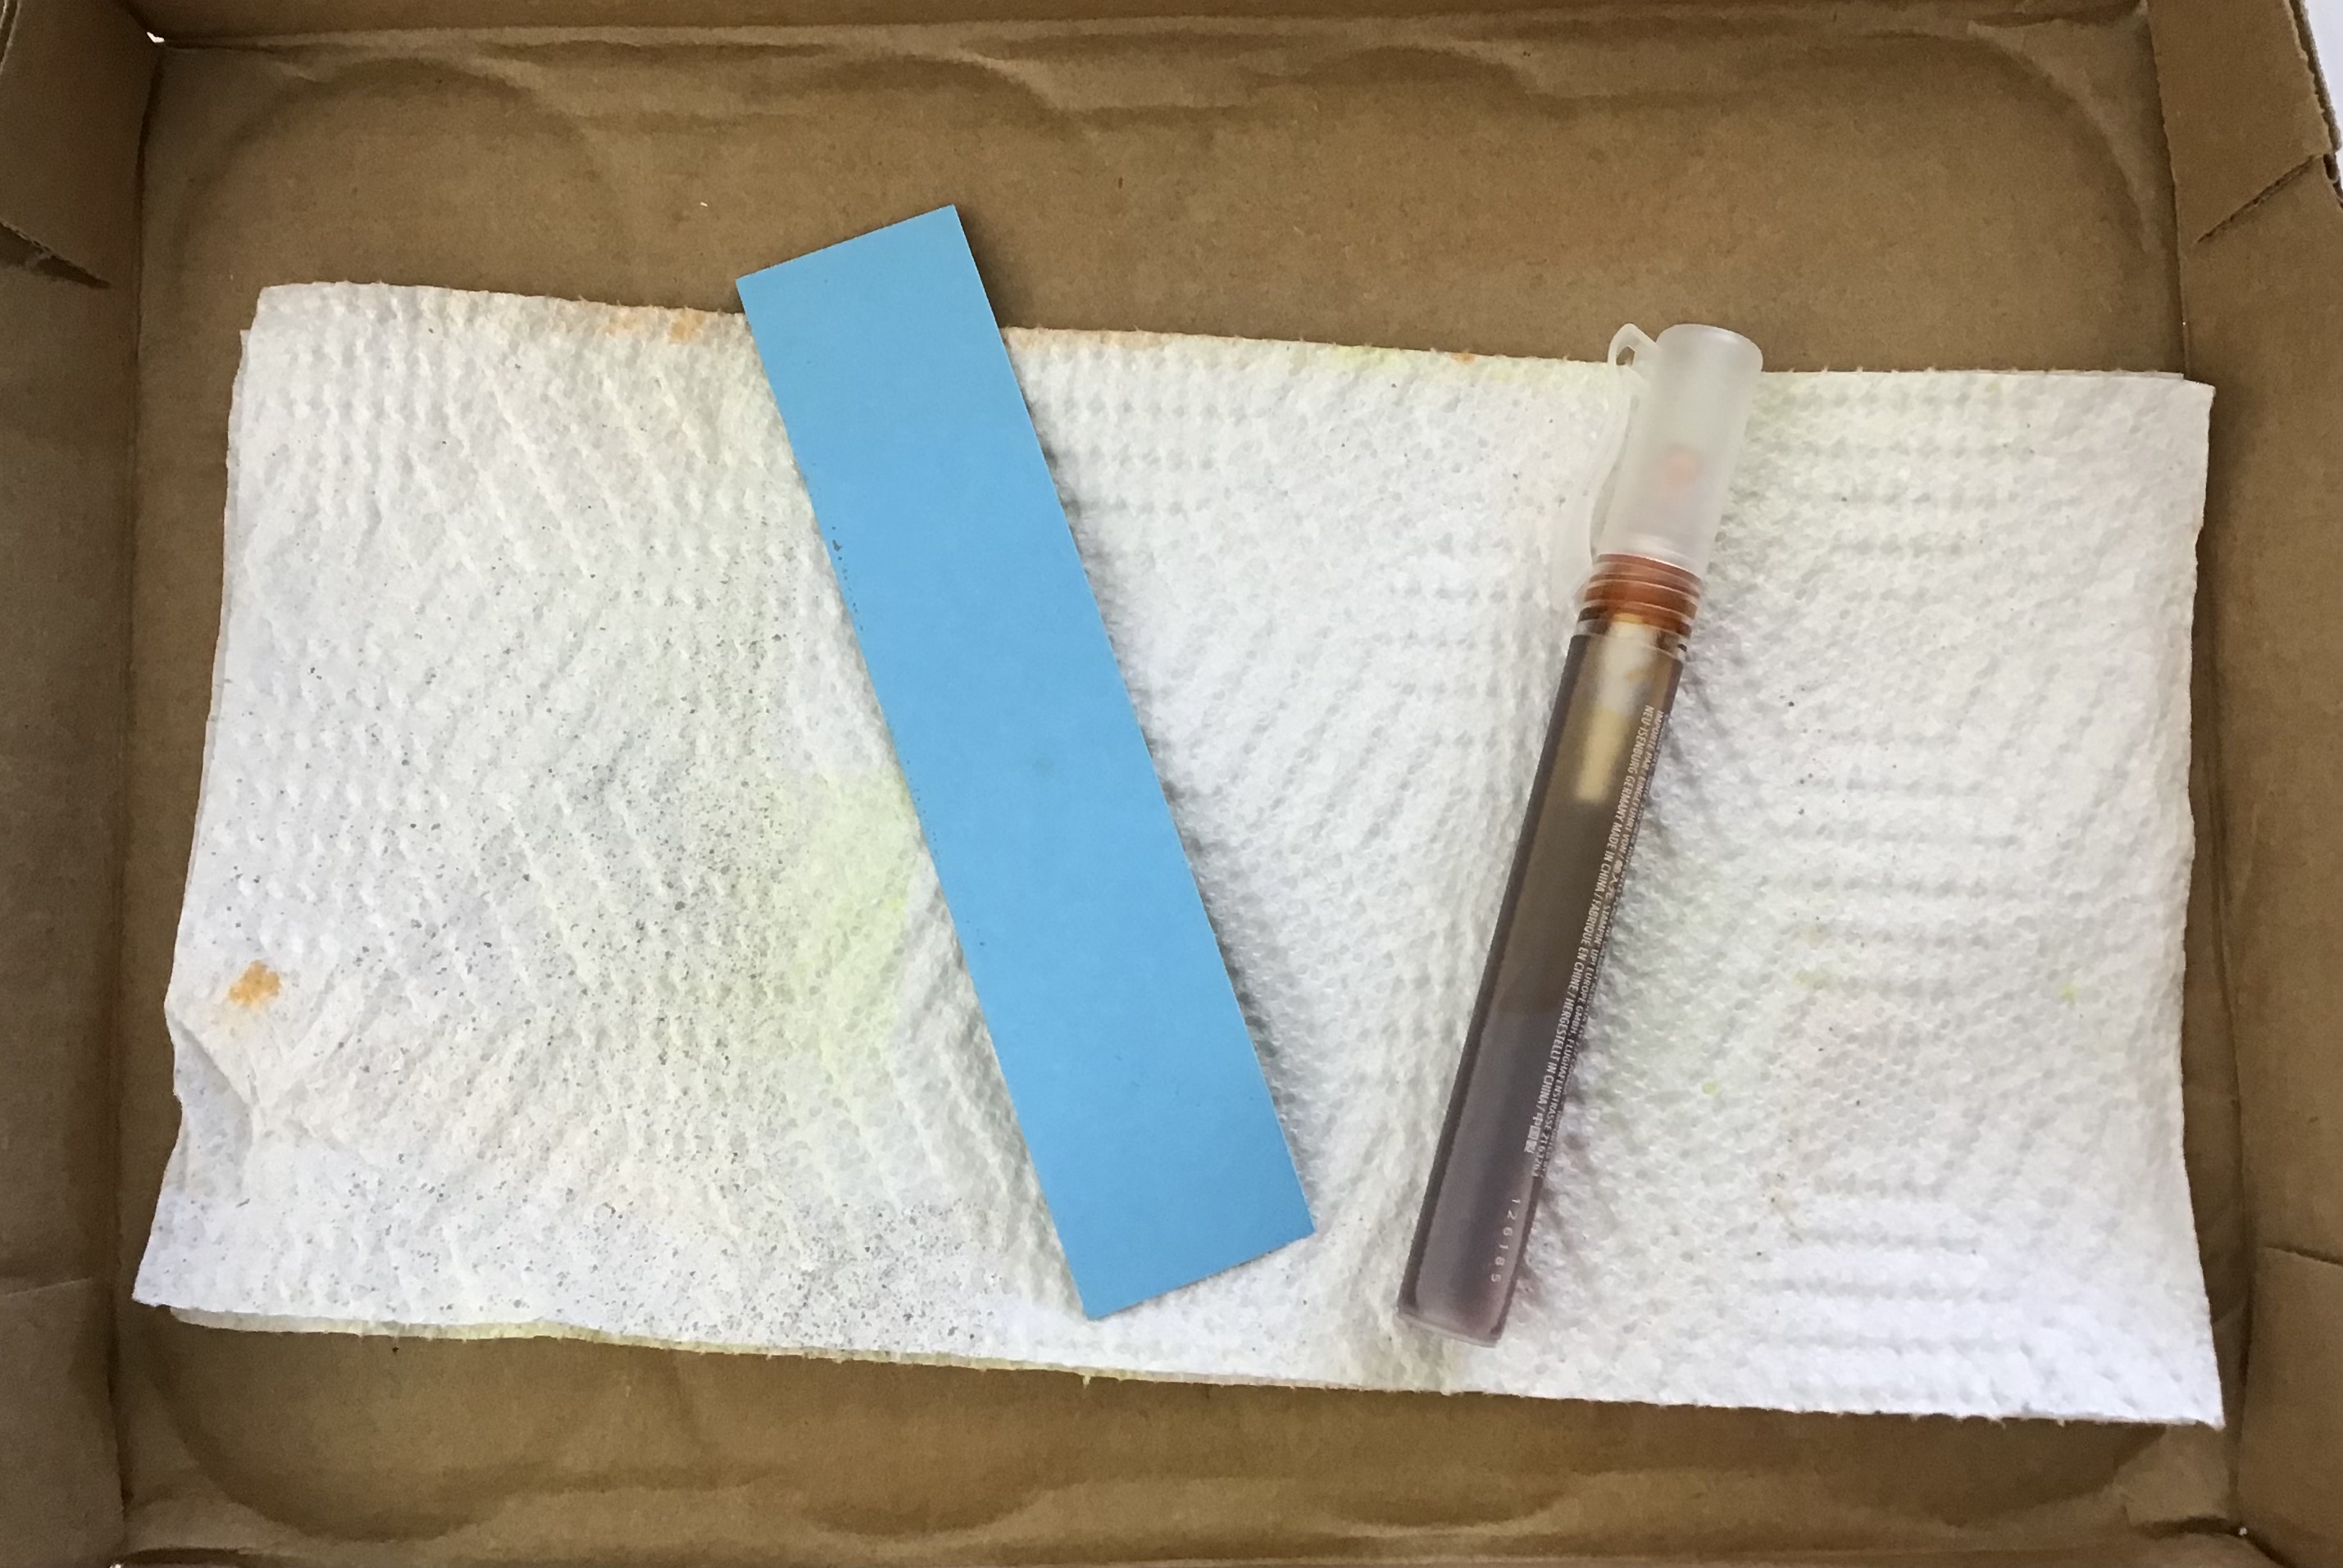

 
Place the paper towel on the bottom of the cardboard box. Place the treat bag on top the paper towel. Cover the peekaboo window with the strip of cardstock. You can secure the strip with tape if you like.


Begin to spritz the color onto the bag. Continue until you get the look you like. Allow the alcohol /ink to dry a few moments before adding stamped images, die cuts, etc to the treat bag.


The treat bag is ready to be decorated as you please.


LOVELIEST DAY PEEKABOO TREAT BAG

SUPPLIES FOR THIS BAG

* White Peekaboo treat bag
* Hello Harvest Bundle
* Pumpkin Pie Ink for spritzer.
* Scraps of Basic White and Pale Papaya cardstock (I lightly spritzed these pieces of cardstock with the Pumpkin Pie / alcohol mixture. 
* Small scrap of Old Olive cardstock to die cut vines
* Inks - Pumpkin Pie, Early Espresso; Stampin’ Blends - Pale Papaya (light & dark), Pumpkin Pie (light)
* Ribbon of choice - about 18” (I used some retired Old Olive twill ribbon. I encourage you to use what you have on hand. 
* Adhesive, dimensionals 

Note - I filled this bag with mixed nuts. I used about 3 - 4 Tablespoons of nuts.

BEWITCHING TREAT BAG

SUPPLIES FOR THIS BAH

* White Peekaboo Treat Bag
* Bewitching Bundle & Best Witches stamp set
* Granny Apple Green ink for spritzer
* Scraps of Basic White to stamp hat and frog
* Ink - Memento Tuxedo Black, Gorgeous Grape; Stampin’ Blends - Granny Apple Green (dark), Pumpkin Pie (light), Highland Heather (light & dark), Parakeet Party (light & dark
* Black Baker’s Twine (about 38”) and Metallic Mesh Ribbon about 5” (or twine and ribbon of choice)
* Adhesive, dimensionals 

Note - I filled this bag with 3 TBSP of Reese’s Pieces

Most schools require treats brought into the classroom be packaged. The individual snack sized bags of Reese’s Pieces, m & m’s, Skittles, etc will fit inside these treat bags.


NUTS ABOUT TREATS


SUPPLIES FOR THIS BAG

* Nuts About Squirrels stamp set
* Kraft treat bag
* Early Espresso ink to mix with alcohol (darker colored ink work best on the kraft colored bags)
* Basic White cardstock for stamping
* Inks - Early Espresso, Cajun Craze, Crumb Cake Old Olive, Crushed Curry
* Stylish Shapes Dies (circle that fits around greeting)
* Ribbon - about 8”
* Adhesive, dimensionals 

NOTE - I used a bit less than three TBSPs of nuts is this bag.

SCARY CUTE TRICK OR TREAT TIME


SUPPLIES FOR THIS BAG

* White treat bag
* Scary Cute stamp set
* Pumpkin Pie ink to mix with the alcohol
* Inks - Memento Tuxedo Black
* Basic Black Baker’s Twine (about 38”) and Metallic Mesh Ribbon 5” or so

Note - I used a mix of candy corn and peanuts in this bag about 1 1/2 TBSP each!

PEEKABOO TREAT BAGS
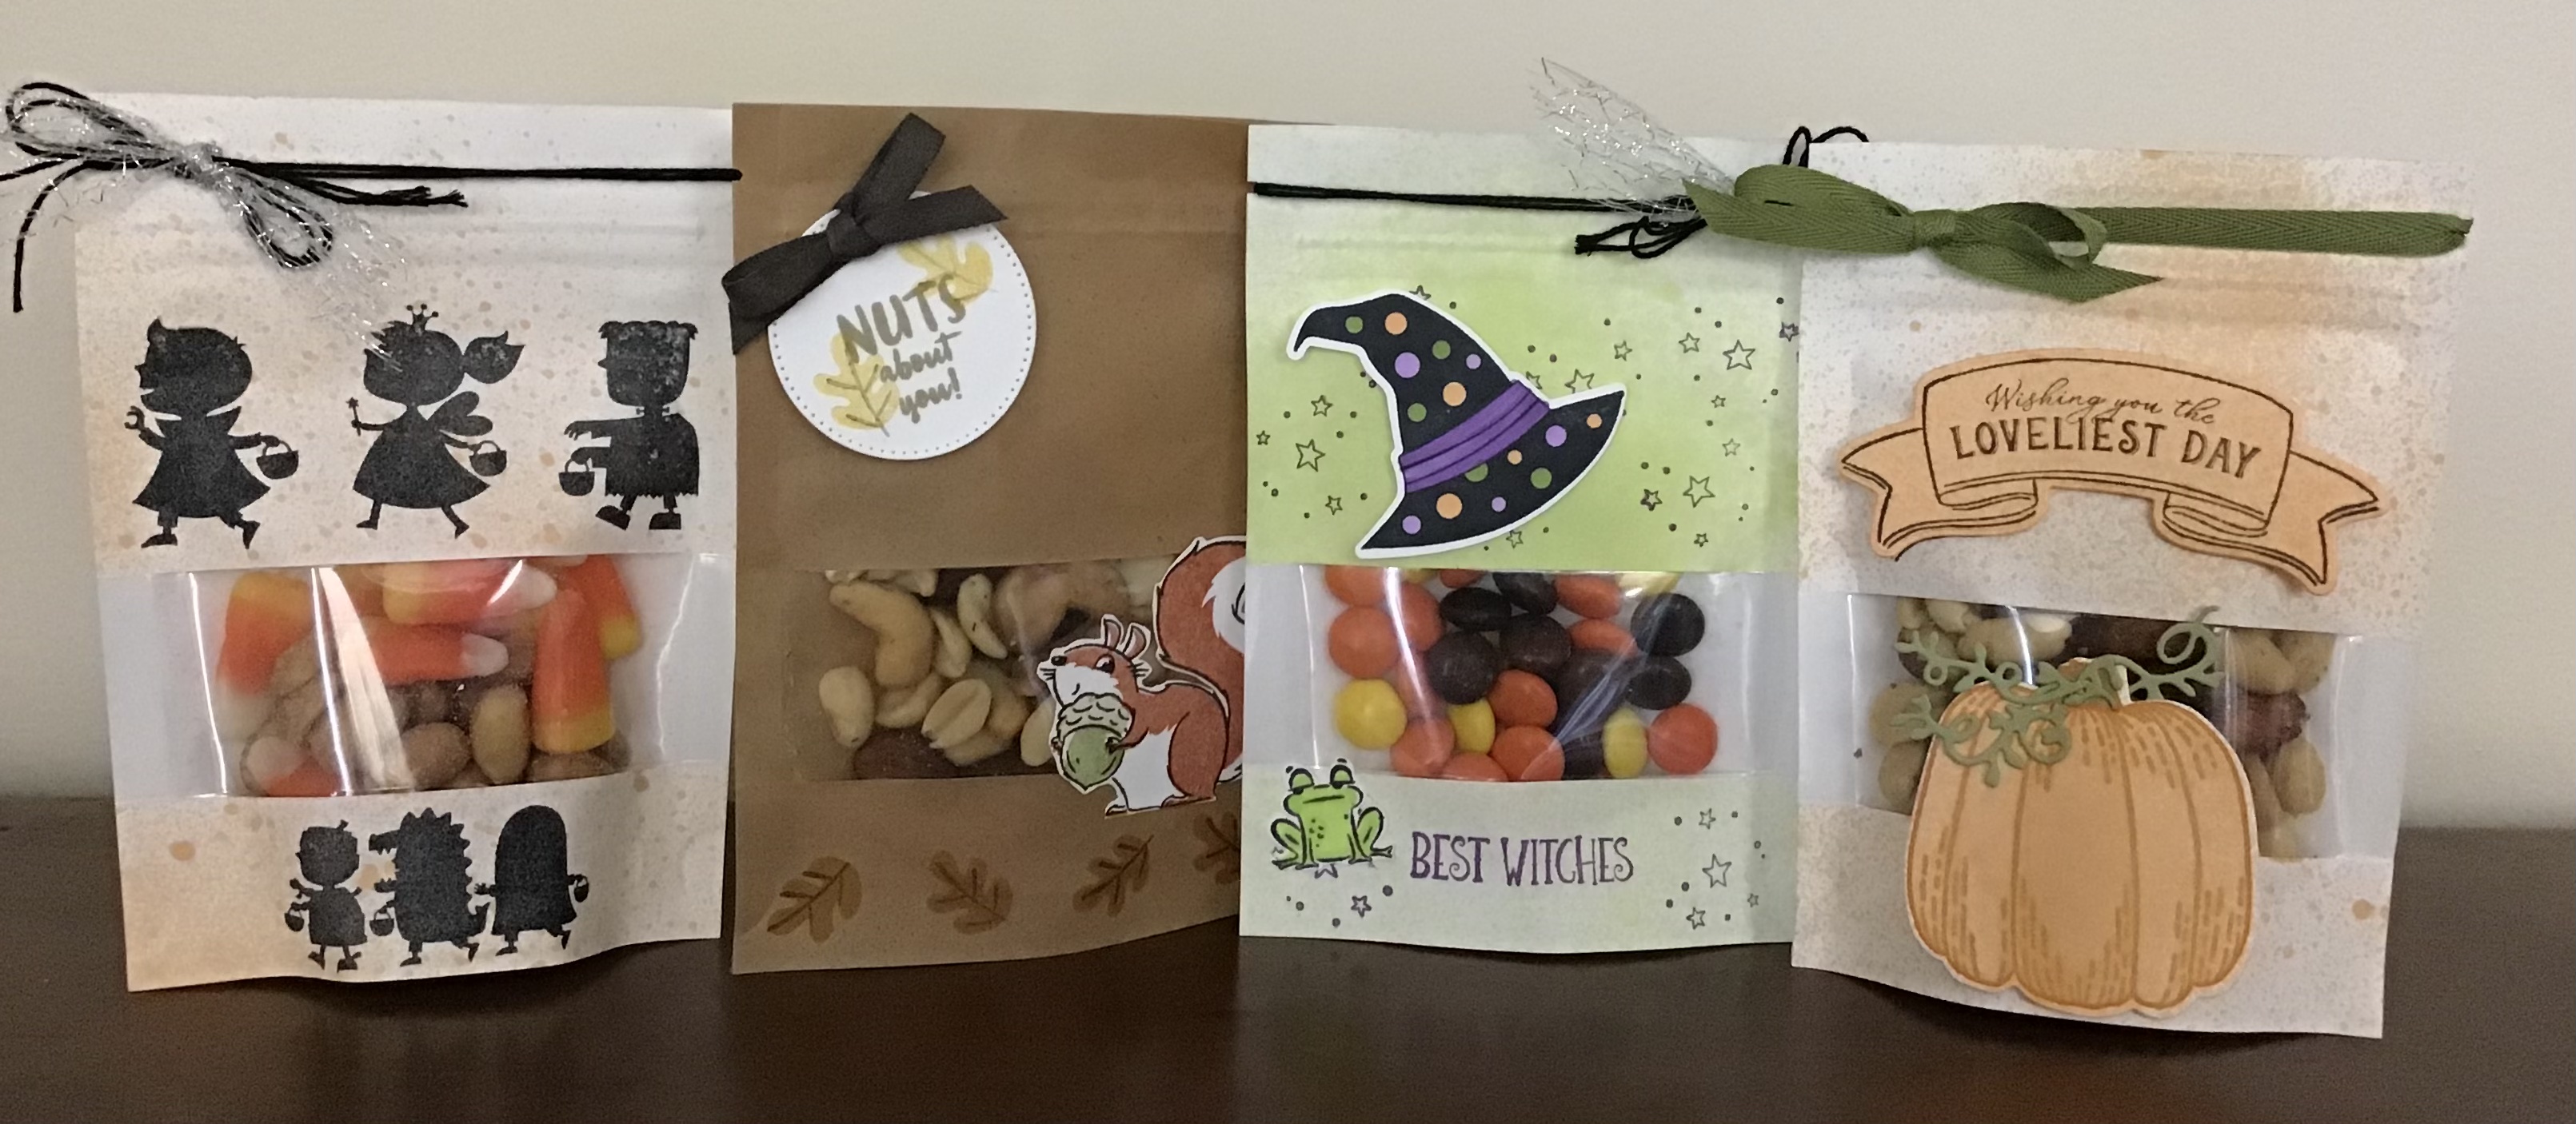

These treat bags are unique, and so easy to decorate. I think I will mark some with Christmas themes, fill them, and place them in a basket on my coffee table to offer to friends and family who stop by for a visit.

That is all for today. Thank you so much for stopping by. Until next time…
Stamp Happy!

Kim

All stamps and stamped images ©️1990-2022 Stampin’ Up!®️

Thursday, October 7, 2021

A GO TO CARD LAYOUT FOR GREAT CARDS IN A SNAP!

Hi Stampers!

 When I need cards in a hurry, or when my creativity meter is low, I pull out my card layout notebook. It contains several card layouts that can be used with most stamp sets. Today I am sharing one of those card layouts.

Let’s take a look at the cards I made using the layout:


SUPPLIES & CUTTING DIMENSIONS FOR THE CARD

* Card base - 11” x 4 1/4” scored and folded at 5 1/2” or 8 1/2” x 5 1/2” scored and folded at 4 1/4”, and a piece of cardstock the same color as the base cut at 3 7/8” x 2 5/8”to mat focal panel.
* Basic White cardstock (or cardstock that contrasts with card base color) cut at  5 1/2” x 2 1/4” for mat, and a piece of. ASIC White cut at 3 3/4” x 2 1/2” to stamp focal image.
* Designer Series Paper (DSP) cut at 5 1/2” x 2”.
* Optional - Basic White cut at 5” x 3 3/4” for inside card.

*Now that you have the pieces for the card layout, choose an image to stamp and a greeting. 
* Select your ink colors.
* Decide on embellishment - yes or no, what ones? Ribbon? Gems? 

ASSEMBLY
* Stamp the image and sentiment on the focal panel. Adhere this to its mat. If you want to use ribbon on this panel add it now. 
* Adhere the DSP to its mat.  Place this piece on the card base about 1/4” from the left hand side of the card front. 
* Ahere the matted focal panel somewhere near the center about 1” from the left edge of the card. I used dimensionals to adhere the focal panel.

As I mentioned, use any images, greetings, inks, and paper you desire to create a terrific card using this layout. I have listed the supplies I used for my cards just in case you are wondering what I used.


SQUIRREL POOL PARTY

* Nuts About Squirrels stamp set (current mini catalog)
* Pool Party card base and mat for focal panel. 
* Basic White for focal panel and DSP mat.
* DSP - Pattern Party.
* Inks - Cinnamon Cider, Crumb  Cake, and Old Olive.
* Linen thread, 
* Dimensionals.

BLUSHING BRIDE SQUIRREL

* Nuts About Squirrels stamp set (current mini catalog).
* Blushing Bride card base and mat for focal panel.
* Basic White for focal panel and to mat DSP.
* DSP from Pattern Party.
* Inks - Basic Gray, Crumb Cake, Old Olive. 
* Blushing Bride Frayed Grosgrain Ribbon.
* Dimensionals.
    
For the next two cards, the layout is the same, I just stamped the image on a separate piece of Basic White cardstock, die cut it with the Layering Circles Dies, matted that on another die cut from coordinating cardstock. I adhered this piece to the focal panel.

 GREEN TURTLE CARD

* Back On Your Feet stamp set (current annual catalog).
* Granny Apple Green card base, focal panel mat, and focal image mat.
* Basic White for DSP mat, focal panel, and focal image.
* 6” x 6” Designer Series Paper, Brights - Granny Apple Green
* Inks - Memento Tuxedo Black; Stampin’ Blends - Granny Apple Green, Daffodil Delight, Crumb Cake, and Pool Party (light).
* Layering Circles Dies or circle punches.
* White Crinkled Seam Binding Ribbon - dyed with Granny Apple Green (dark) Stampin’ Blend.
* Dimensionals.  

YELLOW TURTLE CARD

* Back On Your Feet stamp set.
* Daffodil Delight card base, mat for focal panel, and to die cut circle.
* Basic White for DSP mat, focal panel, and for focal image (die cut circle).
* 6” x 6” DSP - Brights - Daffodil Delight.
* Inks - Memento Tuxedo Black; Stampin’ Blends - Daffodil Delight, Granny Apple Green, Crumb Cake, and Pool Party (light). 
* Layering Circles Dies or circle punches.
* Dimensionals.

There you go, if you need a go to card layout this one might be for you! Why not give it a try!


That’s all for today. Thank you for stopping by. Until next time…
Stamp Happy!

Kim

All stamps and stamped images ©️1990-2021 Stampin’ Up!®️

Saturday, August 28, 2021

PENGUIN PLAYMATES & PEACEFUL PRINTS DSPS - THEY’RE NOT JUST FOR THE HOLIDAYS!

 Hi Stampers!

September arrives in a few days, and that means we are right in the middle of SALE-A-BRATION! Today I thought we would take another look at two collections of Designer Series Papers featured in the Sale-a-bration Brochure. You can select either one of these papers for free with a $50 Stampin’ Up!®️ product purchase now through 30 September 2021. The two collections of DSP I am focusing on today are PENGUIN PLAYMATES & PEACEFUL PRINTS. 

PENGUIN PLAYMATES


This DSP is wintry, whimsical, and festive! It coordinates with the PENGUIN PLACE BUNDLE (Penguin Place stamp set and Penguin Builder punch) found in the Stampin’ Up! July-August 2021 Mini Catalog. The paper is great for backgrounds, paper piecing, fussy cutting, and one of the penguin images coordinates with the Penguin Builder punch!

PEACEFUL PRINTS


This DSP is comfy and cozy and perfect for rustic, woodsy, and country looking Christmas cards. It coordinates with the PEACEFUL DEER BUNDLE (Peaceful Deer stamp set and Deer Builder punch) found in the Stampin’ Up! July - December 2021 Mini Catalog.  This DSP is great for layering, backgrounds, and more. The deer image coordinates with the deer builder punch. One of the deer images faces the opposite direction of the punch. To learn how to use the punch with that image see my 10 August 2021 post.

CHRISTMAS CARDS


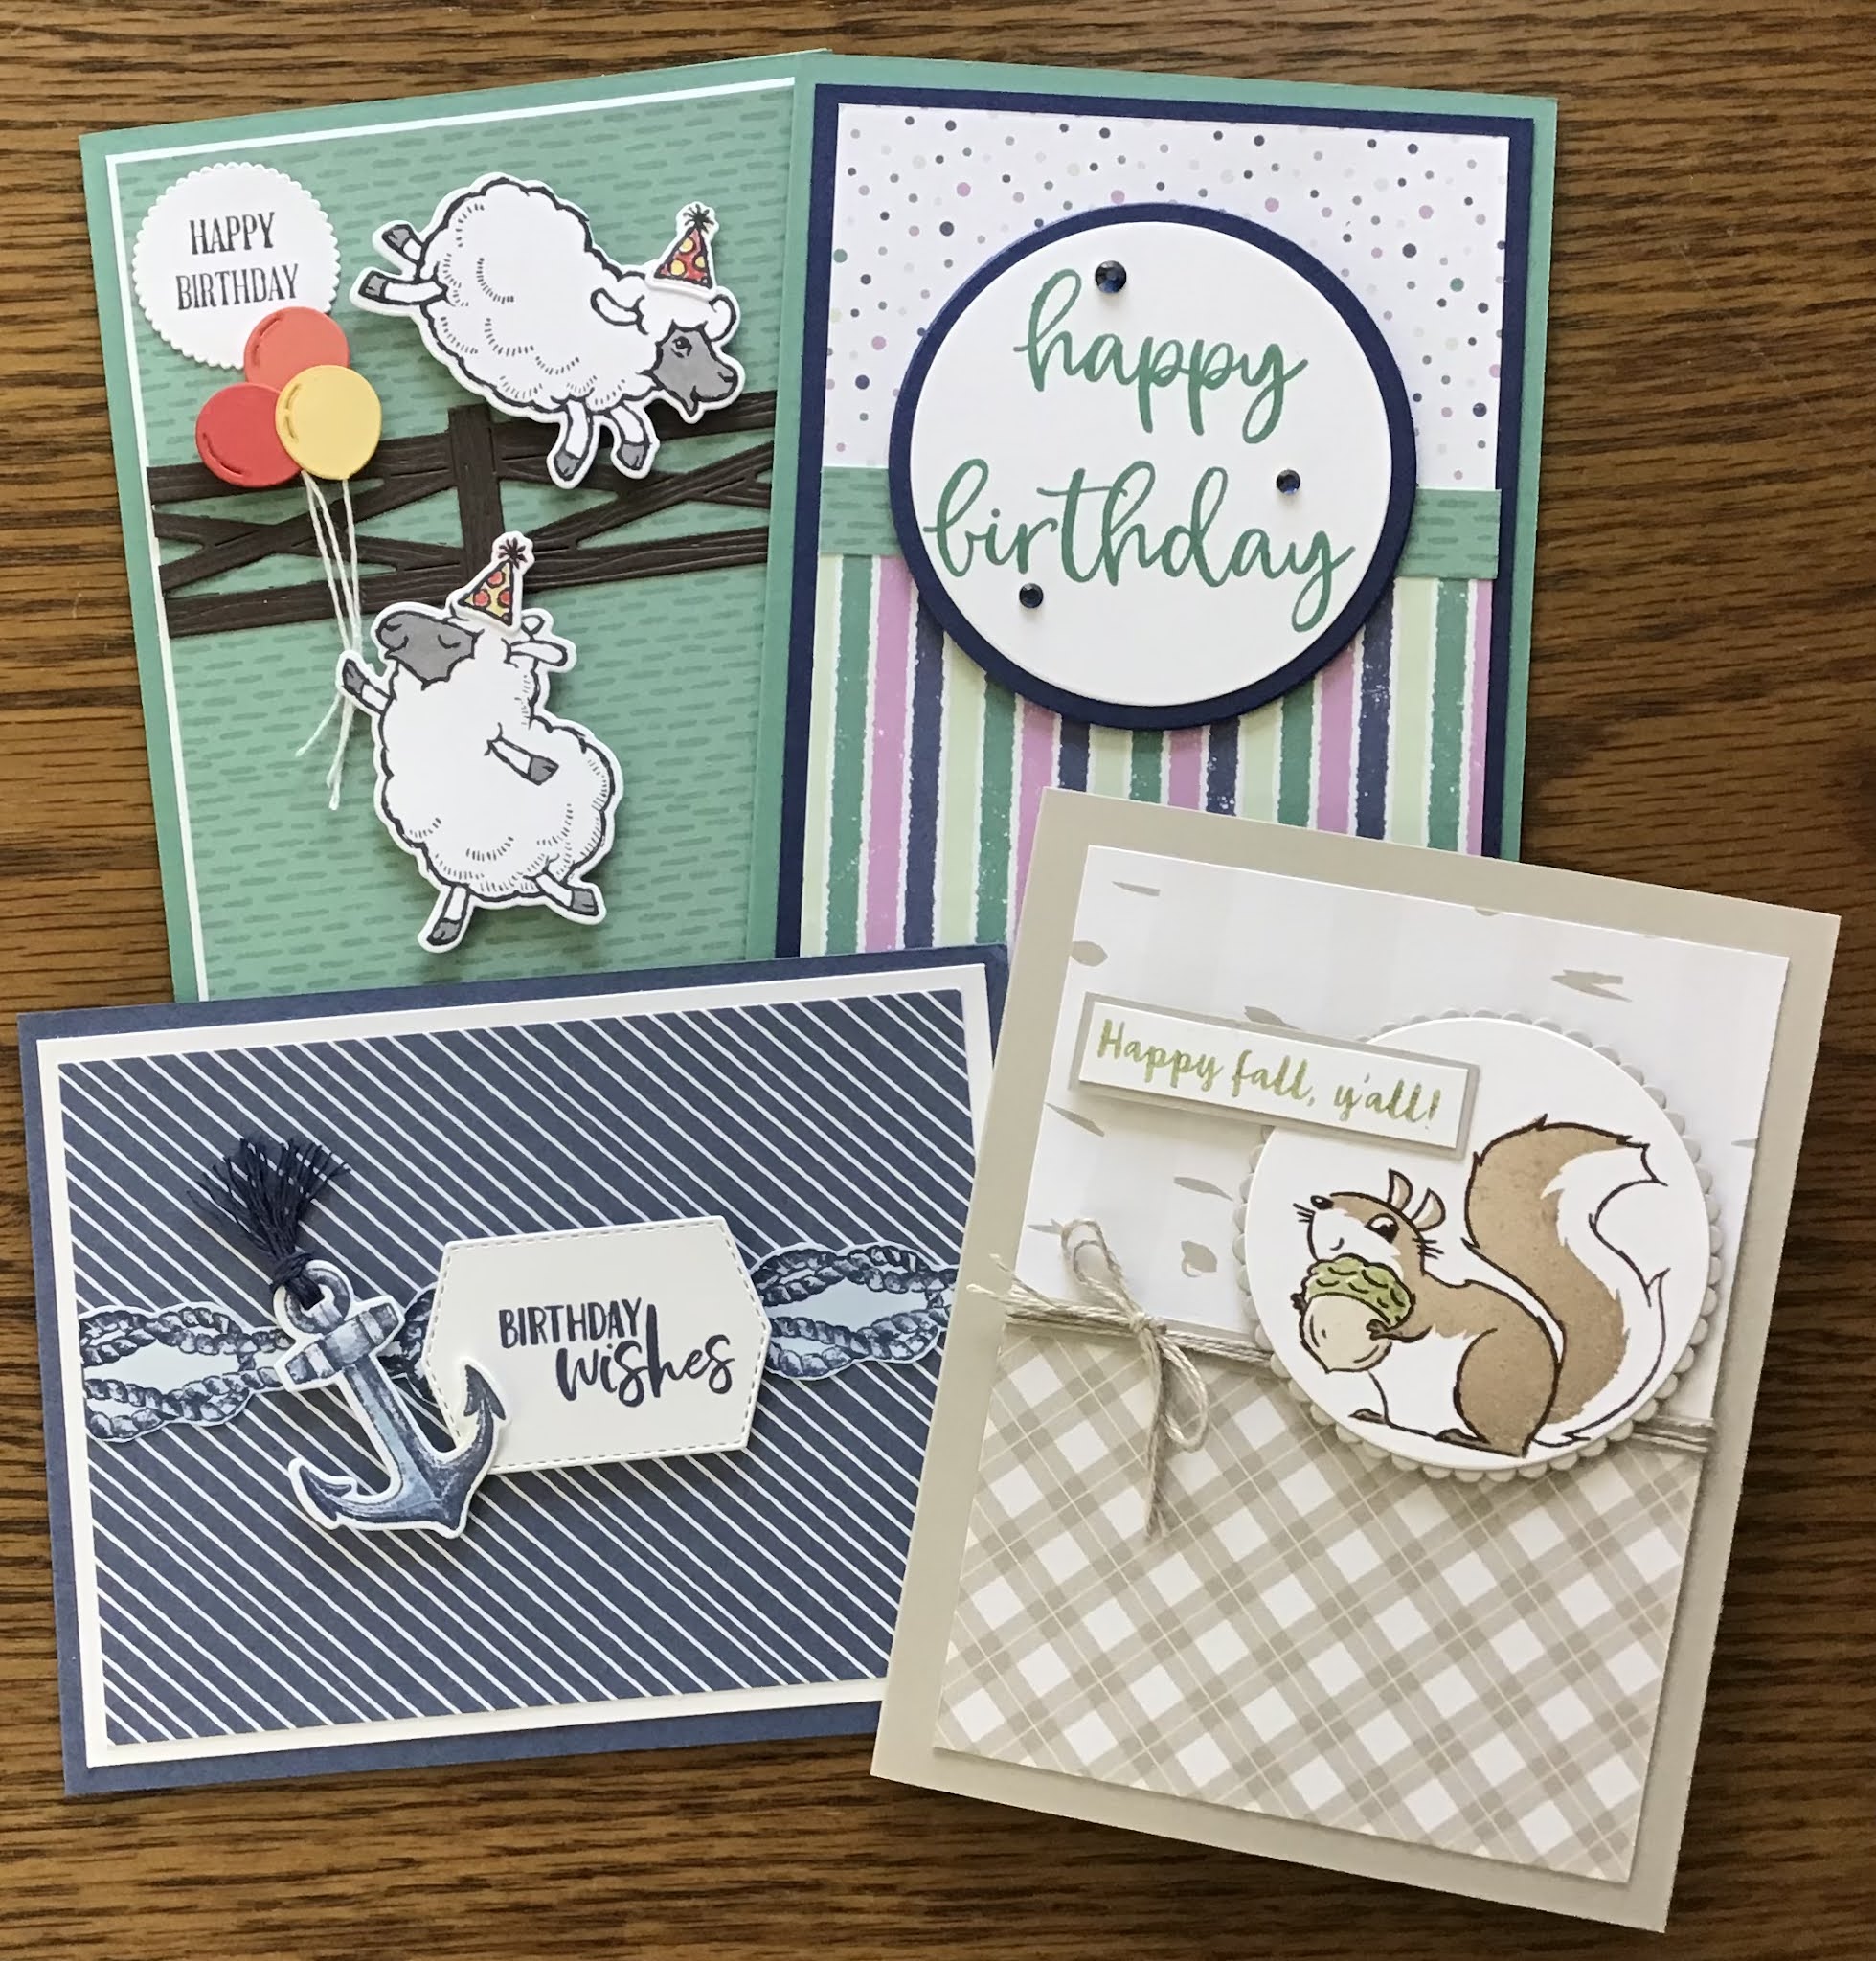
Here are four Christmas cards I created using the DSPS. These papers are great for Holiday cards, but they also can be used on cards for any occasion! Stampin’ Up!’s DSPs usually have a theme based print on one side and a more neutral / generic pattern on the other side. 

Here are some non- Christmas cards I made using the DSPs. I chose to make mostly birthday cards, but all the cards can easily be adapted for any occasion.

ALL OCCASION CARDS


HAPPY BIRTHDAY CARD WITH STRIPES, DOTS & DASHES

SUPPLIES
* Stamp set - Biggest Wish 
* Just Jade card base
* Night Of Navy cardstock cut at 5 1/4” x 4” to mat the focal layer, and use the Layering Circles Dies to cut a 3” diameter circle from the center to use as a mat for the greeting.
* Scrap of Basic White - use the Layering Circle Dies to cut a 2 5/8” circle for the greeting.
* Penguin Place DSP - striped pattern 3 3/4 x 2 1/2”, dot pattern 3 3/4” x 2 1/2”, dash pattern 3 3/4” x 1/2”
* Just Jade ink
* Holiday Rhinestones - 3, Night Of Navy
* Adhesive and dimensionals

SAILING HOME BIRTHDAY


SUPPLIES
* Sailing Home stamp set & Smooth Sailing dies; Garden Birdhouses stamp set; Tasteful Labels Dies
* Misty Moonlight card base
* Basic White cardstock cut at 5 1/4” x 5” and scraps for images and greeting
* Penguin Playmates - diagonal stripe pattern, cut at 5 x 3 3/4”
* Misty Moonlight ink & blender pen
* Baker’s twine
* Adhesive and dimensionals

COUNTING SHEEP BIRTHDAY


SUPPLIES
* Counting Sheep  and A Wish for Everything stamp sets, Sheep Dies, Layering Circles Dies
* Just Jade card base
* Basic White cardstock 5 1/4” x 4” for focal panel may. Use this piece to stamp and die cut the two sheep, party hats, and greeting. Keep the stamped images in the center.
* Penguin Playmates DSP - Just Jade with dash pattern, cut at 5” x 3 3/4”
* Small scraps of Poppy Parade, Calypso Coral, and Daffodil Delight cardstock for balloons.
* Scrap of Early Espresso for fence
* Inks - Tuxedo Black; Basic Gray (light & dark), Poppy Parade and Daffodil Delight Stampin’ Write Markers.
* Baker’s Twine
* Adhesive and dimensionals

HAPPY FALL SQUIRREL CARD

SUPPLIES
* Nuts About Sauirrels and Banner Year stamp sets, Layering Circles Dies
* Sahara Sand Card base, plus scraps for focal image and greeting mats.
* Scraps of Basic White for focal image and greeting
* Peaceful Prints DSP - birch bark & plaid patterns each cut at 3 3/4 x 2 1/2”
* Inks - Crumb Cake, Old Olive, and Tuxedo Black
* Linen Thread
* Adhesive & Dimensionals

BEAUTIFUL SEASON & WHIMSICAL TREES

SUPPLIES
* Amaryllis Abloom, Christmas Tree Dies, Layering Circles Dies
* Fresh Freesia card base and Scrap of Fresh Freesia cardstock for greeting mat
* Basic White cardstock cut at 5 1/8” x 3 7/8” for focal panel mat - cut the three tree images and piece for greeting from center.
* Penguin Playmates DSP cut at 5” x 3 3/4”
* Fresh Freesia Open Weave Ribbon - about 20”
* Elegant Faceted Gems - 3, clear
* Adhesive and dimensionals


PEACEFUL PRINTS - LOVE & PEACE

SUPPLIES
* Peaceful Deer stamp set
* Garden Green card base
* Scraps of Garden Green, Real Red, and Basic Black cardstock for greeting. These will be cut with the layering circles dies.
* Red & black checked DSP cut at 5 1/4” x 4” and the Garden Green with Trees cut at 4 3/4” long & x 3 1/2” wide. (Directional pattern)
* Memento Tuxedo Black ink.
* Basic Black Baker’s Twine, about 16”, doubled, tied in a bow, and ends trimmed.
* Adhesive, dimensionals, glue dot (for twine).

PEACEFUL PRINTS SNOW WONDER CARD


SUPPLIES
* Snow Wonder stamp set and Snow Time dies
* Basic Black card base and Basic Black cardstock cut at 5 1/8” x 3 7/8” for focal panel mat, and a 3” x 7/8” piece to mat greeting.
* Basic White for stamping image and greeting.
* Peaceful Prints DSP - Real Red,  Tattersall Pattern 5 3/8” x 4 1/8”; Real Red - Tattersall with Snowflakes pattern 5” x 3 3/4”.
* Inks - Memento Tuxedo Black; Stampin’ Blends - Real Red (light & dark), Old Olive (light & dark), Pumpkin apiece (dark), and Smoky Slate (dark).
* Matte Black Dots - 2
* Adhesive, dimensionals


BE MERRY PENGUIN PLAYMATES CARDS


SUPPLIES
* Penguin Place and Banner Year stamp sets and Tasteful Labels dies.
* Fresh Freesia card base
* Basic White scraps for the “snow” and greeting.
* Penguin Playmates DSP - Dots pattern -  5 3/8” x 4 1/8”; Snowflake pattern - 5” x 3 3/4”; Polar Bear and Snowman pattern (fussy cut).
* Inks - Fresh Freesia and Misty Moonlight
* Cute Stars Adhesive Backed Sequins - Highland Heather - 3.
* Adhesive and dimensionals.

I had so much fun creating these cards, and I love how easy it is to use the DSP for all types of cards. As I mentioned earlier, the PENGUIN PLAYMATES  and the PEACEFUL PRINTS DSPs are each available to you free with a $50 Stampin’ Up! product purchase during SALE-A-BRATION! Remember - SALE-A-BRATION ends 30 September 2021. Here is one more look at today’s cards.

HOLIDAY CARDS


ANY DAY CARDS


Thank you so much for stopping by. For online shopping simply click one of the catalog pictures in the right column.  Questions? You can contact me at:  greatinkspirations@gmail.com

Until next time…

Stamp Happy!

Kim


All Stamps and stamped images ©️1990-2021 Stampin’ Up!®️


Monday, July 26, 2021

SQUIRRELS JUST WANT TO HAVE FUN: QUICK & EASY CARDS MADE WITH NUTS ABOUT SQUIRRELS STAMP SET

 Hi Stampers!

I have a fun stamp set to share today. It is called NUTS ABOUT SQUIRRELS! This stamp set is featured in the STAMPIN’ UP!®️ JULY-DECEMBER 2021 MINI CATALOG premiering 3 August 2021. Let’s take a look:


The stamp set is a Two-Step set, meaning there are outline images and what I call “filler” images. The filler images allow you to add color to images quickly and easily. Of course, if you decide to color the images with Stampin’ Blends, water coloring, etc., you can do that as well!  Although the stamp set hints of autumn, it can be used year round for many occasions!

Here are two cards I made using the stamp set:


These cards went together fairly quickly. I pulled the layering pieces from my bin of larger scraps of cardstock. I always look for opportunities to use scraps! I chose autumn colors for these cards.

BRIGHT-EYED & BUSHY-TAILED CARD


SUPPLIES FOR THIS CARD
* Pumpkin Pie card base 11” x 4 1/4” scored and folded at 5 1/2”
* Mango Melody cardstock mat cut at 5” x 3 5/8”
* Two Basic White pieces of cardstock for focal panel and inside card, both cut at 5” x 3 3/4” and a piece of scrap to stamp the squirrel.
* Inks - Pumpkin Pie, Cajun Craze, Cherry Cobbler, Crushed Curry, Calypso Coral, Early Espresso, Balmy Blue, and Memento Tuxedo Black
* Birch background stamp
* Stitched Rectangles Dies (3rd largest)
* Gilded Gems
* Blending Brush
* Adhesive of choice and dimensionals

ASSEMBLY
* Use the Stitched Rectangles Die to die cut one piece of the Basic White cardstock
* Use the Pumpkin Pie ink to stamp the birch background on the card front
* With Early Espresso stamp the tree limb on the left side of the focal panel about halfway down the page.
* Stamp the leaves using Calypso Coral, Cherry Cobbler, Crushed Curry, and Cajun Craze - for the leaves I inked the stamp, stamped off on scrap paper, then stamped the image on the card front. I stamped the lines on the leaf without stamping off.
* Use the blending brush and Balmy Blue ink to add a bit of color (sky) to the cardstock
* Stamp the greeting in Early Espresso.
* On scrap using Memento Tuxedo stamp the squirrel, then use Pumpkin Pie ink and the filler stamp to color the squirrel. Fussy cut the squirrel
* Adhere the focal panel to the Mango Melody mat, and adhere this piece to the card. Adhere the Basic White piece to the inside (stamp a squirrel image on it if you like)
* Attach the squirrel with dimensionals
* Add the gems

HEY THERE! CARD

SUPPLIES FOR THIS CARD
* Old Olive card base
* Cinnamon Cider cardstock for mat cut at 4 3/4” x 3 3/8”
* Scrap of Mango Melody cardstock and scrap of Basic White cardstock and a piece of Basic White cardstock cut at 5” x 3 3/4” for the inside of the card
* Layering Circles Dies (largest circle and largest scallop circle)
* Inks - Cinnamon Cider, Crumb Cake, Old Olive, Balmy Blue, and Memento Tuxedo Black
* Blending Brush
* Macrame 3-D Embossing Folder
*Linen thread about 18” plus 8” for the bow and Matte Decorative Dots - 3 in Old Olive
* Acorn image from Banner Year stamp set
* Adhesive of choice and dimensionals

ASSEMBLY
* Stamp the squirrel outline with Memento Tuxdo Black ink on he scrap of Basic White. Use Cinnamon Cider to color the squirrel. use Crumb Cake and Old Olive inks to add color to be acorn.
* Use the Balmy Blue ink and the blending brush to add “sky”
* Stamp the greeting with Cinnamon Cider ink
* With Old Olive stamp the acorns along all edges of the card front
* Die cut the squirrel image and the Mango Melody scrap using the circle die and the scalloped circle
* Emboss the Cinnamon Cider cardstock with the Macrame embossing folder
* Adhere he squirrel image to the mat
* Put a bit of adhesive on the back of the Cinnamon Cider mat about 1” from the bottom. Attach one end of the linen thread to the adhesive and wrap it around the card about 3 times. Adhere on the back with adhesive
* Fold the remaining piece of linen thread in half; slip it under the rows of linen thread and toe in a bow. 
* Adhere the Cinnamon Cider piece to the card base,  attach the sqirrel image to it’s mat then attach this to the card front with dimensionals, and adhere the 5” x3 3/4” Basic White cardstock to the inside of the card
* Place the Matte Decorative Dots on the card.


That is all for today! Thank you so much for stopping by. Until next time…
Stamp Happy!
Kim

All stamps and stamped images ©️1990-2021 Stampin’ Up!