Showing posts with label Hello Harvest. Show all posts

Tuesday, October 4, 2022

PEEKABOO! IT’S A TREAT FOR YOU! - A STAMP HAPPY HOLIDAYS POST

Hi Stampers,

Today’s Stamp Happy Holiday’s project is super simple treat bags. The bags I am using for the project are the PEEKABOO TREAT BAGS found on page 140 of the Stampin’ Up!®️ 2022-2023 Annual Catalog or view in my ONLINE STORE.  

Each package contains 10 food safe treat bags; 5 kraft and 5 white.  The bags feature a ziplock type closure. They are ready for you to decorate and fill with a cookie or two, candies, nuts, or other treats. Let’s take a look at my samples:


To view Stampin’ Up!sample projects see pages 19 and 50 in the annual catalog and page 57 in the Stampin’ Up! July -December 2022 Mini Catalog.

I plan to use these bags as party favors for Halloween and I will put one at each place setting on Thanksgiving.

PEEKABOO TREAT BAGS


CREATING THE BACKGROUND ON THE BAGS

I added color to treat bags with a Stampin’ Spritzer that contained a mixture of isopropyl alcohol and re-inker. A mixture of water and re-inker will work as well, but the color will take longer to dry.


I used an cardboard box as a tray for my spritzing. This contained the mess. I placed paper towel in the box prior to spritzing each bag. This insured a clean surface for each bag, and kept any wet ink or pools of ink from coloring the back side of the bag. I also used a strip of scrap cardstock to cover the peekaboo window while spritzing the color onto the bag. The strip of cardstock should be cut at 1 3/8” wide. The bag is 4” across, so the length of the strip should be at least 5”  to cover the peekaboo window and give room on each end to maneuver the strip into place and remove it after spritzing. 

It is easy to mix the alcohol and ink in the spritzer. Fill the Stampin’ Spritzer 1/2 - 3/4 of the way with the alcohol. Add 6-10 drops of re-inker to the spritzer (more if you like). If you will be spritzing only a bag or two you can use less alcohol and less re-inker. Place the lid on the spritzer and give the spritzer a gentle shake or two to mix the ink with the alcohol. 
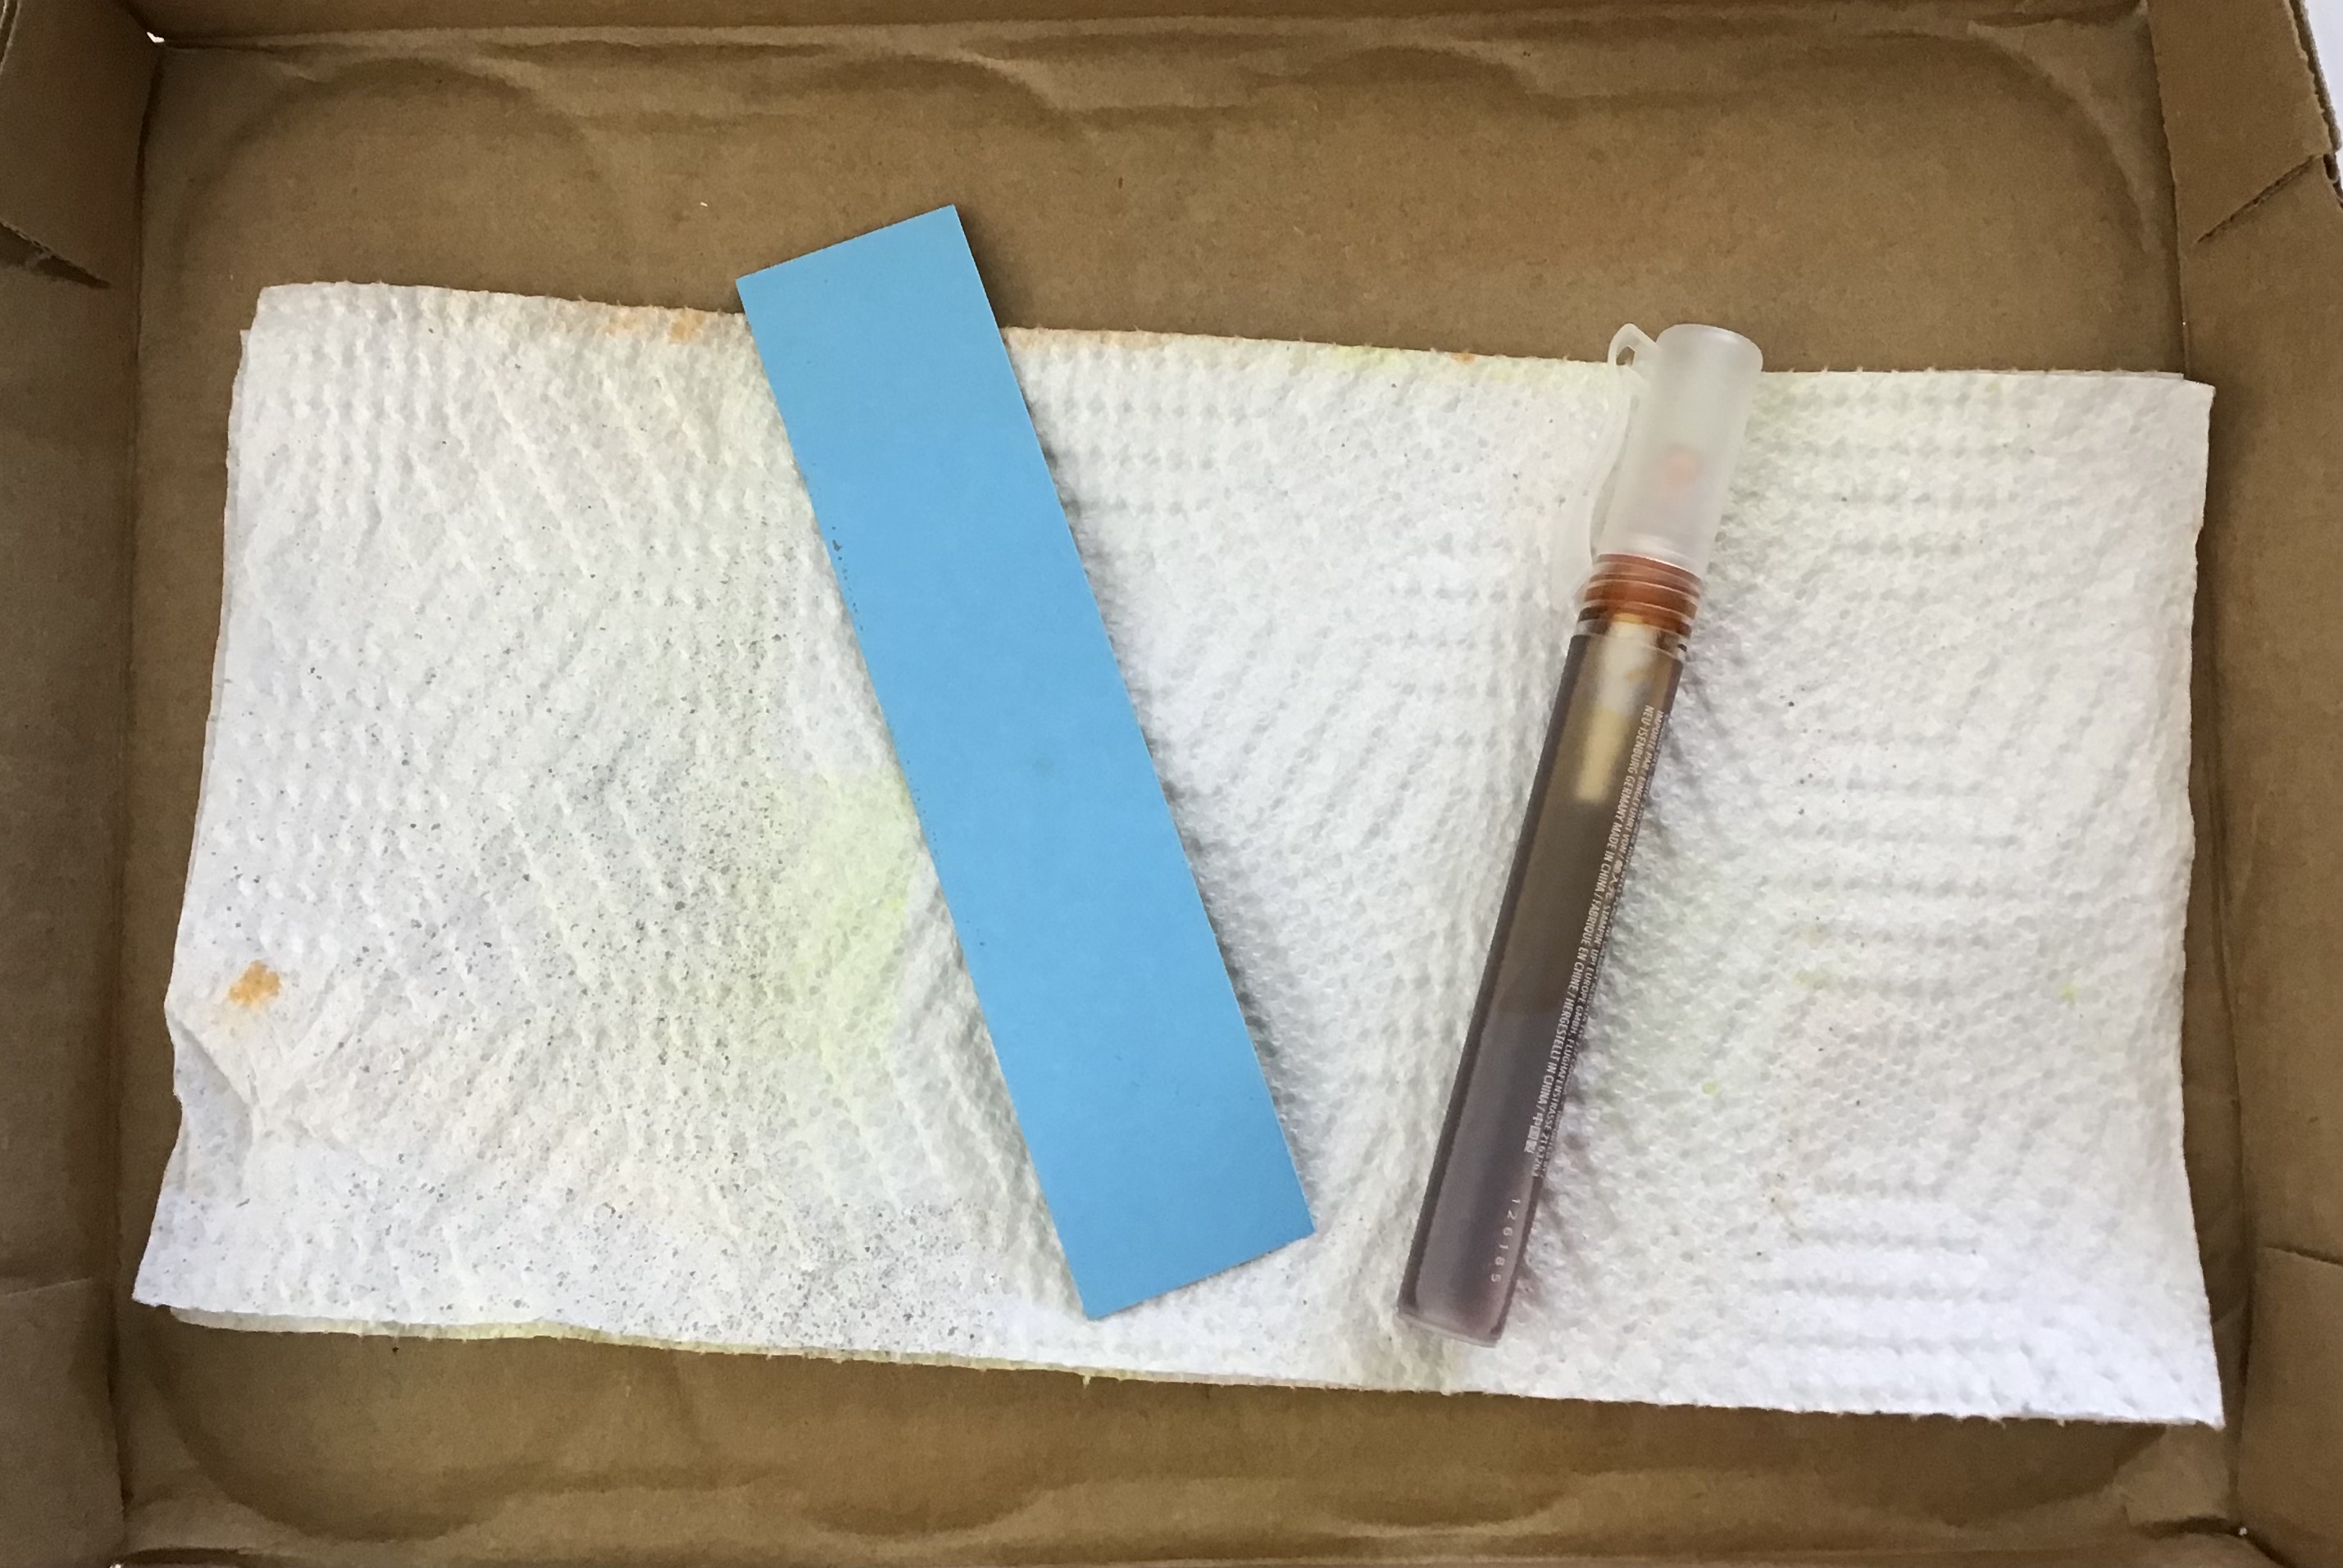

 
Place the paper towel on the bottom of the cardboard box. Place the treat bag on top the paper towel. Cover the peekaboo window with the strip of cardstock. You can secure the strip with tape if you like.


Begin to spritz the color onto the bag. Continue until you get the look you like. Allow the alcohol /ink to dry a few moments before adding stamped images, die cuts, etc to the treat bag.


The treat bag is ready to be decorated as you please.


LOVELIEST DAY PEEKABOO TREAT BAG

SUPPLIES FOR THIS BAG

* White Peekaboo treat bag
* Hello Harvest Bundle
* Pumpkin Pie Ink for spritzer.
* Scraps of Basic White and Pale Papaya cardstock (I lightly spritzed these pieces of cardstock with the Pumpkin Pie / alcohol mixture. 
* Small scrap of Old Olive cardstock to die cut vines
* Inks - Pumpkin Pie, Early Espresso; Stampin’ Blends - Pale Papaya (light & dark), Pumpkin Pie (light)
* Ribbon of choice - about 18” (I used some retired Old Olive twill ribbon. I encourage you to use what you have on hand. 
* Adhesive, dimensionals 

Note - I filled this bag with mixed nuts. I used about 3 - 4 Tablespoons of nuts.

BEWITCHING TREAT BAG

SUPPLIES FOR THIS BAH

* White Peekaboo Treat Bag
* Bewitching Bundle & Best Witches stamp set
* Granny Apple Green ink for spritzer
* Scraps of Basic White to stamp hat and frog
* Ink - Memento Tuxedo Black, Gorgeous Grape; Stampin’ Blends - Granny Apple Green (dark), Pumpkin Pie (light), Highland Heather (light & dark), Parakeet Party (light & dark
* Black Baker’s Twine (about 38”) and Metallic Mesh Ribbon about 5” (or twine and ribbon of choice)
* Adhesive, dimensionals 

Note - I filled this bag with 3 TBSP of Reese’s Pieces

Most schools require treats brought into the classroom be packaged. The individual snack sized bags of Reese’s Pieces, m & m’s, Skittles, etc will fit inside these treat bags.


NUTS ABOUT TREATS


SUPPLIES FOR THIS BAG

* Nuts About Squirrels stamp set
* Kraft treat bag
* Early Espresso ink to mix with alcohol (darker colored ink work best on the kraft colored bags)
* Basic White cardstock for stamping
* Inks - Early Espresso, Cajun Craze, Crumb Cake Old Olive, Crushed Curry
* Stylish Shapes Dies (circle that fits around greeting)
* Ribbon - about 8”
* Adhesive, dimensionals 

NOTE - I used a bit less than three TBSPs of nuts is this bag.

SCARY CUTE TRICK OR TREAT TIME


SUPPLIES FOR THIS BAG

* White treat bag
* Scary Cute stamp set
* Pumpkin Pie ink to mix with the alcohol
* Inks - Memento Tuxedo Black
* Basic Black Baker’s Twine (about 38”) and Metallic Mesh Ribbon 5” or so

Note - I used a mix of candy corn and peanuts in this bag about 1 1/2 TBSP each!

PEEKABOO TREAT BAGS
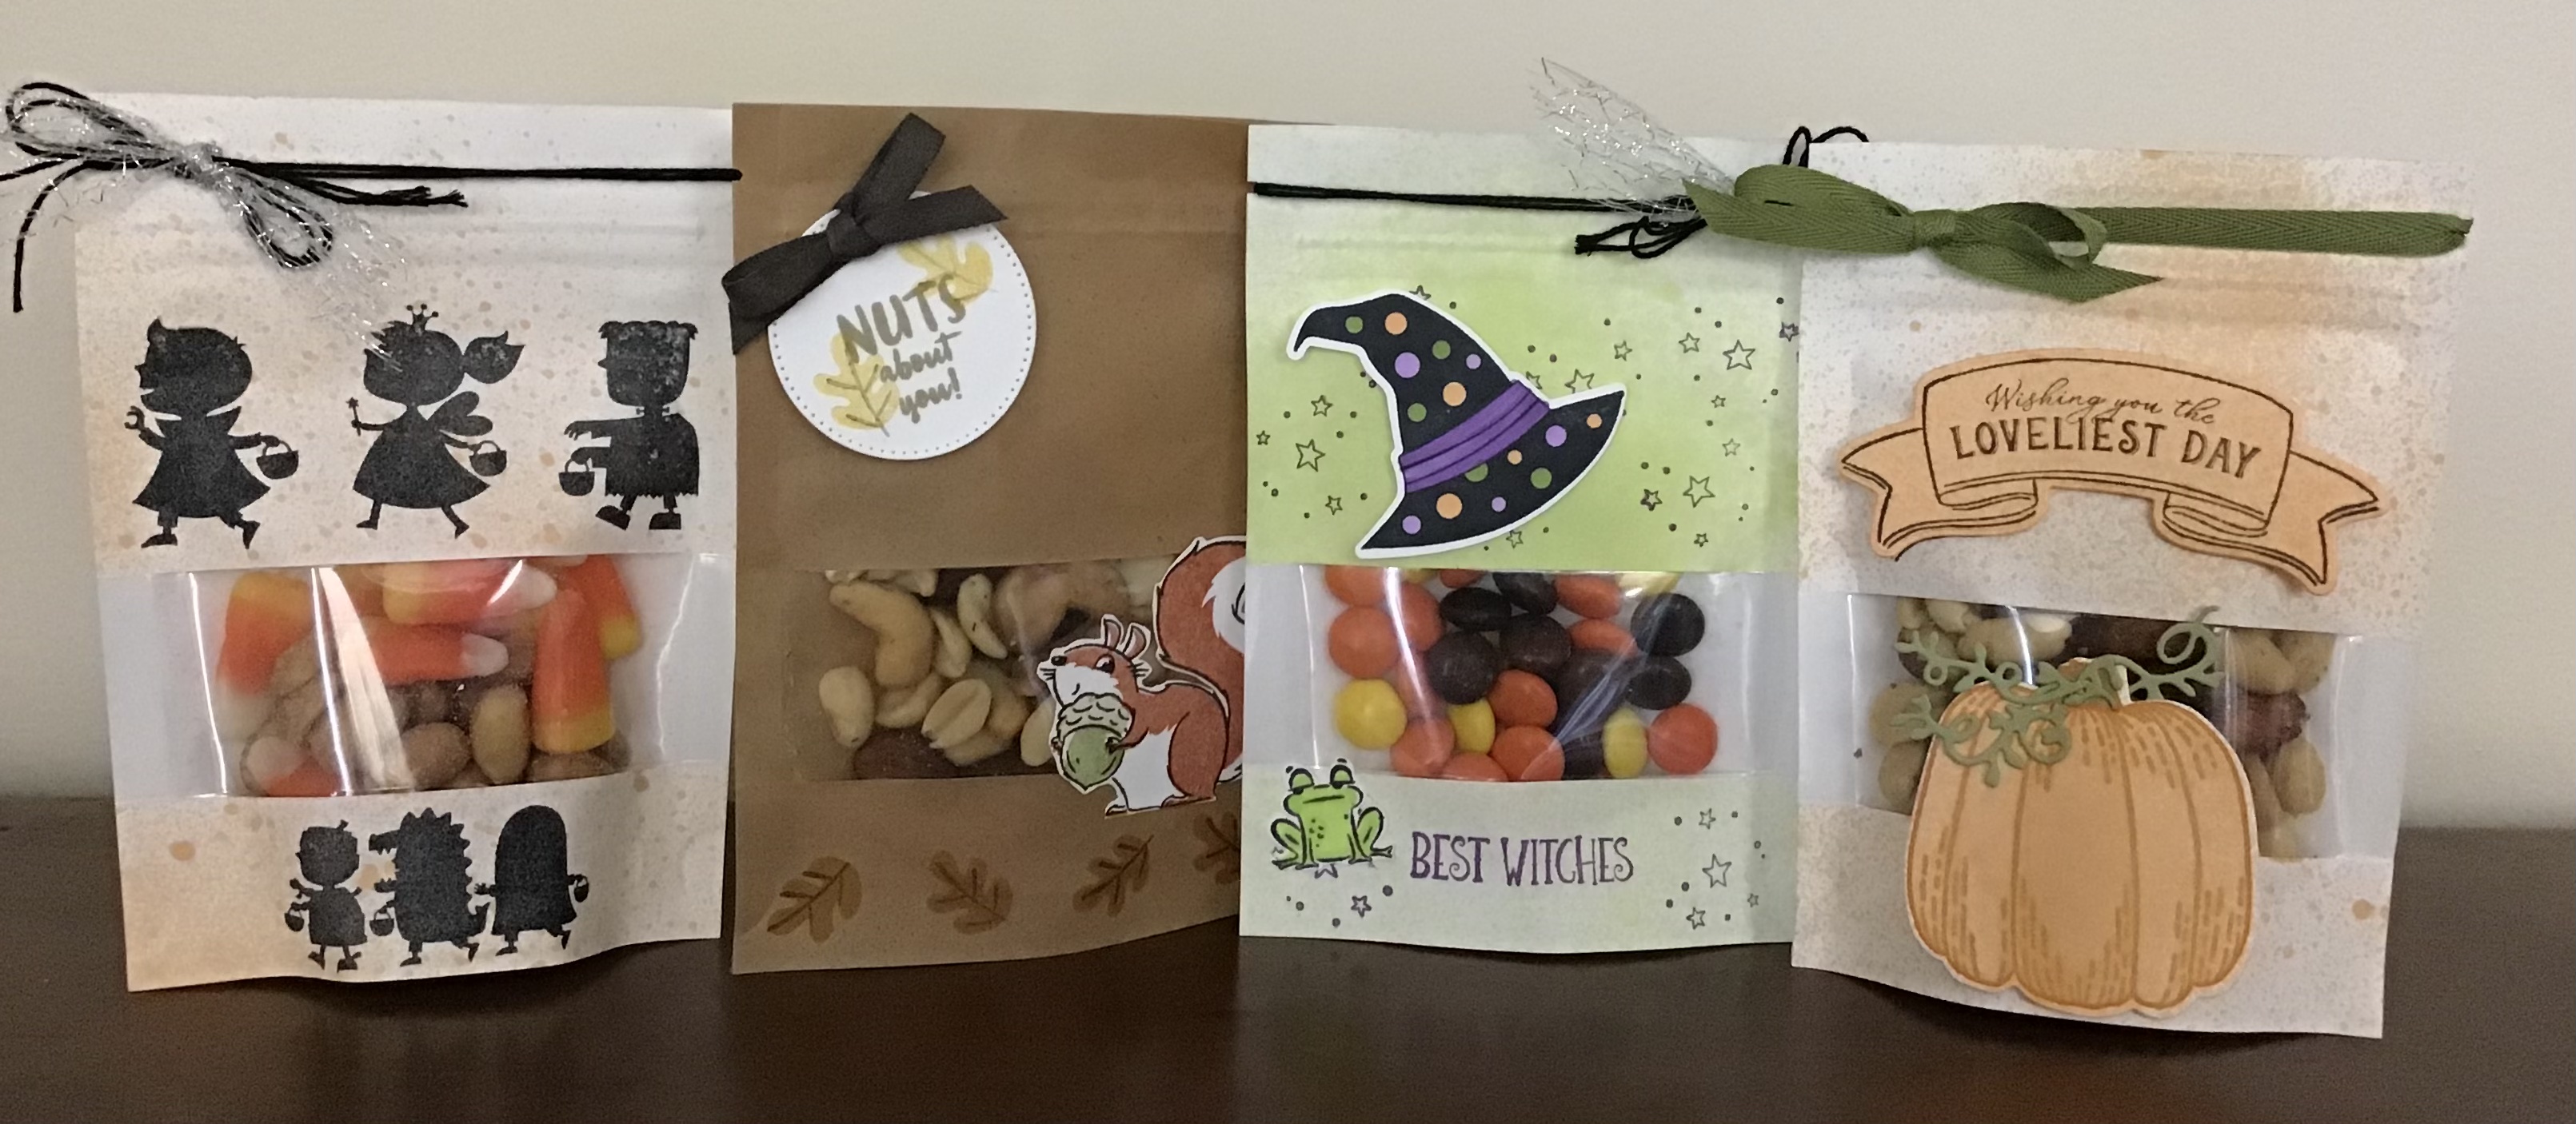

These treat bags are unique, and so easy to decorate. I think I will mark some with Christmas themes, fill them, and place them in a basket on my coffee table to offer to friends and family who stop by for a visit.

That is all for today. Thank you so much for stopping by. Until next time…
Stamp Happy!

Kim

All stamps and stamped images ©️1990-2022 Stampin’ Up!®️

Tuesday, August 16, 2022

HELLO HARVEST! USING SPECIALTY PAPERS FOR PRETTY FALL CARDS - A STAMP HAPPY HOLIDAYS POST

 Hi Stampers!

Welcome to week three of my Stamp Happy Holidays series! Today’s cards are fall themed, and can be used for thank you cards, birthday cards, Halloween cards, or Thanksgiving cards depending on the greeting selected. Another thing the cards have in common is they were created using specialty papers. Stampin’ Up!®️offers a fantastic collection of specialty papers from glimmer papers to foil sheets, metallic cardstock, vellum, velvet cardstock, pearlescent paper, and more! I love specialty papers, but sometimes I am guilty of being a specialty paper collector as opposed to a specialty paper user. I decided it was time to cut up some of my “collection.” Today’s cards are the result of that decision. Let’s take a look:


I used the HELLO HARVEST BUNDLE (Hello Harvest stamp set & Rustic Pumpkin Dies.) The specialty papers used are: Gold & Rose Gold 6” x 6” Metallic Paper (gold) from the Annual Catalog, Metallic & Shimmer 6” x 6” Paper (Cajun Craze / Pumpkin Pie) from the current Mini Catalog, Brushed Metallic 12” x 12” Cardstock (gold) from the Annual Catalog, and *Silver & Gold 6” x 6” DSP (gold) from the Sale-A-Bration Brochure.

* This DSP is a Sale-A-Bration choice, free with a $50 Stampin’ Up! product purchase now through 31 August or while supplies last.

HELLO HARVEST STAMP SET


RUSTIC PUMPKIN DIES


I used a very simple layout for the cards. I moved the images and greeting around a bit, but kept the measurements for the layers the same.

FOR ALL CARDS

* Card base - A-2 size, 8 1/2” x 5 1/2” scored and folded at 4 1/4” OR 4 1/4” x 11” scored and folded at 5 1/2”
* Mat layer - 5 1/4” x 4”
* Focal image layer - 5” x 3 3/4”

SO GRATEFUL CARD

SUPPLIES
* Rustic Pumpkin Dies for pumpkin and dies
* Card base - Basic White (thick) cardstock
* Mat - Gold & Rose Gold 6” x 6” Metallic Paper (gold)
* Focal panel - Basic White cardstock embossed with the Leaf Fall 3D embossing folder
* Leaf Fall 3-D embossing folder
* Gold embossing powder for greeting (greeting is from the Soft Seedlings stamp set)
* Ink - Versa Mark
* Adhesive and dimensionals (greeting and pumpkin are attached with dimensionals) 

TIPS 
* Die cut the pumpkin pieces from the center of the mat. Depending on the size of your chosen greeting you might be able to cut the mat for the greeting from the mat. The focal panel will cover up the wholes from the die cuts. 
* Assemble the pumpkin using adhesive on choice. I used a small dot of liquid glue to attach the vines to to the back side of the pumpkin. I attached the completed pumpkin to the card with dimensionals.
* The Leaf Fall 4-D embossing folder’s design basically runs diagonally across the page. Place your cardstock in the folder so as to get as much of the area embossed as possible. I placed my die cut pumpkin in an are with very few embossed images.

HELLO RUSTIC PUMPKIN


SUPPLIES
* Hello Harvest Bundle
* Card base - Cajun Craze cardstock
* Mat - Pumpkin Pie cardstock
* Focal Panel - Metallic & Shimmer 6” x 6” paper - Cajun Craze / Pumpkin Pie
* Inks - Pumpkin Pie, Cajun Craze
* Sponge dauber

TIPS
* Follow the tips for die cutting and for assembling and adhering the pumpkin.
* Sponge Pumpkin Pie ink along the sides of the pumpkin pieces before assembling.
* The greeting is stamped on Pumpkin Pie cardstock and matted on a piece of the specialty paper.it is adhered with dimensionals.

HARVEST HELLO

SUPPLIES
*  Hello Harvest Bundle
* Card base - Basic White (thick) cardstock
* Mat - Brushed Metallic cardstock - gold
* Focal panel - Silver & Gold 6” x 6” DSP - gold
* Basic White cardstock for stamping and die cutting
* Inks - Versa Mark
* Gold embossing powder
* Stylish Shapes Dies - circle, second smallest for greeting mat
* Beautiful Shapes dies - circle smallest for greeting (greeting is from Soft Seedlings)
* Adhesive and dimensionals 

TIPS:
* I die cut the greeting mate and pumpkin vines from the mat.
* I embossed and die cut two of the floral bunches to use as a background for the pumpkin
* I adhered the vines to the back side of the pumpkin before attacking it to the card with dimensionals.

ONE MORE LOOK AT THE CARDS


I hope today’s card samples encourage you to open up those packages of specialty papers and create something wonderful!

Thank you for checking in. Until next time…
Stamp Happy!

Kim

All stamps and stamped images ©️1990 - 2022 Stampin’ Up!®️