Showing posts with label Banner Year. Show all posts

Friday, October 8, 2021

CREATE A SPOOKY HALLOWEEN BACKGROUND IN NO TIME WITH INKS AND BLENDING BRUSHES!

 Hi, Stampers!

Today I have another Halloween themed card to share with you. The card features a spooky nighttime background created with inks and blending brushes. Let’s take a look:


The cards are the same except for the moons. The full moon was created by masking the cardstock before applying ink. I removed the mask and applied just a dab of ink to “the moon.” The crescent moon was stamped on a scrap of Basic White cardstock with an image from the TO THE MOON stamp set. I fussy cut the image, and adhered it to the card with dimensionals.

I used images from four stamp sets to create these cards; BANNER YEAR, CLEVER CATS, SEASCAPE, and TO THE MOON. Page down for a video tutorial that includes a look at the stamp sets. If you do not have these stamp sets, use what you have. This background would be great for most any Halloween scene!

SUPPLIES FOR THE CARDS

Each card takes
* Blackberry Bliss card base 8 1/2” x 5 1/2” scored and folded at 4 1/4”
* Pumpkin Pie cardstock cut at 5 1/2” x 4” to mat focal panel.
* Basic White cardstock cut at 5” x 3 3/4” for focal panel.
* Basic White cardstock to stamp bat images and to stamp greeting.
* Inks - Daffodil Delight, Smoky Slate, Blackberry Bliss, Basic Gray, Memento Tuxedo Black; Smoky Slate Stampin’ Blend (dark), and Black erythema Bliss Stampin’ Write Marker.
* Blending brushes (You can also use sponge dauber or sponges - tap on scrap paper to take off a bit of the ink, and use a light touch as you apply the ink to the cardstock.)
* Dimensionals - I used the mini black dimensionals.
* Tasteful Labels Dies - double flagged banner.


This is the card I used the crescent moon image from the TO THE MOON stamp set. The crescent moon is adhered to the card with dimensionals.


To make the moon for this card I used a mask made by die cutting a circle from piece of copy paper. The circle mask is about 1 1/4” in diameter. (If you do not have circle dies, you can use a circle punch, or trace around a small circular object and fussy cut the mask.) I placed the mask on the Basic White focal panel, and left it on until the background was finished. Then I inked up my blending brush with Daffodil Delight, tapped off some of the ink on scrap paper, a very lightly added a little color to the full moon.

For more tips on creating these cards view the video below.


I hope you try this background technique. You can switch out the colors for different looks. You can use darker yellows or even Pumpkin Pie for the moon, and try Night of Navy or Misty Moonlight instead of the Blackberry Bliss. Experiment a little to find color combinations you like best.


That is all for today. Thank you for stopping by. Until next time…
Stamp Happy!

Kim

All stamps and stamped images ©️1990-2021 Stampin’ Up!®️


Thursday, September 23, 2021

DIY YOUR DSP!

 Hi Stampers!

Have you ever had a card idea in mind, but just could not find the right Designer Series Paper (aka DSP)?What to do, what to do? Why not create your own? It is easy to do, and adds a one of a kind element to your cards! The BANNER YEAR stamp set found in the STAMPIN’ UP!®️ 2021-2022 ANNUAL CATALOG is a great set for making your own DSP! It has lots of images to choose from for autumn and winter seasons and holidays.

BANNER YEAR


Here is the card I made with my DIY DSP!


PROCESS:
* I started with a 5 1/4” x 4” piece of Basic White cardstock. (You can start with any size cardstock you like.)
* Next I chose my images and ink colors.
* I began stamping with the largest image (pumpkin). I stamped them “somewhat” randomly, but kept in mind the number and size of the other stamps I planned to use.
* Next I stamped the leaves, one color at a time.
* Finally, I stamped the acorns.
* I cut down the DIY DSP to the size I needed.

TIPS:
* Although you want to stamp the images somewhat randomly, have basic idea of what you want your DSP to look like. (If you decide you want your images stamped in more of a pattern, that is okay too!)
* Turn your images from left to right, up and down if you are stamping randomly.
* Stamp images off the edge of the cardstock, even if you believe you will be trimming down the cardstock.
* Start by stamping with the largest image and then stamp the images that are a bit smaller,  and lastly stamp the smallest images.


SUPPLIES FOR THIS CARD
* Bumblebee cardstock. 11” x 4 1/4” scored and folded at 5 1/2”.
* Merry Merlot cardstock cut at 5 1/8” or 3 7/8”.
*Bumblebee cardstock 3 3/4” x 1” to mat greeting
* Basic White cardstock 3 5/8” x 7/8” for greeting
* DIY DSP cut at 3 3/4” square.
* Inks - Merry Merlot, Pumpkin Pie, Cinnamon Cider, Crumb Cake, Mango Melody, Old Olive, Bumblebee, Soft Sea Foam
* Blending Brush
* Bumblebee Gingham Ribbon @ 14”.
* Ornate Thanks stamp set (annual catalog) for greeting.

Note - I used a blending brush and Soft Sea Foam ink to soften the the Basic White cardstock for the DIY DSP and for the greeting. I just applied a very light coating of the ink over the pieces. I did the similar thing for the inside of the card, except I just went around the images and the edges of the cardstock.

Here is a look at the inside of the card:

I know it is a bit difficult to see, but that little bit of color really softens the brightness of Basic White cardstock.

I hope you give DIY DSP a try!

That’s all for today. Thank you for stopping by. Until next time…
Stamp Happy!

Kim

All stamps and stamped images ©️1990-2021 Stampin’ Up!©️


Tuesday, September 21, 2021

TAG IT! USE YOUR DIES & PUNCHES TO CREATE FESTIVE GIFT TAGS: A TINSEL TIME TUESDAY POST

 Hi Stampers!

A few days ago my sister texted and informed me Christmas is100 days away. I felt a wave of panic pass through my body! There is a lot to do between now and December 25th! My Christmas card stash is growing, and I am on track to have plenty of cards by 1 December. I have made a list of possible gifts, but of course I have done no shopping. I do need to do a bit of shopping soon as my son and his family live overseas.  I have made some tags, but not nearly enough. So… I decided I still have a few days before I need to get serious about gifts, and decided to design some tags, and share them with you. 

I used dies and punches for the images on all the tags. For all the tag bases I used two dies from the TAILOR MADE TAGS (Stampin’ Up!®️ 2021-2022 Annual Catalog). For these tags I also used a bit more of my specialty papers, gems / embellishments, ribbon, and the tag bases were all cut from cardstock I had precut for card bases. Let’s take a look at the tags:


LET IT SNOW TAG

FRONT & BACK OF TAG

SUPPLIES FOR THIS TAG

* Snowman Season stamp set.


* Pool Party cardstock 8 1/2” x 5 1/2” for tag bases.
* Basic White cardstock about 5” x 2” to die cut two 1 5/8” diameter circles.
* Pumpkin Pie cardstock about 1 1/2” x 2” to die cut one 1 1/8” diameter circle.
* Dies shown in the photo below - tag die and the coordinating die that cuts the reenforcement piece, two dies from the Layering Circles Dies 1 5/8” diameter and 1 1/8” diameter. (You can also use circle punches - 1 1/2” and 1” will work just fine.)
NOTE - The photo below shows how I cut 4 tag bases and the reenforcement pieces from 1/2 sheet of cardstock (8 1/2” x 5 1/2”). The reenforcement die cuts three images. I used two on each tag, one on each side of the hole in the tag.  I ran the die through the machine 3 times for enough reinforcements for four tag.


* Inks - Pool Party, Real Red; Wink of Stella; Black Stampin’ Write Marker; Flirty Flamingo (light) Stampin’ Blend, and Stampin’ Blends Color Lifter.


* Ribbon - White Organdy Glittered Ribbon and/ or Pool Party Striped Grosgrain Ribbon - about 6-7 inches per tag.


* Adhesive of choice (for me the liquid glue worked best for this project), and glue dots.


ASSEMBLY
* Do all the die cutting.
* Cut each of the two Basic White circles in half for snowman heads.
* Cut the Pumpkin Pie circle in half then cut four wedges for snowman carrot noses from one of the halves. 
* Use a glue dot to attach the carrot noses to the center top of the snowman head. Use the Basic Black marker to create the snowman’s mouth. Use the Flirty Flamingo (light) Stampin’ Blend to add cheeks. Go over the cheeks with the Color Lifter.
* Use a snowflake stamp and Pool Party ink to add a snowflake background to the tag - on both sides of the tag.  (I used the image from the Penguin Place on my tags, but you can use the one in the Snowman Season set, or any one you have.)
* Use the Real Red ink to stamp the greeting (Let It Snow) on the front side of the tag, and to stamp the “to/from” on the reverse side.
* Adhere the snowman face to the bottom of the tag along the die cut stitching line.
* Go over the snowman’s face and nose with Wink of Stella. 
* Use liquid glue to add the reenforcement pieces to the top of the card on the front and back. (You can skip this if you like, but the die cut piece makes the tag look more finished and it reenforcement the hole keeping the ribbon from tearing the tag.)
* Fold the ribbon in half, then fold it in half again, and thread it through the die cut hole, pull the two ends through  the ribbon’s loop, and pull. Trim ends.

PINE TREE TAG

FRONT & BACK OF TAG

SUPPLIES FOR THIS TAG
* Stamp sets - Penguin Place and Banner Year.


* Pine Tree Punch
* Scraps of DSP- pattern(s) of choice. I used patterns from 2021-23 In Color 6” x 6” DSP Assortment in Soft Succulent and Tidings of Christmas - Pine Cone, Holly, and Greenery pattern in Soft Succulent.


* For these tags I used one of the Basic White card bases from my stash. This piece is cut at 11” x 4 1/4”. As you can see from the photo below, I was able to cut 5 tags from this orientation. I needed10 of the reenforcements. I was able to cut nine from one end of the cardstock, the positioned the die cut just one of the items from the cardstock by positioning the die along the edge.


* Ink - Real Red


* Embellishments - In Color Sheer Ribbon in Soft Succulent, gems, pearls, rhinestones of choice, 3 per tag. (I used a variety - all are found in the Annual Catalog - Metallic Pearls in silver, Holiday Rhinestones - Coastal Cabana, Genial Gems - Mint Macaron, Blue Adhesive Backed Gems, and 2021-2023 In Color Jewels in Soft Succulent.)


* Adhesive of choice.

ASSEMBLY

* Die cut the tags and the reenforcements; punch out the trees.
* Stamp the greeting on the front of the tag near the top with Real Red ink, and stamp the To/From (Banner Year) on the backside of the tag.
* Adhere the trees to the tags. Adhere the reenforcements to the tag.
* Add the ribbon just as for the snowman tag.
* Add 3 gems to each tag.

PENGUIN TAG

FRONT AND BACK OF TAG

SUPPLIES FOR THIS TAG

* Penguin Place Bundle - Penguin Place stamp set and Penguin Builder Punch


* For Unto Us stamp set.

* Balmy Blue cardstock for tag bases cut at 8 1/2” x 5 1/2”.
* Scraps of Basic Black, Basic White, and Mango Melody.


NOTE - this card base from my stash had been scored and folded. I could not die cut it the same way I did for the snowman tag as the score line would have run through one of the tag bases. I was still able to get four tags from the cardstock as you can see in the photo below.


* Specialty Papers - Black Glimmer Paper, Rainbow Glimmer Paper (Annual Catalog) - you will need the area that is green, blue, purple, and a small piece that is the darker yellow-orange color, Snowy White Velvet paper. (You will need small scraps of these for each tag.)


* Inks - Balmy Blue, Night of Navy, Mango Melody, Memento Tuxedo Black; Wink of Stella and White Stampin’ Chalk Marker.


* Other - Basic Borders Dies - the one that sort of looks like clouds or bubbles; White Glittered Organdy Ribbon, Simply Elegant Trim - silver - 6 or so inches of each.


* Liquid adhesive (this worked best for me), glue dots, and dimensionals.


ASSEMBLY

* Die cut the tag pieces and die cut two each, 1 3/4” square pieces of the Velvet paper and the Rainbow shimmer paper (green/blue/purple) along the top edge with the border die. ( I angled the die just a little bit.)
* Punch out the penguins - 2 penguins Basic Black, Basic Whire, and Mango Melody, and 2 penguins with Black Glimmer paper, Basic White cardstock, and the dark yellow/ orange portion of the Rainbow Glimmer paper.
* Use Balmy Blue ink and stamp the snowflake images on the front of the tag. Stamp the greeting (from For Unto Us) with Night of Navy. Stamp the To/From on the back of the tag. 
* On the Basic White layer of the penguins use the Memento Tuxedo Black ink to stamp the eyes, and Mango Melody to stamp the Beal. Use the chalk marker and add a little dot to the eyes to add a bit of personality to the penguin . 
* Assemble the penguins and place dimensionals on the back.
* Adhere the Rainbow Glimmer paper or the velvet paper to the tag along the bottom of the tag just above the stitching.
* Add the reenforcement pieces as for previous tags. 
Add the penguin. 
* Add the ribbon or trim as for the previous tags. (I used the glittered ribbon for the tags on which I used glimmer papers and the Simply Elegant trim with the other design.)


With each step written out it seems like these tags take forever to make, but they don’t. It took me just under an hour to make these tags. The Tailor Made Tags Dies made it so easy to create the tags. There is another tag design, and several tag sizes included in the set of dies. I almost passed on purchasing them. I am so glad I changed my mind!

HOLIDAY TAG TIPS VIDEO


That is all for the edition of Tinsel Time Tuesday. Be sure to check in next Tuesday when we will be hanging our stockings with flair! Until next time…
Stamp Happy!

Kim

All stamps and stamped images ©️1990-2021 Stampin’ Up!®️

Saturday, August 28, 2021

PENGUIN PLAYMATES & PEACEFUL PRINTS DSPS - THEY’RE NOT JUST FOR THE HOLIDAYS!

 Hi Stampers!

September arrives in a few days, and that means we are right in the middle of SALE-A-BRATION! Today I thought we would take another look at two collections of Designer Series Papers featured in the Sale-a-bration Brochure. You can select either one of these papers for free with a $50 Stampin’ Up!®️ product purchase now through 30 September 2021. The two collections of DSP I am focusing on today are PENGUIN PLAYMATES & PEACEFUL PRINTS. 

PENGUIN PLAYMATES


This DSP is wintry, whimsical, and festive! It coordinates with the PENGUIN PLACE BUNDLE (Penguin Place stamp set and Penguin Builder punch) found in the Stampin’ Up! July-August 2021 Mini Catalog. The paper is great for backgrounds, paper piecing, fussy cutting, and one of the penguin images coordinates with the Penguin Builder punch!

PEACEFUL PRINTS


This DSP is comfy and cozy and perfect for rustic, woodsy, and country looking Christmas cards. It coordinates with the PEACEFUL DEER BUNDLE (Peaceful Deer stamp set and Deer Builder punch) found in the Stampin’ Up! July - December 2021 Mini Catalog.  This DSP is great for layering, backgrounds, and more. The deer image coordinates with the deer builder punch. One of the deer images faces the opposite direction of the punch. To learn how to use the punch with that image see my 10 August 2021 post.

CHRISTMAS CARDS


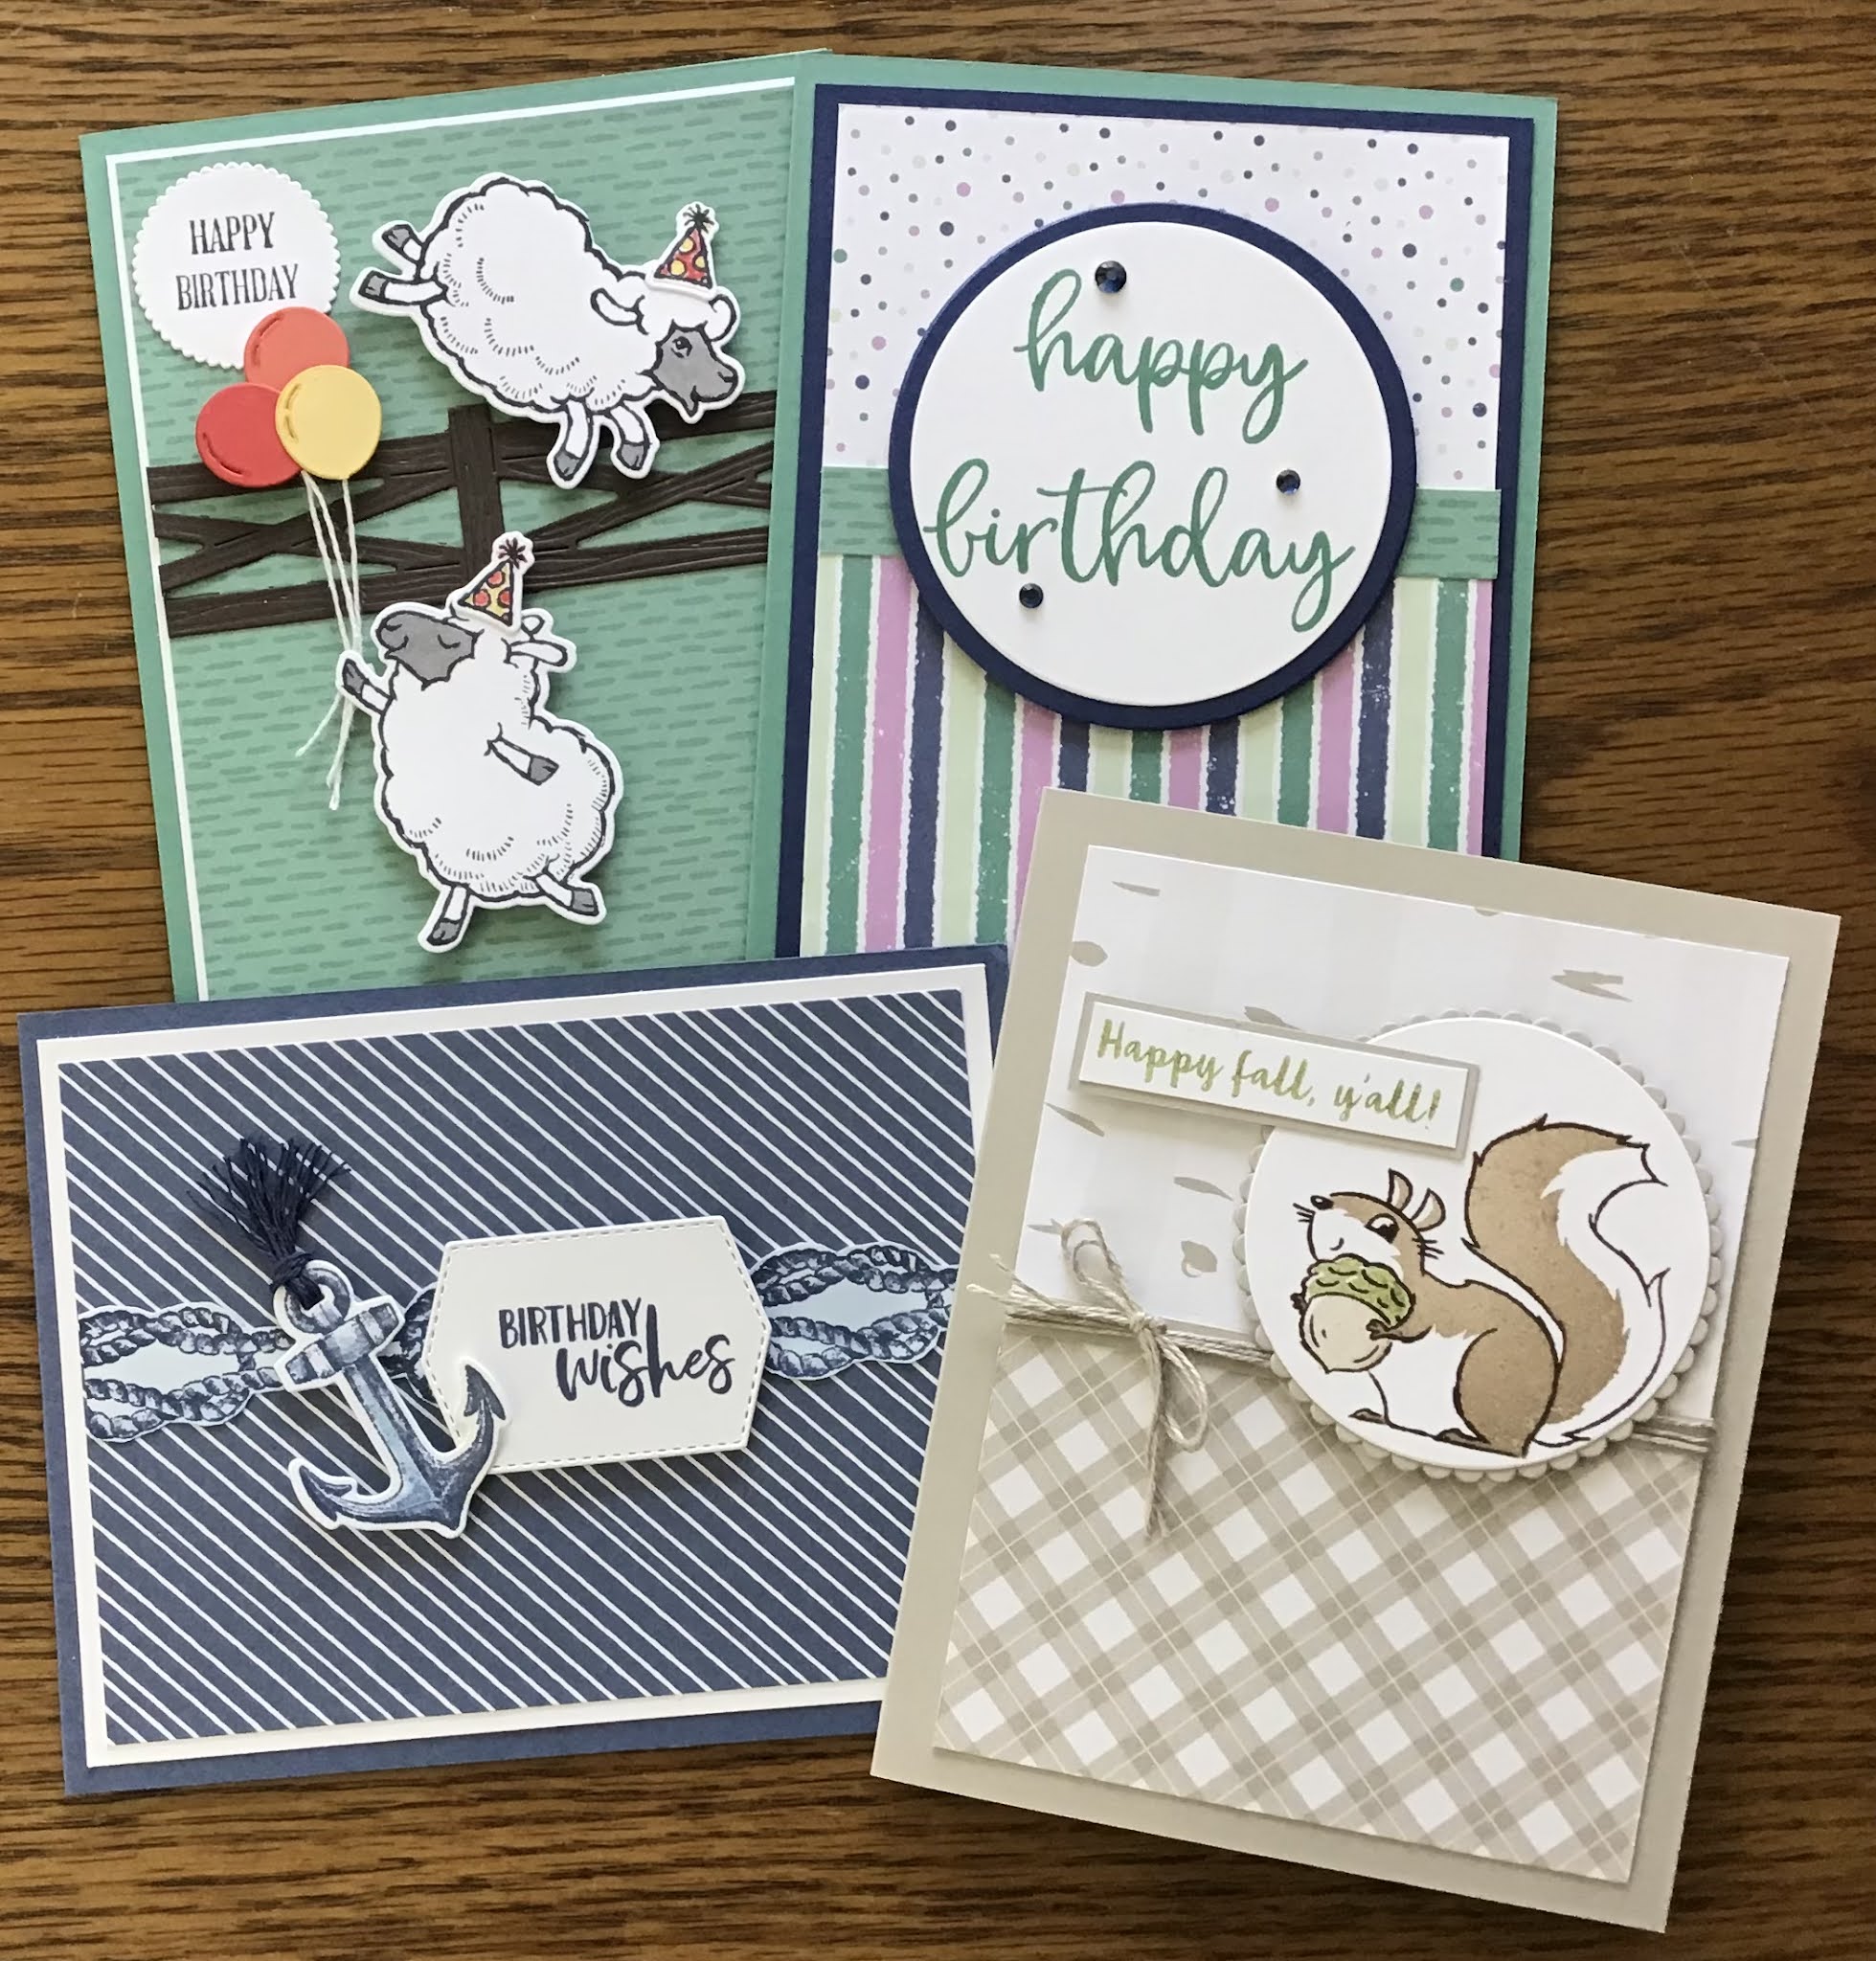
Here are four Christmas cards I created using the DSPS. These papers are great for Holiday cards, but they also can be used on cards for any occasion! Stampin’ Up!’s DSPs usually have a theme based print on one side and a more neutral / generic pattern on the other side. 

Here are some non- Christmas cards I made using the DSPs. I chose to make mostly birthday cards, but all the cards can easily be adapted for any occasion.

ALL OCCASION CARDS


HAPPY BIRTHDAY CARD WITH STRIPES, DOTS & DASHES

SUPPLIES
* Stamp set - Biggest Wish 
* Just Jade card base
* Night Of Navy cardstock cut at 5 1/4” x 4” to mat the focal layer, and use the Layering Circles Dies to cut a 3” diameter circle from the center to use as a mat for the greeting.
* Scrap of Basic White - use the Layering Circle Dies to cut a 2 5/8” circle for the greeting.
* Penguin Place DSP - striped pattern 3 3/4 x 2 1/2”, dot pattern 3 3/4” x 2 1/2”, dash pattern 3 3/4” x 1/2”
* Just Jade ink
* Holiday Rhinestones - 3, Night Of Navy
* Adhesive and dimensionals

SAILING HOME BIRTHDAY


SUPPLIES
* Sailing Home stamp set & Smooth Sailing dies; Garden Birdhouses stamp set; Tasteful Labels Dies
* Misty Moonlight card base
* Basic White cardstock cut at 5 1/4” x 5” and scraps for images and greeting
* Penguin Playmates - diagonal stripe pattern, cut at 5 x 3 3/4”
* Misty Moonlight ink & blender pen
* Baker’s twine
* Adhesive and dimensionals

COUNTING SHEEP BIRTHDAY


SUPPLIES
* Counting Sheep  and A Wish for Everything stamp sets, Sheep Dies, Layering Circles Dies
* Just Jade card base
* Basic White cardstock 5 1/4” x 4” for focal panel may. Use this piece to stamp and die cut the two sheep, party hats, and greeting. Keep the stamped images in the center.
* Penguin Playmates DSP - Just Jade with dash pattern, cut at 5” x 3 3/4”
* Small scraps of Poppy Parade, Calypso Coral, and Daffodil Delight cardstock for balloons.
* Scrap of Early Espresso for fence
* Inks - Tuxedo Black; Basic Gray (light & dark), Poppy Parade and Daffodil Delight Stampin’ Write Markers.
* Baker’s Twine
* Adhesive and dimensionals

HAPPY FALL SQUIRREL CARD

SUPPLIES
* Nuts About Sauirrels and Banner Year stamp sets, Layering Circles Dies
* Sahara Sand Card base, plus scraps for focal image and greeting mats.
* Scraps of Basic White for focal image and greeting
* Peaceful Prints DSP - birch bark & plaid patterns each cut at 3 3/4 x 2 1/2”
* Inks - Crumb Cake, Old Olive, and Tuxedo Black
* Linen Thread
* Adhesive & Dimensionals

BEAUTIFUL SEASON & WHIMSICAL TREES

SUPPLIES
* Amaryllis Abloom, Christmas Tree Dies, Layering Circles Dies
* Fresh Freesia card base and Scrap of Fresh Freesia cardstock for greeting mat
* Basic White cardstock cut at 5 1/8” x 3 7/8” for focal panel mat - cut the three tree images and piece for greeting from center.
* Penguin Playmates DSP cut at 5” x 3 3/4”
* Fresh Freesia Open Weave Ribbon - about 20”
* Elegant Faceted Gems - 3, clear
* Adhesive and dimensionals


PEACEFUL PRINTS - LOVE & PEACE

SUPPLIES
* Peaceful Deer stamp set
* Garden Green card base
* Scraps of Garden Green, Real Red, and Basic Black cardstock for greeting. These will be cut with the layering circles dies.
* Red & black checked DSP cut at 5 1/4” x 4” and the Garden Green with Trees cut at 4 3/4” long & x 3 1/2” wide. (Directional pattern)
* Memento Tuxedo Black ink.
* Basic Black Baker’s Twine, about 16”, doubled, tied in a bow, and ends trimmed.
* Adhesive, dimensionals, glue dot (for twine).

PEACEFUL PRINTS SNOW WONDER CARD


SUPPLIES
* Snow Wonder stamp set and Snow Time dies
* Basic Black card base and Basic Black cardstock cut at 5 1/8” x 3 7/8” for focal panel mat, and a 3” x 7/8” piece to mat greeting.
* Basic White for stamping image and greeting.
* Peaceful Prints DSP - Real Red,  Tattersall Pattern 5 3/8” x 4 1/8”; Real Red - Tattersall with Snowflakes pattern 5” x 3 3/4”.
* Inks - Memento Tuxedo Black; Stampin’ Blends - Real Red (light & dark), Old Olive (light & dark), Pumpkin apiece (dark), and Smoky Slate (dark).
* Matte Black Dots - 2
* Adhesive, dimensionals


BE MERRY PENGUIN PLAYMATES CARDS


SUPPLIES
* Penguin Place and Banner Year stamp sets and Tasteful Labels dies.
* Fresh Freesia card base
* Basic White scraps for the “snow” and greeting.
* Penguin Playmates DSP - Dots pattern -  5 3/8” x 4 1/8”; Snowflake pattern - 5” x 3 3/4”; Polar Bear and Snowman pattern (fussy cut).
* Inks - Fresh Freesia and Misty Moonlight
* Cute Stars Adhesive Backed Sequins - Highland Heather - 3.
* Adhesive and dimensionals.

I had so much fun creating these cards, and I love how easy it is to use the DSP for all types of cards. As I mentioned earlier, the PENGUIN PLAYMATES  and the PEACEFUL PRINTS DSPs are each available to you free with a $50 Stampin’ Up! product purchase during SALE-A-BRATION! Remember - SALE-A-BRATION ends 30 September 2021. Here is one more look at today’s cards.

HOLIDAY CARDS


ANY DAY CARDS


Thank you so much for stopping by. For online shopping simply click one of the catalog pictures in the right column.  Questions? You can contact me at:  greatinkspirations@gmail.com

Until next time…

Stamp Happy!

Kim


All Stamps and stamped images ©️1990-2021 Stampin’ Up!®️


Monday, May 24, 2021

CARDS FOR ANGLERS, SPELUNKERS, AND CHIROPTEROLOGISTS USING LAYERING DIORAMA DIES

 Hi Stampers!

Today’s cards feature the new Layering Diorama Dies from the Stampin’ Up!®️ 2021-2022 Annual Catalog. Catalog sample  cards can be found on pages 12, 51, & 82. The dies are found on page 163. Here is a look at the dies:

LAYERING DIORAMA DIES


Each die will give you two images to work with; a frame and an abstract shape. For today’s cards I worked with the frames.


Here are the cards I made using these dies:


As you can see, one card would be perfect for the anglers (people who enjoy fishing) or fish lovers in your life. The explore card would be a great card to send any spelunkers (those strange people who enjoy exploring caves) or those with a liking for adventure. The Halloween card is just a fun card I made inspired by my trips to Carlsbad Caverns. The greeting could easily be changed to Happy Birthday or Hello. I know this card will put a smile on the face of all the chiropterologists (biologists who study bats) out there, and maybe even a few spelunkers! 

The first thing I learned while making these cards is the importance of working backwards - sort of. Usually I start with the focal point of my card, which in most instances is a piece or panel that will be mounted on a card base. For these cards it was necessary to reverse that process, and accomplish the stamping, embossing, blending, etc, on the card base before assembling the other pieces of the card. The second thing I learned is for the two top layers it works better (for me) to use two pieces of cardstock equal in size. For me it was easiest to cut the two top layers at 4 1/4” x 5 1/4”. Attempting to use scraps to “save” cardstock is not a good plan when using the frame shapes created with these dies. These cards take a little extra time, but they are not difficult to make.

GONE FISHIN’ CARD


I CASED this card from the card on page 12 of the catalog. I used the Playful Alphabet Dies to create the greeting. The images are from the new SEASCAPE stamp set. CASEing is a good strategy to use when you are not quite certain where to start or how to use a particular stamp set or dies collection. 

SEASCAPE


To make the card I started start with a Balmy Blue card base and two pieces of Balmy Blue cardstock cut at 5 1/2” x 4 1/4”. I selected two of the Layering Diorama Dies I felt looked best for the particular scene on he card. I chose the 3rd largest die for the outer layer, and one two sizes smaller (die #5 going from largest to smallest) for the second layer.

Next I die cut the two 5 1/2” x 4 1/4” pieces of cardstock with the Diorama Dies. I placed the middle layer (the frame with the smallest opening) on top of the card base and used a pencil to lightly trace the shape of the opening. This gave me a guide for my blending and stamping.

I darkened the area of the card base inside the area I had traced with a pencil (and just a bit beyond the pencil line) using Misty Moonlight ink and a blending brush. If you’d prefer to skip this step use a Misty Moonlight card base.  Next I used Versa Mark to stamp the water plant image in the lower right area of the inked cardstock making certain a good portion of the image was inside my pencil line. (This stamp is large so I only inked the top 1/3 or so with the Versa Mark. I embossed the image with white embossing powder. Next I stamped the “three fish” image a few times toward the top to the middle of the inked area.

For the middle area I lightly added some Misty Moonlight with a blending brush around the inner edge of the frame

For the top layer I stamped the “three fish” stamp several times across the piece, more toward the top, using Balmy Blue ink. 

I adhered the top and middle layers together with Stampin’ Seal, but only around the outside edges. I placed dimensionals on the back of this piece and adhered it to the card base.

I stamped the two larger fish on Basic White cardstock using Calypso Coral and Flirty Flaming inks. These fish were fussy cut.

I die cut the sea weed / coral (Granny Apple Green) image and the two smaller fish (Crushed Curry) using the Sea Life Dies. The letters got the greeting were cut out using the Playful Alphabet dies.

I placed the sea weed die cut between the top and second layers of the card, and used glue dots to keep it in place. The fish are on dimensionals. I used multipurpose glue to attach the lettering.


EXPLORE CAVE CARD


The card base and layers of this card are Gray Granite. I used the same process creating this card as for the previous one, except my top two layers are cut at 5 1/4” x 4”.

The texture image on the card was stamped with a stamp from the SEASCAPE stamp set.

The lantern is from the CAMPOLOGY  stamp set. It was stamped on Basic White cardstock with Memento Tuxedo Black ink, colored with Stampin’ Blends, and fussy cut.

CAMPOLOGY


I used the SAILING HOME stamp set and Coordinating Smooth Sailing Dies plus the Tasteful Labels Dies to create the compass. The needle on the compass was die cut from Basic White cardstock. I used a Real Red (dark) Stampin’ Blend to color half of the needle. It is attached to the compass image (this image was die cut with the Layering Circles Dies) with a black brad. I attached this to the Basic Black die cut with 3-4 glue dots on the outer edges of the circle. This allows the compass needle to turn freely. The compass is attached to the card with dimensionals. 

SAILING HOME


I finished the card with a greeting cut from the Playful Alphabet Dies, and some black Baker’s twine.

BATS EXITING A CAVE CARD


For this card I used a Basic  Black card base, and layers of Basic Gray and Gray Granite. I did nothing to the Basic Black card base except add the fussy cut bats with glue dots. The two top layers are stamped with the texture stamp from the SEASCAPE stamp set using Basic Gray ink.

The bat images are from the  BANNER YEAR stamp set. They were stamped on Basic Gray cardstock with Memento Tuxedo Black ink, then fussy cut. They are adhered with glue dots.

BANNER YEAR

The Happy Halloween is die cut from Pumpkin Pie cardstock using the Word Wishes Dies.

There you go - three cards made using the Layering Diorama Dies! So... if you find yourself needing cards for anglers, spelunkers, chiropterologists, or anyone at all, why not give these fun dies a try?


That is all for today. Until next time...
Stamp Happy!
Kim

All stamps and stamped images ©️1990-2021 Stampin’ Up!®️