Showing posts with label Whimsical Trees. Show all posts

Tuesday, October 19, 2021

WHIMSICAL TREES WITH ORNAMENTS FOR ALL; A TINSEL TIME TUESDAY POST

 Hi Stampers,

Before we get to today’s cards I want to let you know about the Stampin’ Up!®️ 24 Hour Stamp Sale! The sale includes select cling stamp sets from the Stampin’ Up! 2021-2022 Annual Catalog. It all starts tomorrow, 20 October 2021. For more information and a list of included stamp sets click HERE. 

Okay, let’s talk about card making! Today I want to talk about how to take one card design and change the look by simply changing the color scheme. I made a “retro” themed card, one in traditional Christmas colors, a classic in gold and white, one in neutral colors for a woodsy look, one using Victorian inspired colors, a monochromatic card, and a whimsical less traditional version. The image for the cards is from the WHIMSICAL TREES stamp set. (The greetings are from various stamp sets.) Let’s take a look at the cards:


As you can see, some of the cards require coloring of individual ornaments, while others do not, so this card idea offers options. If you’ve followed me for long, you know I love options, and believe in card making there are always options!

MEASUREMENTS FOR THE CARDS
* Card base - Basic White (thick) 8 1/2” x 5 1/2” scored and folded at 4 1/4”.
* Basic White for focal piece cut at 5 1/2” x 2 1/4”.
* Mat - various colors cut at 5 1/2” x 2 3/4”.

Here is a look at the stamp set:

WHIMSICAL TREES
(Stampin’ Up!®️ July - December 2021 Mini Catalog)


GOING RETRO 

Do you have someone in your life who has a passion for all things retro? This could be the card for that person! I just searched “retro ornaments” and “1950’s ornaments” to find my color palette. There are plenty of other color choices to reflect a fun retro look. Here is the list of colors I used (all are Stampin’ Blends):
* Poppy Parade (light & dark), Pool Party (light & dark), Smoky Slate (light & dark), Flirty Flamingo (light & dark), and Petal Pink (light & dark).
* Memento Tuxedo Black ink for image and greeting.
* The mat is Bermuda Bay.

TRADITIONAL HOLIDAY

The inspiration for this card comes from a 1960’s gift box that was passed around in our family from person to person from year to year for decades. I do not recall exactly the last year it was used, but it was in the late 90’s. Once again, I used Stampin’ Blends. Here are the colors and other items needed to complete the card:
* Real Red (light & dark), Poppy Parade (light & dark), Granny Apple Green (light & dark), Shaded Spruce (light), Daffodil Delight (light).
* Memento Tuxedo Black ink for image and greeting.
* Mat - Green Foil
* Adhesive
NOTE - to get the most from your specialty papers, such as the Green Foil, instead of cutting the mat at 5 1/2”  x 2 3/4”, cut two strips that are 5 1/2” x 1/2”. Adhere one strip along the top side of the focal panel, and the second along the bottom side of the focal panel.

CLASSIC ELEGANCE

You can never go wrong with gold and white.  The embossed gold images on a white background is festive, yet elegant, and requires no coloring. To make this card you will need:
* Versa Mark ink, gold embossing powder, and a heat tool. 
* Brushed Metsllic cardstock - Gold, for the mat.
* Adhesive
NOTE - As with the Green Foil for the previous card, to get the most from your specialty papers instead of cutting the mat 5 1/2” x 2 3/4” you can cut two strips that are 5 1/2” x 1/2” and adhere one strip along the top and one along the bottom side of the focal panel. 

A NATURAL TOUCH

This card is a bit non-traditional, but I really like the way it turned out. I wanted a woodsy, outdoorsy, back to nature kind of look. I think the cork specialty paper emphasizes the “natural” theme. Instead of using the Memento Tuxedo Black ink to stamp the image, I used Soft Suede ink. The images are colored with Stampin’  Blends.
* Colors used - Crumb Cake (dark & light), Soft Suede (dark & light), Cinnamon Cider (dark & light), Ivory; Soft Suede ink for image and greeting.
* Cork Specialty Paper. 
* Adhesive

VICTORIAN INSPIRED

My mom loved Christmas, and she loved all things Victorian. I always made her a Victorian inspired Christmas card. She passed away in 2017, but every year I still make a card inspired by her admiration for the Victorian era. To select colors for this card I searched “ Victorian Era Color Palette.”  The results were truly overwhelming, but eventually I chose some colors that matched some of the color swatches I viewed. Notice on this card I chose to leave two of the ornaments white. I did color the center portion and the top of the ornament.
* Stampin’ Blends - Rich Razzleberry (light & dark), Daffodil Delight (light & dark), So Saffron (light& dark), Cherry Cobbler (light & dark), Soft Succulent (light & dark), and Calypso Coral (light & dark). Memento Tuxedo Black to stamp image, Versa Mark, gold embossing powder, and heat tool for greeting. 
* Gold Glimmer Vellum to mat focal image.
* Adhesive
NOTE - Adhere focal panel to vellum, the put adhesive on the backside of the vellum only where it will be covered by the focal panel. The vellum will be adhered well to the card, but you will not see the adhesive through the vellum.

IN A MONOCHROMATIC MOOD

This version of the card is another that requires no coloring of the individual ornaments. I used a blending brush with two colors of ink (Soft Succulent and Mint Macaron) to add the background color to the Shimmery White cardstock focal panel, then stamped the images with a third color of ink (Evening Evergreen). Here are the items I used for this card.
* Inks - Soft Succulent, Mint Macaron, and Evening Evergreen
* For this focal panel I used Shimmery White cardstock. The photo does not pick up the shimmer, but in real life it is a visible festive touch.
* Evening Evergreen cardstock mat.
* Adhesive.

NON-TRADITIONAL WHIMSY

This version of the card was very quick and easy to create, and the result was a bit serendipitous! Doesn’t the background remind you of a peppermint stick! (Sort of, a little bit? 😁) The background color is a watercolor wash. I did use the Basic White cardstock for this panel. It is not recommended for water coloring, but being the rule breaker I am, I used it anyway! (You can use watercolor paper or Shimmery White cardstock if you like). To be honest, I did not use a lot of water, just enough to move the color across the page. I just lightly tapped an acrylic block on a Polished Pink ink pad, used the large flat brush tipped water painter (annual catalog) to add 2-3 drops of water to the ink, inked up the brush, then stroked it diagonally across the paper. The paper was not very wet at all, just a tiny bit damp. I used my heat tool to dry it (you can let it air dry), then stamped the image on top with Polished Pink ink. Supplies for the card:
* Inks - Polished Pink ink
* Water Painter - large flat brush tip
* Adhesive.


FOR MORE TIPS ON MAKING THIS CARD, VIEW THE VIDEO BELOW.


I hope you give this card design a try, and find color combinations or coloring techniques you love!


OCTOBER SURPRISE!


Tomorrow, 20 October 2021, Stampin’ Up! Is offering 15% off select cling (red rubber) stamp sets! The sale will last only 24 hours only. To view the list of included stamp sets click HERE

That is all for today! Thanks for stopping by. Until next time…
Stamp Happy!

Kim

All stamps and stamped images ©️1990-2021 Stampin’ Up!®️


Tuesday, October 12, 2021

SEND SEASON’S GREETING WITH A TOWER PINWHEEL CARD; A TINSEL TIME TUESDAY POST

Hi, Stampers!

Here we are, beginning the second half  of this year’s Tinsel Time Tuesday! I hope your stash of  Christmas cards is growing, and by the time December arrives you will have all you need to send family and friends Holiday greetings. 

Today’s card is a fun fold of sorts. It is called a tower pinwheel card (or maybe a pinwheel tower card, or a tower card 🙂). Have you seen the card? I first saw the card this past spring on Pinterest (I think), and since have seen more and more of them! I am not certain who came up with the idea for this card, but whoever you are, thank you! 

Let’s take a look at the cards I made:


And here is a look at the card from the top. In the center you can see the mechanism that makes the cards interestingly interactive. Page down to view video tutorial on putting the card together.


This card can be made any size you like by adjusting the height of the “tower” and the size of the “wings” (pinwheel part). We’ll talk more about that later.

Three of my cards, when flat, measure 5 1/2” x 4 1/4” and will fit in a Stampin’ Up!®️ medium envelope. The fourth card measures 6” x 4”. 

PEACEFUL CABIN CARDS

BIRTHDAY

CHRISTMAS

These cards are identical with the exception of the sentiments. I love the colors in the Peaceful Place DSP - Smoky Slate, Basic Gray, Basic Black, and Silver. Many of the designs can be used year round, the remaining are wintry. It is a great package of DSP for masculine cards, and of course, Christmas cards.

Here is a look at the stamp set:

PEACEFUL CABIN


Here are the other three sides of the cards:


Isn’t the cabin pattern great?  The cabin with the porch reminds me of my house a bit.


SUPPLIES FOR THE CARD
* Piece of DSP cut at 4 1/4” x 4 1/4” and scored at 1”, 2”, 3”, and 4”.
* 4 pieces of Basic Gray cardstock cut at 4 1/4” x 2 3/4”.
* 4 pieces of DSP cut at 4” x 2 1/2” - be aware of pattern direction.
* 4 pieces of DSP cut at 4” x 1 1/2” - be aware of pattern direction. One piece can be Basic Whiteto use as a space to write a short message and sign.
* Simply Elegant Trim, Silver - about 12 -14”.
* Basic Gray ink.
* Adhesive and dimensionals.

WHIMSICAL TREES CARD
(This card measures 6” x 4”)


The tree is die cut from the DSP. The Holly was stamped with Smokey Slate ink, colored with Stampin’ Blends, and die cut.

WHIMSICAL TREES STAMP SET


Here are the other three sides of the card:


I fussy cut packages from another piece of the DSP, put dimensionals on the back, and adhered them over the top of a corresponding package on the card panel. This added a bit of dimensional interest to the card panel.

SUPPLIES FOR THE CARD
* DSP for tower, cut at 4” x 4 1/4”. Score along 4 1/4” side at 1”, 2”, 3”, and 4”.
* Mint Macaron cardstock cut at 4” x 3” and scrap to mat greeting. 
* Whimsy & Wonder DSP; 4 pieces cut at 3 3/4” x 2 3/4” and 3 pieces cut at 3 3/4” x 1 3/4”, plus 2 pieces of Basic White cardstock cut at 3 3/4” x 1 3/4” for greetings.
* Basic White scraps to stamp and die cut a tree image, and 3 holly images, and for Stampin greeting.
* DSP pattern with tree image and gift images. Fussy cut the gifts, die cut the tree image with the Christmas Trees Dies.
* Inks - Smoky Slate; Stampin’ Blends - Flirty Flamingo (light) and Mint Macaron (light).
* Metallic Pearls- silver. 
* Adhesive and dimensionals.

SNOW WONDER AND PERFECTLY PLAID CARD


For this card I used pieces of Real Red and Mossy Meadow cardstock. I alternated the colors as I adhered them to the tower.

Here are the other sides of the card:


SUPPLIES FOR THIS CARD
* DSP for tower cut at 4 1/4” square, and scored at 1”, 2”, 3”, and 4”.
* Cardstock cut at 4” x 2 3/4” - 2 Real Red and 2 Mossy Meadow.
* Heart Warming Hugs DSP - 4 pieces cut at 4” x 2 1/2” and 4 cut at 4” x 1 1/2”.
* Basic White cardstock - 2 at  3 3/4” x 1 1/2”, plus scraps for greeting and to stamp images for die cutting  (trees, wreath, and greeting). 
* Snow Time Dies and Stitched Rectangles Dies.
* Inks - Real Red and Mossy Meadow; Stampin’ Blends - Real Red (light and dark), Mossy Meadow (light and dark).
* Wonderful Gems - red -6.
* Adhesive and dimensionals.

Instructions for scoring “tower” and cutting dimensions for  a 5 1/2” x 4 1/4” size card.

(Click to enlarge.)

DIFFERENT SIZES OF CARDS

It is easy to change the size of the card. For all cards the tower piece will be 4 1/4” wide and the scoring will be the same.  Simple change the height of the tower to the height you want the card to be. For example, if you want the card to be 4” tall x 6” wider
* The tower will be 4” x 4 1/4” svored along the 4 1/4” side scored at 1”, 2”, 3”, and 4”.
* For the “wings” you will need 4 pieces cut at 4” (height of the card) x 3” (half the width of the card - 1/2 of 6 is 3).

Let’ try one more example:
For a 5” x 7” card
* The tower piece will be 5” x 4 1/4”.
* The wings will be 5” x 3 1/2” (half of 7”).

In general it I feel it is easier to decorate the cards if the lesser measurement of the card dimension is the tower height and the greater measurement is the width. This gives more room for decorating the card. This doesn’t mean you cannot reverse the measurements. The sections of your card will be narrower. The tower width will still be 4 1/4”.

VIDEO TUTORIAL


Thank you for stopping by for this installment of Tinsel Time Tuesday.  Check in next week for another Holiday card idea.  Until next time…

Kim

All stamps and stamped images ©️1990 - 2021 Stampin’ Up!®️
 

Saturday, August 28, 2021

PENGUIN PLAYMATES & PEACEFUL PRINTS DSPS - THEY’RE NOT JUST FOR THE HOLIDAYS!

 Hi Stampers!

September arrives in a few days, and that means we are right in the middle of SALE-A-BRATION! Today I thought we would take another look at two collections of Designer Series Papers featured in the Sale-a-bration Brochure. You can select either one of these papers for free with a $50 Stampin’ Up!®️ product purchase now through 30 September 2021. The two collections of DSP I am focusing on today are PENGUIN PLAYMATES & PEACEFUL PRINTS. 

PENGUIN PLAYMATES


This DSP is wintry, whimsical, and festive! It coordinates with the PENGUIN PLACE BUNDLE (Penguin Place stamp set and Penguin Builder punch) found in the Stampin’ Up! July-August 2021 Mini Catalog. The paper is great for backgrounds, paper piecing, fussy cutting, and one of the penguin images coordinates with the Penguin Builder punch!

PEACEFUL PRINTS


This DSP is comfy and cozy and perfect for rustic, woodsy, and country looking Christmas cards. It coordinates with the PEACEFUL DEER BUNDLE (Peaceful Deer stamp set and Deer Builder punch) found in the Stampin’ Up! July - December 2021 Mini Catalog.  This DSP is great for layering, backgrounds, and more. The deer image coordinates with the deer builder punch. One of the deer images faces the opposite direction of the punch. To learn how to use the punch with that image see my 10 August 2021 post.

CHRISTMAS CARDS


Here are four Christmas cards I created using the DSPS. These papers are great for Holiday cards, but they also can be used on cards for any occasion! Stampin’ Up!’s DSPs usually have a theme based print on one side and a more neutral / generic pattern on the other side. 

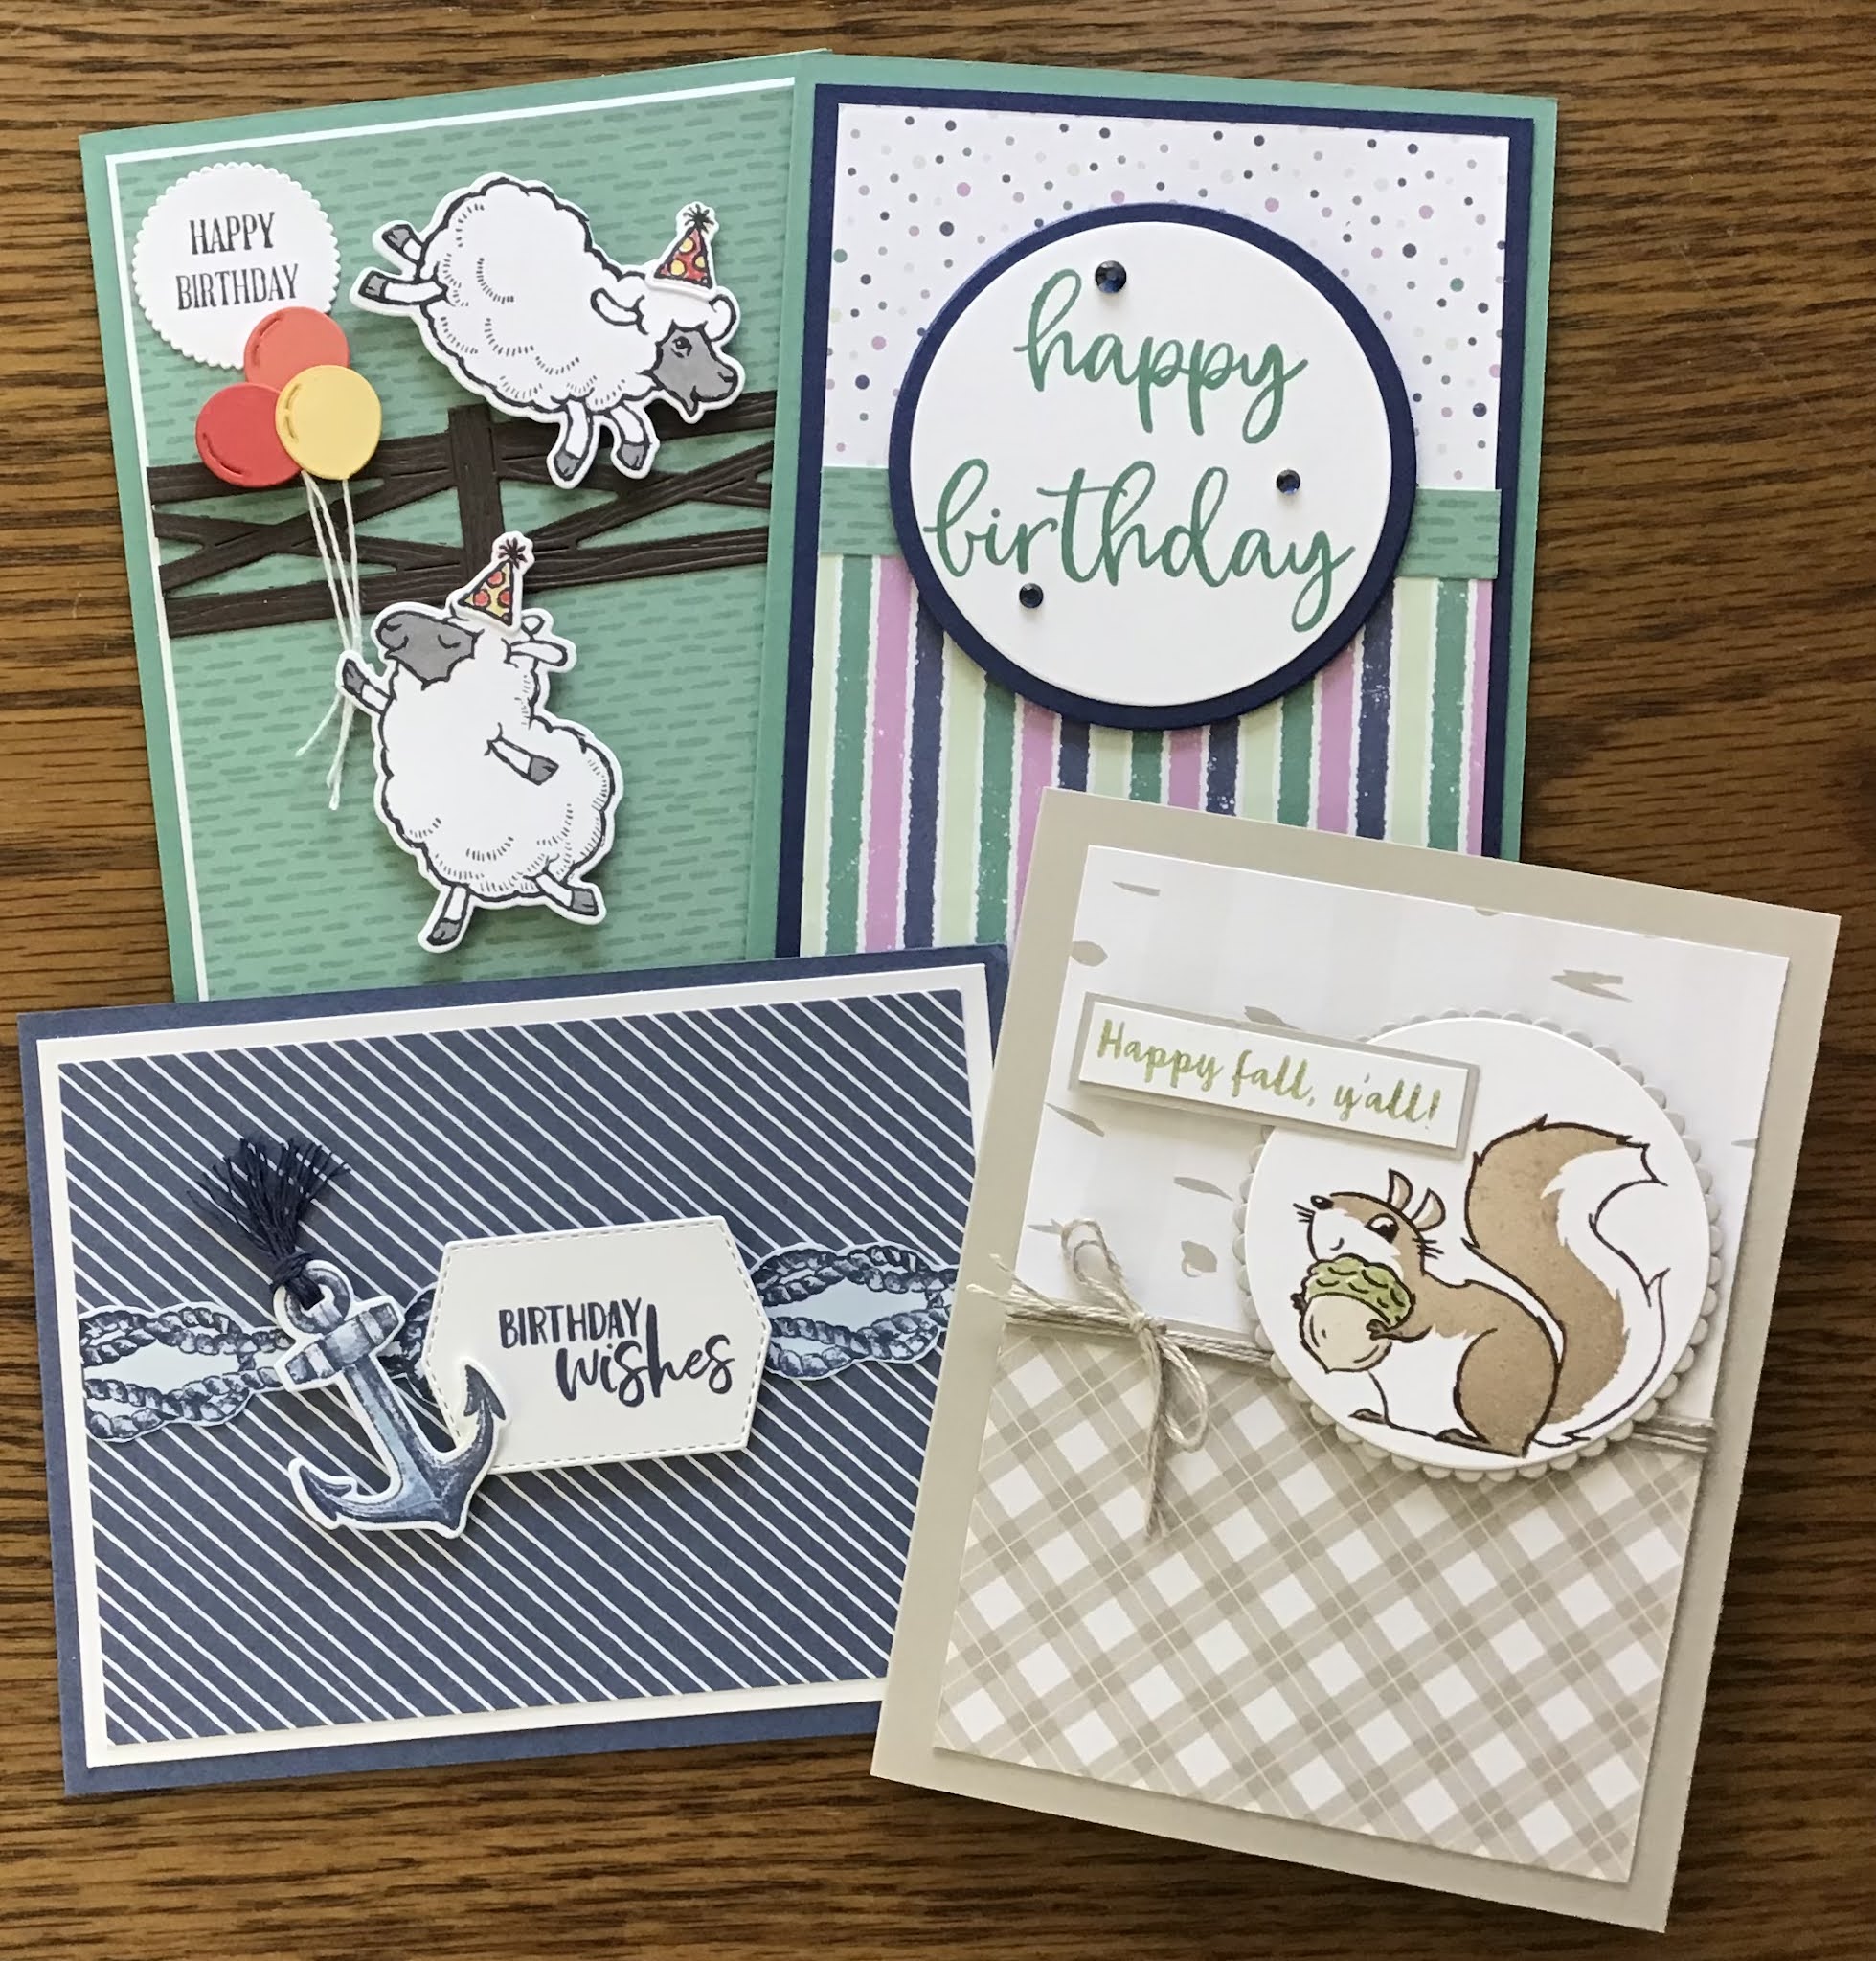
Here are some non- Christmas cards I made using the DSPs. I chose to make mostly birthday cards, but all the cards can easily be adapted for any occasion.

ALL OCCASION CARDS


HAPPY BIRTHDAY CARD WITH STRIPES, DOTS & DASHES

SUPPLIES
* Stamp set - Biggest Wish 
* Just Jade card base
* Night Of Navy cardstock cut at 5 1/4” x 4” to mat the focal layer, and use the Layering Circles Dies to cut a 3” diameter circle from the center to use as a mat for the greeting.
* Scrap of Basic White - use the Layering Circle Dies to cut a 2 5/8” circle for the greeting.
* Penguin Place DSP - striped pattern 3 3/4 x 2 1/2”, dot pattern 3 3/4” x 2 1/2”, dash pattern 3 3/4” x 1/2”
* Just Jade ink
* Holiday Rhinestones - 3, Night Of Navy
* Adhesive and dimensionals

SAILING HOME BIRTHDAY


SUPPLIES
* Sailing Home stamp set & Smooth Sailing dies; Garden Birdhouses stamp set; Tasteful Labels Dies
* Misty Moonlight card base
* Basic White cardstock cut at 5 1/4” x 5” and scraps for images and greeting
* Penguin Playmates - diagonal stripe pattern, cut at 5 x 3 3/4”
* Misty Moonlight ink & blender pen
* Baker’s twine
* Adhesive and dimensionals

COUNTING SHEEP BIRTHDAY


SUPPLIES
* Counting Sheep  and A Wish for Everything stamp sets, Sheep Dies, Layering Circles Dies
* Just Jade card base
* Basic White cardstock 5 1/4” x 4” for focal panel may. Use this piece to stamp and die cut the two sheep, party hats, and greeting. Keep the stamped images in the center.
* Penguin Playmates DSP - Just Jade with dash pattern, cut at 5” x 3 3/4”
* Small scraps of Poppy Parade, Calypso Coral, and Daffodil Delight cardstock for balloons.
* Scrap of Early Espresso for fence
* Inks - Tuxedo Black; Basic Gray (light & dark), Poppy Parade and Daffodil Delight Stampin’ Write Markers.
* Baker’s Twine
* Adhesive and dimensionals

HAPPY FALL SQUIRREL CARD

SUPPLIES
* Nuts About Sauirrels and Banner Year stamp sets, Layering Circles Dies
* Sahara Sand Card base, plus scraps for focal image and greeting mats.
* Scraps of Basic White for focal image and greeting
* Peaceful Prints DSP - birch bark & plaid patterns each cut at 3 3/4 x 2 1/2”
* Inks - Crumb Cake, Old Olive, and Tuxedo Black
* Linen Thread
* Adhesive & Dimensionals

BEAUTIFUL SEASON & WHIMSICAL TREES

SUPPLIES
* Amaryllis Abloom, Christmas Tree Dies, Layering Circles Dies
* Fresh Freesia card base and Scrap of Fresh Freesia cardstock for greeting mat
* Basic White cardstock cut at 5 1/8” x 3 7/8” for focal panel mat - cut the three tree images and piece for greeting from center.
* Penguin Playmates DSP cut at 5” x 3 3/4”
* Fresh Freesia Open Weave Ribbon - about 20”
* Elegant Faceted Gems - 3, clear
* Adhesive and dimensionals


PEACEFUL PRINTS - LOVE & PEACE

SUPPLIES
* Peaceful Deer stamp set
* Garden Green card base
* Scraps of Garden Green, Real Red, and Basic Black cardstock for greeting. These will be cut with the layering circles dies.
* Red & black checked DSP cut at 5 1/4” x 4” and the Garden Green with Trees cut at 4 3/4” long & x 3 1/2” wide. (Directional pattern)
* Memento Tuxedo Black ink.
* Basic Black Baker’s Twine, about 16”, doubled, tied in a bow, and ends trimmed.
* Adhesive, dimensionals, glue dot (for twine).

PEACEFUL PRINTS SNOW WONDER CARD


SUPPLIES
* Snow Wonder stamp set and Snow Time dies
* Basic Black card base and Basic Black cardstock cut at 5 1/8” x 3 7/8” for focal panel mat, and a 3” x 7/8” piece to mat greeting.
* Basic White for stamping image and greeting.
* Peaceful Prints DSP - Real Red,  Tattersall Pattern 5 3/8” x 4 1/8”; Real Red - Tattersall with Snowflakes pattern 5” x 3 3/4”.
* Inks - Memento Tuxedo Black; Stampin’ Blends - Real Red (light & dark), Old Olive (light & dark), Pumpkin apiece (dark), and Smoky Slate (dark).
* Matte Black Dots - 2
* Adhesive, dimensionals


BE MERRY PENGUIN PLAYMATES CARDS


SUPPLIES
* Penguin Place and Banner Year stamp sets and Tasteful Labels dies.
* Fresh Freesia card base
* Basic White scraps for the “snow” and greeting.
* Penguin Playmates DSP - Dots pattern -  5 3/8” x 4 1/8”; Snowflake pattern - 5” x 3 3/4”; Polar Bear and Snowman pattern (fussy cut).
* Inks - Fresh Freesia and Misty Moonlight
* Cute Stars Adhesive Backed Sequins - Highland Heather - 3.
* Adhesive and dimensionals.

I had so much fun creating these cards, and I love how easy it is to use the DSP for all types of cards. As I mentioned earlier, the PENGUIN PLAYMATES  and the PEACEFUL PRINTS DSPs are each available to you free with a $50 Stampin’ Up! product purchase during SALE-A-BRATION! Remember - SALE-A-BRATION ends 30 September 2021. Here is one more look at today’s cards.

HOLIDAY CARDS


ANY DAY CARDS


Thank you so much for stopping by. For online shopping simply click one of the catalog pictures in the right column.  Questions? You can contact me at:  greatinkspirations@gmail.com

Until next time…

Stamp Happy!

Kim


All Stamps and stamped images ©️1990-2021 Stampin’ Up!®️