Showing posts with label Get Well Card. Show all posts

Wednesday, July 9, 2025

SPLIT PANEL LAYOUT FOR CARDS IN A HURRY

Hi Stampers!

Today I am sharing a very basic card layout. It is perfect for double sided patterned paper, or for larger scraps of patterned paper. It is the perfect layout for when you need a card in a hurry!  All it takes is an A-2 card base, a 5 1/4”x 4” piece of double sided patterned paper, or one piece of patterned paper that is 4” wide  x 3 1/4” tall and one that is 4” wide x 2”tall, an inside panel, and a greeting. Of course you can add other elements to the card, keep it simple or jazz it up! You can change it up by switching the position of the two pieces of patterned paper. The layout can be oriented as portrait or landscape. This  is why I like basic layouts -use the layout, then make it uniquely yours! Let’s take a peek at the sample cards:

PORTRAIT VERSIONS


LANDSCAPE VERSIONS


VIDEO

SPLIT PANEL CARD LAYOUT FOR CARDS IN A HURRY


SPLIT PANEL CARD LAYOUT


This layout can be flipped. It can also be created in landscape orientation.

BASIC SUPPLIES
* Card Base -A-2 size; 8 1/2” x 5 1/2” scored and folded on 8 1/2” side at 4 1/4”
* Card Panel - Double sided patterned paper (be sure to like the designs on each side) cut at 5 1/4’” x 4” Cut it at 3 1/4” on the 5 1/4” side. Flip one of the pieces over. OR cut 1 piece of patterned paper at 3 1/4” x 4” and another coordinating piece at 2” x 4”
* Inside panel - white or light colored cardstock cut at either 5 1/4” x 4” or 5” x 3 3/4” 
* Optional - divider to cover seam - can be ribbon a 1/4” - 1/2” strip of cardstock or patterened paper, etc.

OTHER SUPPLIES
* Greeting, stamped or die cut images
* Other Cardstock
* Inks
* Embellishments
* Adhesives, Dimensionals

SAMPLE CARDS

UNCOVERED SEAM


For this card I flipped the layout. Next, I simply adhered the paper pieces to the cardbase, making sure to leave no space between the two pieces.

SUPPLIES I USED
* Sentiment - Mini Birthday (Scrapbook.com)
* Embellishments - Enamel Dots (Simple Stories)
* All other supplies are from Stampin’ Up! ®️

USE 1/4” STRIP OF PATTERNED PAPER TO COVER SEAM


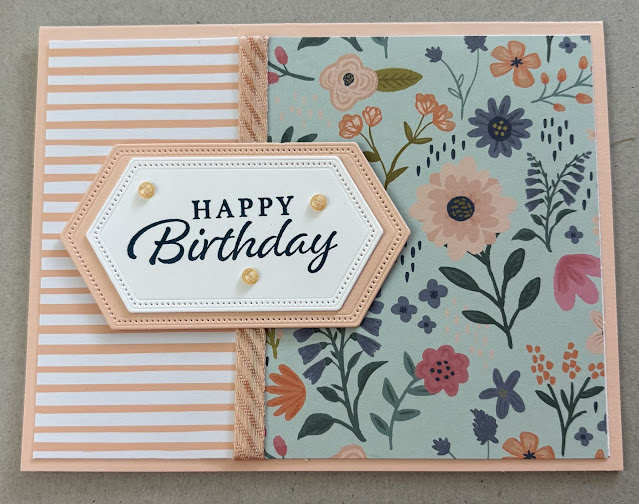
Once again, I flipped the layout and adhered the two pieces of patterned papers leaving no space between the two. I used a piece of coordinating patterned paper cut at 4” x 1/4”to cover the seem.

SUPPLIES I USED
* Stamps - Birthday Wishes (Waffle Flower)
* Embellishments - Enamel Dots (Simple Stories)
* All other supplies are from Stampin’ Up!

USE 1/4” STRIP OF CARDSTOCK TO COVER SEAM


No flipping the layout this time. I covered the seem with a piece of cardstock which is cut at 1/4” x 4”.

SUPPLIES I USED
* Stamps - Flippin’ Fabulous (Honey Bee Stamps)
* All other supplies are from Stampin’ Up!

USE RIBBON TO COVER SEAM


The card panel for this card was assembled on a piece of printer paper. The seam on this card was covered with two pieces of ribbon. Each piece of ribbon is cut at 5 1/4” long. They are adhered to the card panel with glue dots and secured to the back of the panel with tape. Then I adhered the panel to the card base.

SUPPLIES I USED
* All supplies for this card are from Stampin’ Up!


USE 1/2” STRIP OF PATTERNED PAPER TO COVER STRIP


To cover the seam on this card a used a coordinating piece of patterned papers cut at 1/2” x 4”.

SUPPLIES I USED
* Embellishments - Enamel Dots (Simple Stories)
* All other supplies are from Stampin’ Up!

CHRISTMAS VERSION OF LAYOUT


Here is a Christmas version of the layout. Once again I flipped it. I added a contrasting strip of cardstock to cover the seam. 

SUPPLIES IUSED
* Embellishments - Enamel Dots - Brights (Violet Studios)
* All other supplies from Stampin’ Up!

DOUBLE STRIP CARDSTOCK TO COVER SEAM


To cover the seam for this card I used two strips of cardstock. The wider one is 3/4” x 4”. The narrower one is 1/2” x 4”.

SUPPLIES I USED
* All supplies are from Stampin’ Up!

LANDSCAPE VERSIONS


SUPPLIES I USED
* All supplies are from Stampin’ Up!


SUPPLIES I USED
* Floral Patterned Paper - Florals Essentials Collection (Violet Studios)
* All other supplies are from Stampin’ Up!


VIDEO CARDS


SUPPLIES I USED
* All are from Stampin’ Up!


SUPPLIES I USED
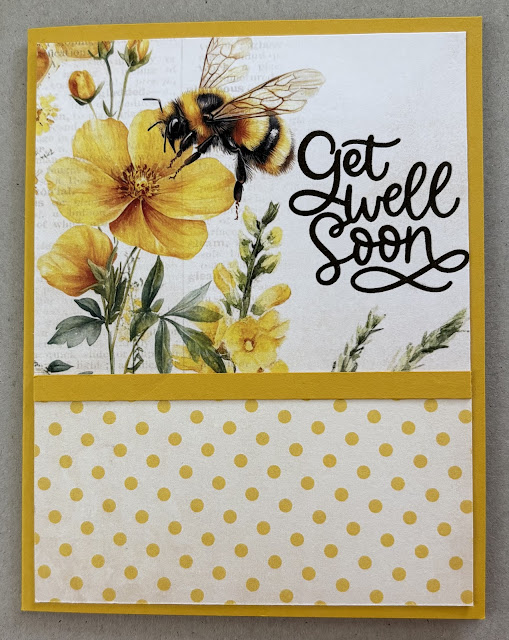
* Patterned Paper - Bees & Butterflies Collection (Paper Rose)
* All other supplies are from Stampin’ Up!


SPLIT PANEL LAYOUT CARDS


The split panel card layout, is easy to create, uses patterned paper scraps and cardstock scraps, is great for showcasing larger greetings, there are various options for covering the seam, and the layout can be flipped! The layout can also be used in portrait or landscape orientation. So easy, so many options! Why not give it a try?

Thank you so much for stopping by today! Until next time . . .
Stamp Happy!

Kim

NOTE
I use mostly Stampin’ Up! products. Products from other companies are noted as such. I am not affiliated with, nor am I compensated by any company, manufacturer, or other entity.i share where I get my supplies as a resource only.

Tuesday, April 9, 2024

SENTIMENTAL VALUE - CREATING CARDS THAT FOCUS ON SENTIMENTS FEATURING SWEETLY SCRIPTED

Hi Stampers,

If you are new to stamping and have few supplies, or if you are on a budget (aren’t we all) and looking for ways to get more out of your crafting dollars; do I have a tip for you! Get sentimental! That’s right! Go on the search for a great sentiment stamp set or two. Sets can be geared toward one occasion such as birthdays or designed to be used for many different occasions. Some sets contain sentiments designed  to be used on the outside of a card that have a coordinating sentiment for the inside of the card. Sentiments can be paired with most any stamped image or stand alone on a card! Some of my favorite stamps sets are sentiment sets!

So, what are some ways to show off my sentiment stamps? I thought we would explore that today! Let’s take a look at the cards I created for today’s post. I used the Sweetly Scripted stamp set to create my sample cards:


SWEETLY SCRIPTED STAMP SET
(ONLINE EXCLUSIVE)


VIEW IT ONLINE HERE


VIDEO
SENTIMENTAL VALUE;
CREATING CARDS THAT FOCUS ON SENTIMENTS


CLASSIC ANNIVERSARY WHITE ON WHITE WITH GOLD CARD


SUPPLIES FOR THIS CARD

* Stamp set - Sweetly Scripted
* Card base - Basic White (thick) - 8 1/2” x 5 1/2” scored and folded at 4 1/4”
* Mat Layer - Basic White cardstock cut at 5 1/4” x 4” - embossed
* Embossing Folder - Zinnia (Online Exclusive) 
* Greeting strip - Basic White cardstock - 5 1/4” x 1”
* Inks - Crumb Cake for stamping inside greeting, Versa Mark and Gold Embossing Powder
* Embossing Buddy, Heat Tool, etc
* Embellishment - Blooming Pearls - Gold - 3
* Adhesive

REPEATING GREETING BIRTHDAY CARD


SUPPLIES FOR THIS CARD

* Stamp Sent & dies - Simply Scripted
* Card base - Azure Afternoon cardstock 8 1/2” x 5 1/2”
* Focal panel - Basic White cardstock 5 1/4” x 4” - cut a second one for the inside panel
* Inks - Coastal Cabana, Daffodil Delight, Granny Apple Green, Azure Afternoon, Pumpkin Pie; Stampin’ Blends - Pool Party (dark), Daffodil Delight (dark), Granny Apple Green (dark), Azure Afternoon (dark), Pumpkin Pie (dark)
* Rhinestone Basic Jewels - 5 - use the Stampin’ Blends to color the rhinestones, one of each color
* Adhesive

MATTED STRIPS MINI SLIM LINE THANK YOU CARD


The colorful matted strips and dimentionals elevate the greeting! This mini slim line cards fits on a lette4 size envelope.

SUPPLIES FOR THIS CARD

* Simply Scripted stamp set
* Card base - Misty Moonlight cardstock - 7” x 6” scored at 3 1/3” along 7” side
* Inside panel - Basic White cardstock - 5 3/4” x 3 1/4”
* Mats for DSP - Crushed Curry - cut 4 at 3” x 1 1/4”
* DSP - Delightfully Eclectic - Tulip pattern, cut 4 at 2 3/4” x 1”
* Greeting Mat - Misty Moonlight cardstock - 5 3/4” x 1”
* Greeting panel - Basic White cardstock - 5 6/8” x 3/4”
* Inks - Crushed Curry
* Embellishments - Brushed Brass Butterflies
* Adhesive of choice and dimensionals- 3


GREENERY & A GREETING GET WELL CARD


SUPPLIES

* Stamp sets - Simply Scripte and Earthen Textures
* Card base - Crumb Cake cardstock - 8 1/2” x 5 1/2” scored and folded at 4 1/4”
* Focal panel & inside panel - Basic White cardstock - cut 2 at 5 1/4” x 4”
* Inks - Old Olive, Wild Wheat, Crumb Cake, Balmy Blue
* Blending Brush - use with the Balmy Blue ink to create a “sky”
* Embellishments - Brushed Brass Butterflies - 3
* Adhesive

CONGRATULATIONS SHAKER CARD


SUPPLIES GOR THIS CARD

* Stamp set - Simply Scripted
* Card base - Calypso Coral cardstock - 8 1/2” x 5 1/2” scored and folded at 4 1/4”
* Inside panel - Basic White cardstock - 5” x 3 3/4”
* Shaker element - Basic White cardstock. Window Sheet, & Lighter than Air DSP all cut at 5” x 3 3/4”
* Deckled Rectangles Dies - 4 3/4” x 3 1/2” and 4” x 2 5/8” 
* Shaker pieces - Loose sequins, small beads, etc
* Twine - Lemon Lolly - 2 pieces cut at 8” - tie double bow - adhere with glue dot
* Inks - Flirty Flamingo, Calypso. Oral, Lemon Lolly, Granny Apple Green, and Azure Afternoon
* Adhesive, glue dots, adhesive foam strips

NOTES
* Die cut the shaker elements paper with the largest die. Next center the smaller die over the die cut DSP, and cut a window.
* Stamp the sentiment multiple times on the die cut cardstock
* Use Tear & Tape on the back of the DSP frame and adhere it to the die cut window sheet
* Place the foam adhesive strips on the back side of the DSP/window sheet piece all around the perimeter. 
* Place loose sequins or other shaker pieces inside the DSP / window sheet piece and top with the stamped Basic White piece. Make sure the stamped images are facing down.
* Place adhesive on the back side of the shaker piece and adhere to card base at an angle
* Add the bow using a glue dot
SAVE THE DATE CARD IDEA


* This is not a card, but more of a card concept or idea. It would be easy to create this or something similar, and on the opposite side of the card base adhere a piece of cardstock on which the specific information for the event has been printed.

SUPPLIES USED

* Stamp sets - Sweetly Scripted and Days to Remember (retiring)
* Card base - Berry Burst cardstock - 5 1/2” x 4 1/4”
* Basic White cardstock - 5 1/4” x 4”
* Inks - Garden Green and Berry Burst ; Stampin’ Write Markers - Daffodil Delight
* Adhesive


That is all for today. Thank you so much for checking in. Until next time . . .
Stamp Happy!

Kim

All stamps and stamped images ©️1990 - 2024 Stampin’ Up!®️

Thursday, October 7, 2021

A GO TO CARD LAYOUT FOR GREAT CARDS IN A SNAP!

Hi Stampers!

 When I need cards in a hurry, or when my creativity meter is low, I pull out my card layout notebook. It contains several card layouts that can be used with most stamp sets. Today I am sharing one of those card layouts.

Let’s take a look at the cards I made using the layout:


SUPPLIES & CUTTING DIMENSIONS FOR THE CARD

* Card base - 11” x 4 1/4” scored and folded at 5 1/2” or 8 1/2” x 5 1/2” scored and folded at 4 1/4”, and a piece of cardstock the same color as the base cut at 3 7/8” x 2 5/8”to mat focal panel.
* Basic White cardstock (or cardstock that contrasts with card base color) cut at  5 1/2” x 2 1/4” for mat, and a piece of. ASIC White cut at 3 3/4” x 2 1/2” to stamp focal image.
* Designer Series Paper (DSP) cut at 5 1/2” x 2”.
* Optional - Basic White cut at 5” x 3 3/4” for inside card.

*Now that you have the pieces for the card layout, choose an image to stamp and a greeting. 
* Select your ink colors.
* Decide on embellishment - yes or no, what ones? Ribbon? Gems? 

ASSEMBLY
* Stamp the image and sentiment on the focal panel. Adhere this to its mat. If you want to use ribbon on this panel add it now. 
* Adhere the DSP to its mat.  Place this piece on the card base about 1/4” from the left hand side of the card front. 
* Ahere the matted focal panel somewhere near the center about 1” from the left edge of the card. I used dimensionals to adhere the focal panel.

As I mentioned, use any images, greetings, inks, and paper you desire to create a terrific card using this layout. I have listed the supplies I used for my cards just in case you are wondering what I used.


SQUIRREL POOL PARTY

* Nuts About Squirrels stamp set (current mini catalog)
* Pool Party card base and mat for focal panel. 
* Basic White for focal panel and DSP mat.
* DSP - Pattern Party.
* Inks - Cinnamon Cider, Crumb  Cake, and Old Olive.
* Linen thread, 
* Dimensionals.

BLUSHING BRIDE SQUIRREL

* Nuts About Squirrels stamp set (current mini catalog).
* Blushing Bride card base and mat for focal panel.
* Basic White for focal panel and to mat DSP.
* DSP from Pattern Party.
* Inks - Basic Gray, Crumb Cake, Old Olive. 
* Blushing Bride Frayed Grosgrain Ribbon.
* Dimensionals.
    
For the next two cards, the layout is the same, I just stamped the image on a separate piece of Basic White cardstock, die cut it with the Layering Circles Dies, matted that on another die cut from coordinating cardstock. I adhered this piece to the focal panel.

 GREEN TURTLE CARD

* Back On Your Feet stamp set (current annual catalog).
* Granny Apple Green card base, focal panel mat, and focal image mat.
* Basic White for DSP mat, focal panel, and focal image.
* 6” x 6” Designer Series Paper, Brights - Granny Apple Green
* Inks - Memento Tuxedo Black; Stampin’ Blends - Granny Apple Green, Daffodil Delight, Crumb Cake, and Pool Party (light).
* Layering Circles Dies or circle punches.
* White Crinkled Seam Binding Ribbon - dyed with Granny Apple Green (dark) Stampin’ Blend.
* Dimensionals.  

YELLOW TURTLE CARD

* Back On Your Feet stamp set.
* Daffodil Delight card base, mat for focal panel, and to die cut circle.
* Basic White for DSP mat, focal panel, and for focal image (die cut circle).
* 6” x 6” DSP - Brights - Daffodil Delight.
* Inks - Memento Tuxedo Black; Stampin’ Blends - Daffodil Delight, Granny Apple Green, Crumb Cake, and Pool Party (light). 
* Layering Circles Dies or circle punches.
* Dimensionals.

There you go, if you need a go to card layout this one might be for you! Why not give it a try!


That’s all for today. Thank you for stopping by. Until next time…
Stamp Happy!

Kim

All stamps and stamped images ©️1990-2021 Stampin’ Up!®️

Monday, July 26, 2021

SQUIRRELS JUST WANT TO HAVE FUN: QUICK & EASY CARDS MADE WITH NUTS ABOUT SQUIRRELS STAMP SET

 Hi Stampers!

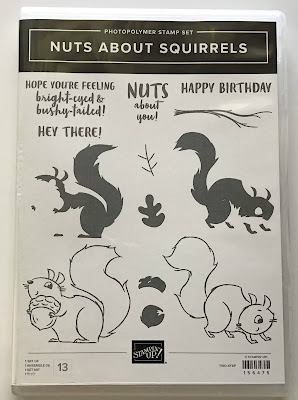
I have a fun stamp set to share today. It is called NUTS ABOUT SQUIRRELS! This stamp set is featured in the STAMPIN’ UP!®️ JULY-DECEMBER 2021 MINI CATALOG premiering 3 August 2021. Let’s take a look:


The stamp set is a Two-Step set, meaning there are outline images and what I call “filler” images. The filler images allow you to add color to images quickly and easily. Of course, if you decide to color the images with Stampin’ Blends, water coloring, etc., you can do that as well!  Although the stamp set hints of autumn, it can be used year round for many occasions!

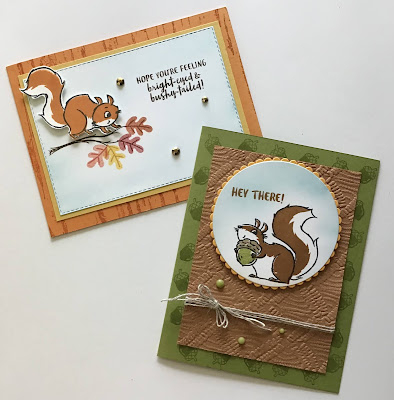
Here are two cards I made using the stamp set:


These cards went together fairly quickly. I pulled the layering pieces from my bin of larger scraps of cardstock. I always look for opportunities to use scraps! I chose autumn colors for these cards.

BRIGHT-EYED & BUSHY-TAILED CARD


SUPPLIES FOR THIS CARD
* Pumpkin Pie card base 11” x 4 1/4” scored and folded at 5 1/2”
* Mango Melody cardstock mat cut at 5” x 3 5/8”
* Two Basic White pieces of cardstock for focal panel and inside card, both cut at 5” x 3 3/4” and a piece of scrap to stamp the squirrel.
* Inks - Pumpkin Pie, Cajun Craze, Cherry Cobbler, Crushed Curry, Calypso Coral, Early Espresso, Balmy Blue, and Memento Tuxedo Black
* Birch background stamp
* Stitched Rectangles Dies (3rd largest)
* Gilded Gems
* Blending Brush
* Adhesive of choice and dimensionals

ASSEMBLY
* Use the Stitched Rectangles Die to die cut one piece of the Basic White cardstock
* Use the Pumpkin Pie ink to stamp the birch background on the card front
* With Early Espresso stamp the tree limb on the left side of the focal panel about halfway down the page.
* Stamp the leaves using Calypso Coral, Cherry Cobbler, Crushed Curry, and Cajun Craze - for the leaves I inked the stamp, stamped off on scrap paper, then stamped the image on the card front. I stamped the lines on the leaf without stamping off.
* Use the blending brush and Balmy Blue ink to add a bit of color (sky) to the cardstock
* Stamp the greeting in Early Espresso.
* On scrap using Memento Tuxedo stamp the squirrel, then use Pumpkin Pie ink and the filler stamp to color the squirrel. Fussy cut the squirrel
* Adhere the focal panel to the Mango Melody mat, and adhere this piece to the card. Adhere the Basic White piece to the inside (stamp a squirrel image on it if you like)
* Attach the squirrel with dimensionals
* Add the gems

HEY THERE! CARD

SUPPLIES FOR THIS CARD
* Old Olive card base
* Cinnamon Cider cardstock for mat cut at 4 3/4” x 3 3/8”
* Scrap of Mango Melody cardstock and scrap of Basic White cardstock and a piece of Basic White cardstock cut at 5” x 3 3/4” for the inside of the card
* Layering Circles Dies (largest circle and largest scallop circle)
* Inks - Cinnamon Cider, Crumb Cake, Old Olive, Balmy Blue, and Memento Tuxedo Black
* Blending Brush
* Macrame 3-D Embossing Folder
*Linen thread about 18” plus 8” for the bow and Matte Decorative Dots - 3 in Old Olive
* Acorn image from Banner Year stamp set
* Adhesive of choice and dimensionals

ASSEMBLY
* Stamp the squirrel outline with Memento Tuxdo Black ink on he scrap of Basic White. Use Cinnamon Cider to color the squirrel. use Crumb Cake and Old Olive inks to add color to be acorn.
* Use the Balmy Blue ink and the blending brush to add “sky”
* Stamp the greeting with Cinnamon Cider ink
* With Old Olive stamp the acorns along all edges of the card front
* Die cut the squirrel image and the Mango Melody scrap using the circle die and the scalloped circle
* Emboss the Cinnamon Cider cardstock with the Macrame embossing folder
* Adhere he squirrel image to the mat
* Put a bit of adhesive on the back of the Cinnamon Cider mat about 1” from the bottom. Attach one end of the linen thread to the adhesive and wrap it around the card about 3 times. Adhere on the back with adhesive
* Fold the remaining piece of linen thread in half; slip it under the rows of linen thread and toe in a bow. 
* Adhere the Cinnamon Cider piece to the card base,  attach the sqirrel image to it’s mat then attach this to the card front with dimensionals, and adhere the 5” x3 3/4” Basic White cardstock to the inside of the card
* Place the Matte Decorative Dots on the card.


That is all for today! Thank you so much for stopping by. Until next time…
Stamp Happy!
Kim

All stamps and stamped images ©️1990-2021 Stampin’ Up!


Tuesday, April 27, 2021

HAND-PENNED PETALS - HOW DO I USE THIS DIE? (INTRICATE DETAIL DIES)

 Hi Stampers,

Today’s post will be dedicated to a type of die I don’t use often. I call them the INTRICATE DETAIL dies.  I have no clue what they are officially called, but to me intricate detail describes them perfectly. The type of die I am talking about is like this one from the PENNED FLOWERS DIES:


It is very pretty, and when I use it to die cut the image from cardstock, I like the result, but rarely do I actually do something with the die cut. They tend to be difficult to adhere (there are solutions for this problem), and I sometimes just am at a loss when it comes to incorporating them in a card design. So, today I decided it is time for me to overcome these challenges. I am sharing my results and a few tips.
First let’s take a look at the entire set of the PENNED FLOWERS DIES and the coordinating stamp set, HANDED- PENNED PETALS. These items are featured as a bundle and as part of a suite in the STAMPIN’ UP! 2021-2022 ANNUAL CATALOG which goes live one week from today (4 May 2021).

PENNED FLOWERS DIES & HAND-PENNED PETALS

(HAND-PENNED PETALS BUNDLE)


Here are the items I used from this bundle to create today’s cards. 
(The floral bouquet stamp image, the outline die, and the intricate detail die.)


Here are the cards.


For this card I used the outline die and the intricate detail die to create pieces for the card’s focal point.


SUPPLIES:
Card Base - Basic White cardstock 8 1/2” x 5 1/2” scored and folded at 4 1/4”
DSP - HAND-PENNED DSP (Blushing Bride)
Other Cardstock - Blushing Bride and Basic White
Ink - Versa Mark and White Embossing Powder
Other Dies - Layering Circle Dies and Stitched So Sweetly Dies
Adhesives - Dimensionals and Multi-purpose Glue
* The Happy Birthday greeting is from the PANSY PATCH stamp set.

Use the Versa Mark to stamp the greeting on Blushing Bride cardstock. Sprinkle the white 
I die cut the intricate detail image from Basic White cardstock, and used the multipurpose glue to adhere it to the Blushing Bride piece I cut with the outline die. When using multipurpose glue to adhere the intricate detail dies I look for the largest spaces on the die cut and apply the glue in those areas in a very thin line. To avoid too much using too much glue, I squeeze a bit of glue out on my silicone craft sheet or on a scrap of paper. Once the glue has started it is easier to control the amount that comes out as you apply it to the die cut. 

Die cut a Basic White circle using the largest of the Layering Circle Dies, and from a piece of Blushing Bride cardstock cut a scalloped circle using the largest scalloped die. Adhere the two circle die cuts together. Now adhere the floral piece to the circles. Adhere the DSP to the card base.Use dimensionals to attach the focal point and greeting to the card.

This card is similar to the card above, except it does not have the solid die cut image. The intricate detail die is adhered directly to the panel? I used the multipurpose glue for this die cut too. 

SUPPLIES:
Card Base - Garden Green 8 1/2” x 5 1/2” scored and folded at 4 1/4”
DSP - HAND-PENNED DSP (Garden Green)
Other Cardstock - Basic White 5 1/4” x 4”, Garden Green and Basic White for the focal point
Ink - Versa Mark and white embossing powder
Other Dies - Stitched So Sweetly
Adhesives - multipurpose glue, dimensionals
*The greeting is from the SWEET STRAWBERRY stamp set.

For the next card I stamped the floral image with Memento Tuxedo Black on Basic White cardstock, colored the image with Stampin’ Blends. I used the intricate detail die cut in Basic Black as an overlay for the floral image.


SUPPLIES:
Card Base - Basic White 8 1/2” x 5 1/2” scored and folded at 4 1/4”
DSP - Pattern Party - black& white check
Other Cardstock - Basic Black 5 1/2” x 3” plus  a piece for the die cut & Basic White for the floral image 
Ink - Memento Tuxedo Black, Stampin’ Blends of your choice for the flower image
Other - white crinkled seam binding ribbon -12-14 inches.
Adhesives - multipurpose glue and dimensionals
* The greeting is from HAND-PENNED PETALS

Stamp the greeting with the Tuxedo Black ink toward the lower right corner of the card base. Stamp the floral image on Basic White. Use Stampin’ Blends to color the image. Die cut the image and die cut the intricate detail image. Adhere the Basic Black overlay to the floral image. Adhere the checked DSP to the Basic Black mat. Tie the crinkled seam binding ribbon around the piece on the left side, and tie a bow. Trim the ends. Adhere the piece to the card base along the top of the card. Adhere the floral piece to the card with dimensionals.

This card was easy to make. It is just a Basic White intricate detail die cut colored with Stampin’ Blends.


SUPPLIES:
Card Base - Basic White (thick) 8 1/2” x 5 1/2” scored and folded at 4 1/4” and a piece for the die cut
Ink - Soft Succulent and Stampin’ Blends (or Stampin’ Write Markers).
Other: In Color Open Weave Ribbon in Soft Succulent - about 18” and Champagne Rhinestones
Adhesive: multipurpose glue
* The greeting is from the TIMELESS TULIPS stamp set

Stamp the greeting toward the bottom center of the card. Adhere the die cut to the card. Place the rhinestones in the centers of the flowers. Tie the ribbon around the card and make a bow. Trim the ends. The card is complete!

TIPS FOR ADHERING THE INTRICATE DETAIL DIES

1. Use the method I described above with the multipurpose glue.
2. Multipurpose glue and a sponge.
    Place the die cut face down on a silicone craft sheet (or a piece of wax paper or parchment paper). Put a 
    dab of the glue on the craft sheet. Dip a wedge of a craft sponge in the glue. Pounce the sponge gentle 
    over the back side of the die cut. * Stampin’ Up! discontinued the Stampin’ Sponges. A sponge
    dauber can be substituted. After use wash out as much of the glue as possible and let dry. I am not 
    sure how many uses you will get from the sponge dauber. I have used the same dauber twice, and it 
    appears I will get at least one more use from it.
3. Fine Tip Glue Pen - The tip on this glue is made for the intricate dies. The tip can become clogged if the 
    little pin inside the lid is not inserted into the tip of the bottle correctly when putting on the lid. I use it
    from time to time. 
4. Mini Glue Dots - Some of the intricate detail dies have areas where the mini glue dots will fit. 
    Sometimes I cut the glue dots in half, or use the paper piercing tip of the Take Your Pick Tool to
    roll the glue dot over on itself (sort of fold it in half), and place the glue dot on the die cut.
5. Adhesive Sheets - peel the backing off one side of a section of an adhesive sheet. Place a piece of 
    cardstock the same size as the adhesive sheet over the exposed adhesive. Place the die on top of
    the cardstock and run it through the Stampin’ Cut & Emboss Machine (or other die cut machine).
    Peel the adhesive off the back dice of the die cut, and place it on the mat, card base, etc.

There are several other die sets in the new catalog that contain the intricate detail dies. One is the Sunflowers Dies which are found in the current Annual Catalog. The Brilliant Wings Dies, which are available now as a special promotion. 

Here is another look at the cards I created with the intricate detail die from the PENNED FLOWERS DIES:


That is it for today. Thank you for stopping by. Until next time...
Stamp Happy!
Kim

Are you looking for a Stampin’ Up! Demonstrator? I would be happy to be your demonstrator. Simply click one of the catalogs found in the right column of this post. This will take you to my Stampin’ Up! Web Site. Click on SHOP, and you will be shopping with me. Or go to stampinup.com, click on shop. You will be prompted to select a demonstrator. You can select a demonstrator by name (Kim Tolbert) or by town / zip code (Vevay, IN).

All stamps and stamped images ©️1991-2021 Stampin’ Up!®️