Showing posts with label Festive & Fun. Show all posts

Wednesday, December 13, 2023

CHRISTMAS TREAT POUCHES & GIFT CARD HOLDERS FOR QUICK GIFTS - A STAMP HAPPY HOLIDAYS POST

Hi Stampers!

We made it! We have reached the end of Stamp Happy Holidays for 2023! I cannot believe it has been over 3 months since the first Stamp Happy Holidays post! I hope the cards, tags, and other ideas I have shared inspired you and encouraged you along your Christmas card making journey.  Before we wrap things up for this year, I have a few more projects to share. Today’s samples are easy to make treat pouches and gift card holders. Let’s take a look:


VIDEO

EASY TO MAKE TREAT POUCHES & GIFT CARD HOLDERS


RIBBON PULL GIFT CARD HOLDER


Simply pull upward on the ribbon to reveal the gift card!


SUPPLIES

* Designer Series Paper (DSP)  A Walk In the Forest, cut at 5 1/2” tall x 5” wide (pay attention to the orientation of the DSP pattern) score along the 5” side at 2 1/4” and 4 1/2” then score along the 5 1/2” side at 4 3/4”.  Follow the diagram below for scoring, cutting, and mitering.
* Scraps of Basic White and Shaded Spruce cardstock
* Ink- Real Red; Stampin’ Blends - Shaded Spruce (dark) to color rhinestones
* Dies - Stylish Shapes - circles 3rd and 4th largest  - use largest die to cut Shades Spruce circle, and the smallest one to cut 2 circles from Basic White cardstock - one each for the front and the back (to /from)
* Sentiment - Mine is from the Festive &Fun stamp set. The to/from stamp is from the Joy of Noel stamp set.
* Ribbon - Real Red - about 18”
* Rhinestones - 3
* Hole punch
* Adhesive - Stampin’ Seal+ or Tear & Tape, Dimensionals


DIAPER FOLD TREAT POUCH


This treat pouch idea has been around a while. It can be created quickly, and it is super easy to change the size of the pouch. The pouch itself requires no adhesive. In my sample I used dimensionals to attach the greeting.

HOW TO

* Start with a square piece of DSP.  (For my pouch I used an 8” square.)
* Fold the paper in half diagonally creating a triangle shape.
* The folded edge is the bottom of your treat pouch. Take one of the bottom points of the triangle and fold it over to the middle of the opposite side of the triangle. Now repeat the process with the other bottom point.
* Fold down one layer of the top point of the triangle. 
* Hold the sides of the  pouch in your hand between your thumb and index finger and give it a gentle squeeze. I finds this helps “lock” the flap in place. 
* The pouch is finished. You can leave it as is or decorate it a bit.

NOTE
* A six inch square piece of DSP will create a pouch suitable for small candies or other small items.
* A twelve inch square will create a pouch suitable for full size candy bars, manicure items, etc. I made several this size and put a napkin and plastic eating utensils inside when I hosted a get together.

SUPPLIES

* DSP - Beary. Christmas 8” x 8” folded diagonally
* Greeting - from the Beary Cute stamp set
* Scraps of Basic White and Night of Navy cardstock for greeting and mat
* Ink - Night of Navy
* Dies - Stylish Shapes - circles, 3rd and 4th largest
* Adhesive and dimensionals

The next three items are basically the same pouch. I call them envelope pouches. I changed the size to accommodate the items I planned to fit inside the pouch. I made mine from cardstock, but you can  use DSP. I added a DSP insert to the two treat pouches. These pouches start with a square piece of cardstock cut in half diagonally. Two pouches can be created from each square.

SMALL ENVELOPE TREAT POUCH OR GIFT CARD HOLDER
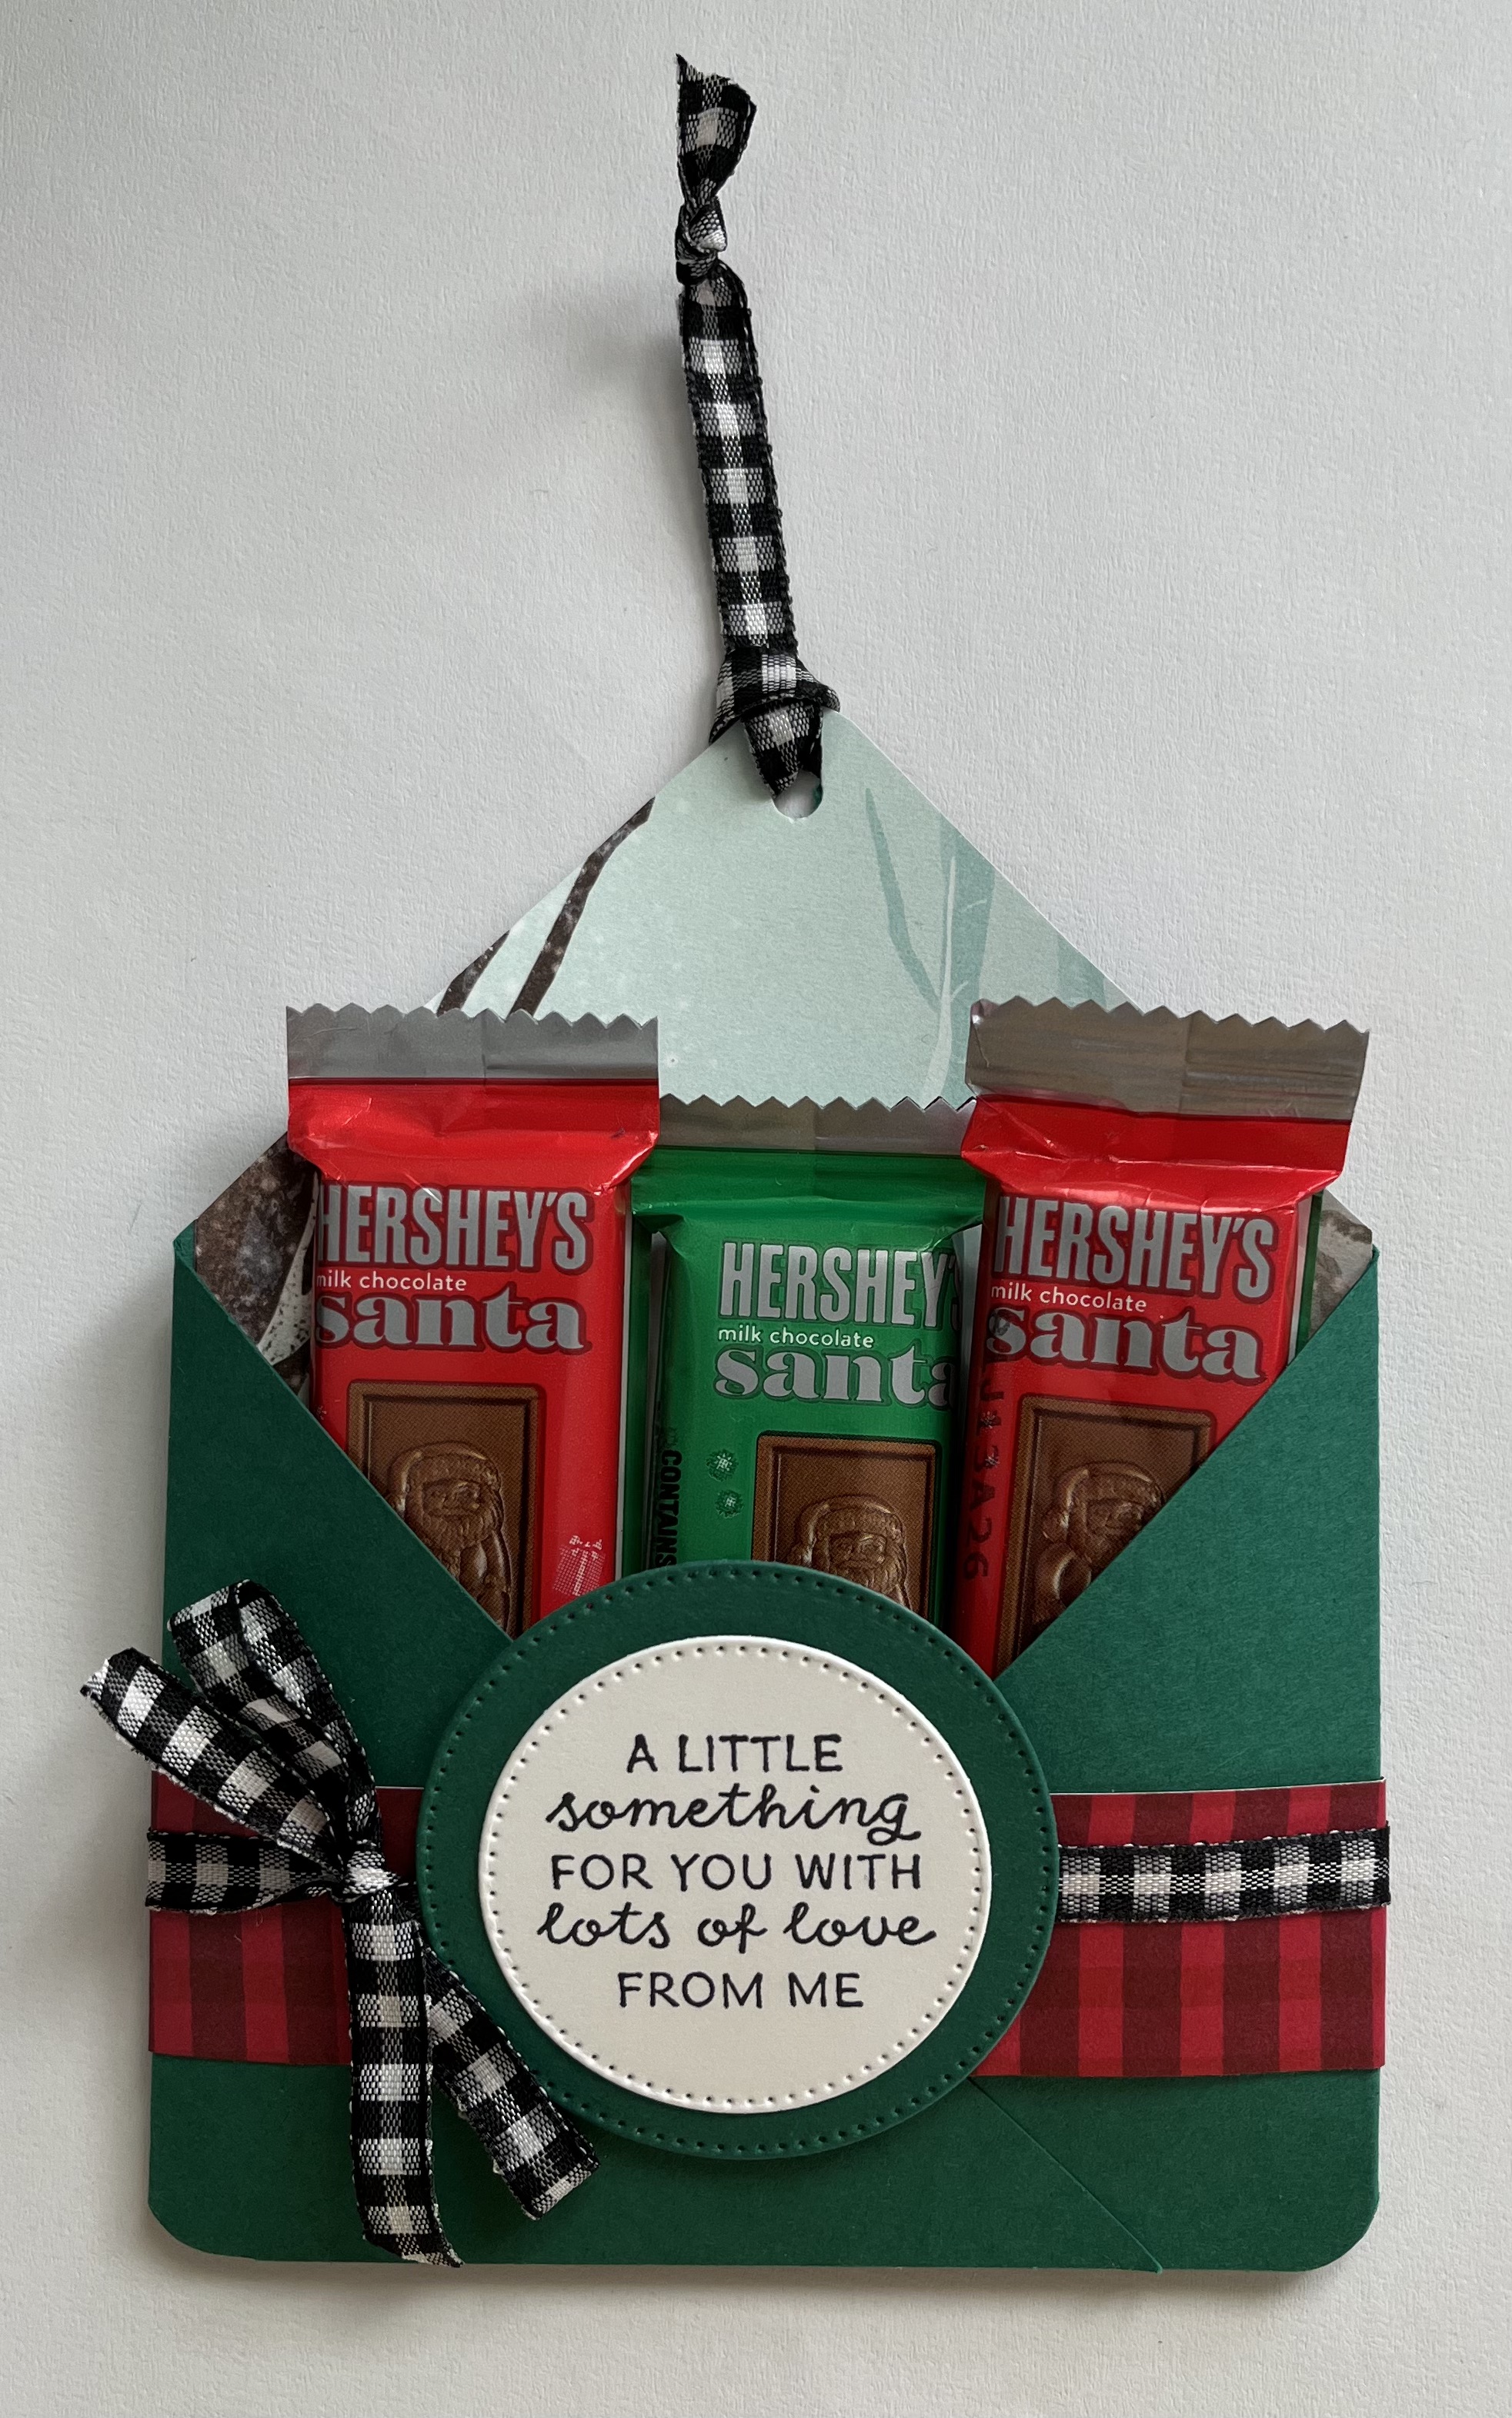

SUPPLIES

* Cardstock - Shaded Spruce 8” x 8” cut in half diagonally (each cardstock square will make 2 pouches),
score along the long side at 3 1/2” and 7 3/4”
* Scraps of Shaded Spruce and Basic White cardstock for greeting  and a to / from tag if needed
* Greeting - from Fun & Festive stamp set
* Ink - Memento Tuxedo Black
* Belly band - Joy of Christmas DSP cut at 9” x 1”
* DSP insert - 5 1/2” x 4 1/8” - One Horse Open Sleigh
* Dies - Stylish Shapes - circles - 3rd & 4th largest 
* Hole punch; cirber rounder punch (optional)
* Ribbon - Black & White Gingham - about 18” to go around pouch and tie in bow, plus 7-8” to create loop at top of pouch (optional)
* Adhesive - Stampin’ Seal + or Tear & Tape, dimensionals 


 CLOSED ENVELOPE TREAT HOLDER / GIFT CARD HOLDER


This gift card holder was created like the previous pouch. I stepped the DSP panel, widened the belly band to 1 1/2”,  folded the top down and tucked it behind the belly band.

SUPPLIES

* Real Red cardstock - same cutting dimensions and scoring as for project above
* DSP - Joy of Christmas for focal image (scrap) and for belly band 9” x 1 1/2”
* Other cardstock - Shaded Spruce and Gold Foil
* Dies - Stylish Shapes - circles, 2nd and 3rd largest; Joy of Noel Dies - greenery
* Corner rounder punch (optional)
* Ribbon - Real Red about 8”
* Stampin’ Seal + or Tear & Tape and dimensionals

LARGER ENVELOPE TREAT POUCH


SUPPLIES

* Cardstock - Boho Blue 8 1/2” square, cut in half diagonally and scored along the long side at 4” and 8”
* Other cardstock - scraps of Basic White and Boho Blue
* DSP - Beary Christmas - insert 6” x 3 7/8” Belly band - 9” x 1 1/2”
* Ink - Boho Blue
* Dies - Stylish Shapes - circles, 3rd and 4th largest
* Stampin’ Seal+ or Tear & Tape; dimensionals

CHRISTMAS TREAT POUCHES & GIFT CARD HOLDERS

There you go! Treat pouches and gift card holders that allow for flexibility and are easy to create! Well, this wraps up Stamp Happy Holidays for 2023. I wish everyone a very Merry Christmas and a very Happy and Healthy 2024. 

Until next time . . .
Stamp Happy!

Kim

All stamps and stamped images ©️1990-2023 Stampin’ Up!®️


Monday, October 9, 2023

FESTIVE & FUN BOX SLEEVE CARD OR TREAT BOX - A STAMP HAPPY HOLIDAYS POST

Hi Stampers!

Welcome to another STAMP HAPPY HOLIDAYS POST! Today’s Christmas card is a fun fold with a twist. This fun fold card can easily be turned into a fun box! This card is another version of my Box Sleeve Cards. Let’s take a look:

STAND ALONE BOX SLEEVE CARD


BACK OF CARD


THE CARD FITS INSIDE AN A2 SIZED ENVELOPE


THE CARD CAN BE TURNED INTO A TREAT BOX


FESTIVE & FUN STAMP SET


TO VIEW PRODUCT DETAIL CLICK HERE

VIDEO
FESTIVE AND FUN BOX SLEEVE CARD OR TREAT BOX


SUPPLIES FOR THIS CARD
* Festive & Fun stamp set - Giraffe image and two greetings
* Card base - Basic White cardstock (thick) 5 1/2” x 4 1/4” 
* Back panel - Basic White cardstock 4 3/4” x 3 1/2”
* Greeting - Basic White cardstock - about 2 1/2” x 1 1/4” - die cut wit Deckled Rectangles Die that measures about 2 3/8” x 1”
* Box Sleeve - Basic White cardstock cut at 5 3/4” x 5 1/2” scored along the 5 3/4” side at 1 1/2”,  2 1/2”, 4”, and 5”. Fold along the score lines, the folds will be mountain folds.
* DSP - MerryBold & Bright - Fa la la pattern - Four pieces: cut one at 5 1/4” x 4”, one at 5 1/4” x 1 1/4”, and cut 2 at 5 1/4” x 7/8”.
* Inks - Memento Tuxedo Black; Stampin’ Blends - Daffodil Delight (light & dark), Lemon Lime Twist (light & dark), Crumb Cake (light & dark), Poppy Patade (light), Shaded Spruce (light), Gray Granite (dark), Smoky Slate (light), Pool Party (light), Color Lifter
* Embellishments - Iridescent Adhesive Backed Discs - Poppy Parade (8)
* Adhesives - Stampin’ Seal, Stampin’ Seal +, dimensionals

Watch the video to see how I put the card together.

TREAT BOX INSERT SCORING AND CUTTING CHART


FESTIVE & FUN BOX SLEEVE CARD / TREAT BOX


That will do it for this week’s STAMP HAPPY HOLIDAYS project. Thank you so much for checking in. Until next time . . .
Stamp Happy!

Kim

All stamps and stamped images ©️1990 - 2023 Stampin’ Up!®️

Tuesday, September 26, 2023

FOR FESTIVE & FUN CARDS GO AROUND THE BLOCK - A STAMP HAPPY HOLIDAYS POST

Hi Stampers!

For today’s Stamp Happy Holidays project I am sharing cards I made using the “Around the Block” layout. It is an oldie, but a goodie! The layout is easy to create, gives cards a little extra umph, and can help you reduce your scrap pile! Let’s take a look at the cards!


For my cards I used the FESTIVE & FUN stamp set from the current Stampin’ Up! ®️ mini catalog. The images in the set work well for this layout. Most medium sized images work well for this layout. 

FESTIVE & FUN STAMP SET


For product details click HERE


VIDEO
FOR FESTIVE & FUN CARDS GO AROUND THE BLOCK


ABOUT THE CARD LAYOUT

The background for this layout is made by cutting 4 strips of patterned paper (DSP) and positioning them on a A-2 sized card base to form a frame. I usually use two coordinating patterns, but you can use 4 patterns if you like. The rectangle area inside the frame measures  
2” x  1/4”. The matted focal panel should be at least that size, but can be larger. If you prefer you can stamp your image directly onto this area of the card base. Stamping a greeting in this space makes the card faster to create, and can really show off that pretty DSP.

The card can be made with the focal image being of portrait or landscape orientation. If the pattern on the paper has a directional design, be sure to cut the strips accordingly.

Two of the cards have a pocket inside that is a great place to tuck gift cards or cash. (I recommend not sending cash through the mail.) 

Here are the measurements for the cards (regular card & card with gift card holder) and around the block panel. Below the pictures of each card you will find measurements for the matted focal image, and the supplies. Used to create the card.

AROUND THE BLOCK CARD

* Card base - A-2 cardstock measures 8 1/2” x 5 1/2” scored and folded at 4 1/4”
* Card base for gift card pocket card- cardstock measures 11” x 5 1/2” scored at 4 1/4” and 
8 1/2, fold score lines, both are mountain folds -adhere the end of the small flap to the card base, this flap should be on the left hand side of the interior of the card
* Strips - cut 2 at 4 1/4” x 1” then cut 2 at 3” x 1”
* Basic White cardstock for inside the card - 5 1/4” x4”
* Basic White cardstock or printer paper cut at 5 1/4” x 4” - adhere your strips to this piece to form the background panel. If you would rather put the four strips of DSP directly on the card base, remember to position the pieces to leave the 1/8” border.
* Adhesive - I used Stampin’ Seal, but liquid adhesive will work just fine. To secure the gift card pocket I recommend using a strong adhesive like Stampin’ Seal + , Tear & Tape, or the Tombow liquid adhesive (AKA green glue)

ASSEMBLING THE AROUND THE BLOCK PORTION OF THE CARD

* I begin forming the around the block design (frame) by positioning the 5 1/4” x 4” piece of Basic White cardstock in the portrait position - 4” side will be at the top. 
* Add adhesive to the back side of one of the 4 1/4” x1” pieces of DSP. Line it up with the top left hand side of the cardstock and adhere it down from top to bottom.
* Place adhesive on one of the 3” x 1” strips. Place this strip along the top of the cardstock from the 4 1/4” on to the top right hand side of the cardstock.
* Place adhesive on the remaining 4 1/4” x 1” strip. This strip will line up on the right hand side right under the 3” x 1” strip and down the right hand side to the bottom of the cardstock.
* Place adhesive on the final strip. Place it along the bottom of the cardstock from right to left. 
* Your around the block background is complete. Stamp a pretty sentiment in the center or add a matted focal image to complete the panel. Then adhere to a card base.


FESTIVE & FUN GIRAFFE


SUPPLIES I USED FOR THIS CARD

* Festive & Fun stamp set - giraffe image
* Card base - Shaded Spruce cardstock
* DSP - Merry Bold & Bright
* Other cardstock  - Basic White - for front panel and inside panel, for focal image 4” x 2 1/8”, for greeting 2 1/8” x 7/8” Shaded Spruce - focal image mat 4 1/4” x 2 3/8”, greeting mat - 
2 3/8” x 1 18”
* Inks - Memento Tuxedo Black, Shaded Spruce; Stampin’ Blends - Daffodil Delight (dark), Shaded Spruce (light & dark), Crumb Cake (light & dark), Smoky Slate (light & dark), Real Red (light), Lemon Lolly (light), Lemon Lime Twist (light)
* Embellishments - Festive Pearls -red , 3

FESTIVE & FUN RHINO


SUPPLIES I USED FOR THIS CARD

* Festive & Fun Stamp set - Rhino image
* Card base - Cherry Cobbler
* DSP - Shining Christmas (Online Exclusive)
* Other cardstock - Basic White for front and inside panels, for focal image 3” x 2 1/8”, Cherry Cobbler - focal image mat - 3 1/4” x 2 3/8”
* Inks - Memento Tuxedo Black, Cherry Cobbler (inside sentiment), Wink of Stella (Rhino, birds, package bows, under rhino and sled); Stampin’ Blends - Cherry Cobbler (light), Mossy Meadow (light), Balmy Blue (light & dark), Daffodil Delight (light & dark), Poppy Parade ( light & dark), Lemon Lolly (light), Lemon Lime Twist (light), Bubble Bath (light & dark), Crumb Cake (dark)
* Embellishments - Festive Pearls -red, 3

FESTIVE & FUN MOOSE


INSIDE OF CARD
(Gift Card Holder Pocket)


SUPPLIES I USED FOR THIS CARD

* Festive & Fun stamp set - Moose image
* Card base - Basic White (thick)
* DSP - A Walk In the Forest
* Other cardstock - Basic White for front panel ( I used printer paper instead of cardstock), for focal image - 3 1/4” x 2” Balmy Blue - for mat 3 1/2” x 2 1/4”
* Inks - Memento Tuxedo Black, Balmy Blue; Stampin’ Blends - Ivory, Pecan Pie (light), Bubble Bath (light), Balmy Blue (light & dark), Shaded Spruce (light), Real Red (light), Smoky Slate (dark)

MOSSY MEADOW FESTIVE & FUN MOOSE
(VIDEO CARD)


SUPPLIES I USED FOR THIS CARD

* Festive & Fun stamp set - Moose image
* Card base - Night of Navy (this card has the gift card pocket)
* DSP - Beary Christmas
* Other cardstock - Basic White for front and inside panel, for focal image - 3 1/4” x 2” Night of Navy for mat - 3 1/2” x 2 1/4”
* Inks - Memento Tuxedo Black, Night of Navy; Stampin’ Blends - Ivory, Bubble Bath (light), Pecan Pie (light), Mossy Meadow (light & dark) Smoky Slate (dark), Real Red (light)


FESTIVE & FUN AROUND THE BLOCK CARDS 


That’s all for today. Thank you so much for stopping by. Until next time…
Stamp Happy!

Kim

All stamps and stamped images ©️1990-2023 Stampin’ Up!®️