Showing posts with label Gift Card Holders. Show all posts

Wednesday, November 12, 2025

CREATE A SLIDING GIFT CARD HOLDER - TWO WAYS; A STAMP HAPPY HOLIDAYS POST 🎄

Hi Stampers!

Here we are coming up on the middle of November. How are your Christmas projects coming along? I think I will have plenty of cards. I need a few more tags, but mostly I need something for gift cards. So, today’s projects are cards that double as gift card holders. I call these Sliding Gift Card Holders, because when you open the card the gift card slides up or pops up. I made a landscape and a portrait version. Both fit inside a A-2 size envelope. Neither is difficult to create. When decorating them keep it simple or dress it up! It’s totally up to you. Let’s take a look at the sample projects:


VIDEO
CREATE A SLIDING GIFT CARD HOLDER - TWO WAYS!


LANDSCAPE VERSIONS


WHAT YOU NEED
* Card Base - cut cardstock at 8 1/2” x 5 1/2”, score at 2 1/2” and 61/2” along 8 1/2” side
* Patterned Paper - cut one at 2 1/4” x 5 1/4” and another at 1 3/4” x 5 1/4” - the papers can be the same designs or different designs. 
* Sliding Mechanism - cut cardstock at 3 3/4” x 4”, score along the 4”side at 1/2”, cut a piece of patterned paper at 2” x 4” this forms the pocket for the gift card. 
    OPTIONAL MECHANISM - CUT CARDSYOCK AT 5 3/4” X 4”  score along the 5 3/4” side at at 1/2” and 3 3/4”
* Stamps, inks, dies, other Cardstock for stamping & die cutting, strong adhesives, etc. 

WHAT TO DO
* Card base - fold score lines toward center of card (valley folds), go over with bone folder.
* Adhere mats to upper and lower flaps on card front. 
* Assemble sliding mechanism. Fold 1/2”score line (mountain fold), put adhesive along bottom and on both sides of the 2” x 4” piece of patterned paper or cardstock, adhere it along bottom edge of mechanism.
    OPTIONAL MECHANISM - fold the 1/2” score line (mountain fold) and fold the 3 3/4” score line (valley folds). Run bone folder over folds. Place adhesive along the right and left sides of the fold. (3 3/4” score line). Fold up to form pocket.
* Place adhesive along the 1/2” flap. Open cardbase with 2 1/2” wide flap at the top. Adhere mechanism just above the score line centered to the left and right. 
* Put adhesive along the left side and right side of the 2” flap at the bottom of the card base. Press to adhere. Slip bottom of mechanism under the 2” flap. 
* Place greeting and / or images on front of card
* Optional - add white or light colored cardstock panel cut at 5 1/4” x 4” to back of card. This panel can be used for an additional sentiment and give extra room for a greeting. 

TRADITIONAL CHRISTMAS


INSIDE


SUPPLIES I USED
* Cardstock - Garden Green, Basic White
* Patterned Paper - Christmas Spectacular (49 and Market)
* Stamps - Framed and Festive (retired)
* Ink - Real Red
* Dies - Stylish Shapes, Stitched Shapes (retired)
* Adhesive - Stampin’ Seal +. Double sided adhesive 1/8” (Scrapbook.com)

HAPPY HOLIDAYS VIDEO CARD


INSIDE


SUPPLIES I USED
* Cardstock - Early Espresso, Basic White, Crumb Cake
* Patterned Paper - (retired)
* Greeting - Gingerbread Patterned Collection (Scrapbook.com)
* Embellishments - Summer Enamel Dots (Simple Stories)
* Adhesive - Stampin’ Seal+  double sided adhesive 1/8” (Scrapbook.com)


PORTRAIT VERSIONS


WHAT YOU NEED
* Card Base - cut cardstock at 5 1/2” x 4 1/4”
* Small Card - cut cardstock at 8 1/2” x 3 1/2” - score at 4 1/4” on 8 1/2” side.
* Mechanism - cut cardstock at 5 3/4” x 3 3/8” - score at 1/2” and 4” on 5 3/4” side
* Patterned Paper - cut one ay 5 1/4” x 4”, cut one at 4” x 2 1/2”, for front of card.  For small card cut one at 4” x 3 1/4”; for inside to decorate pocket cut one at 3 1/8” x 1 1/2”
* Cardstock Strip - cut at 4” x 1/4” (optional)
* Back Panel - cut 1 from white or light colored cardstock at 5 1/4” x 4”
* Stamps, ink, dies, adhesive - other things needed to complete your card

WHAT TO DO
* Adhere 5 1/4” x 4” patterned paper to card base
* Adhere stamped back panel to back of card base.
* Adhere 4” x 3 1/4” pattern paper to front of small card.
* Adhere the small card to the card base centered left to right, and leaving the same amount of border at the top as on the sides.
* Fold mechanism score lines, the score line at 1/2” is a mountain fold, the one at 4” is a valley folds.
* At 4” score line fold apply adhesive on the right and left sides of the flap and adhere to form a pocket.
* Adhere the 3 1/8” x 1 1/2” piece of patterned paper centered on the front of the pocket. 
* Apply adhesive to the 1/2” flap of the mechanism. Open the small card and adhere the mechanism centered just above the center score line of the small card.
* Leave small card open. Adhere the cardstock strip along the top of the 4” x 2 1/2” piece of patterned paper. Place adhesive on the back of this piece along the bottom and sides and adhere to card base - line up with first layer of patterned paper. This forms another pocket.
* Guide the mechanism into the pocket as you close the small card.
* Add a greeting and / or images to the front of the card

STOCKINGS FOR YOU


INSIDE


SUPPLIES I USED
* Cardstock - Real Red, Basic White, Shaded Spruce
* Patterned Paper - (retired)
* Stamps - Sending Cheer & dies)  Holly Jolly Wishes (both retired)
* Ink Real Red
* Adhesive - Stampin’ Seal +,  Double Sided Adhesive 1/8” (Scrapbook.com)

GINGERBREAD TREATS


INSIDE


SUPPLIES I USED
* Cardstock - Real Red, Crumb Cake, Basic White
* Patterned Paper - (retired)
* Stamps - Sending Cheer & dies, Holly Jolly Wishes (both retired)
* Ink - Real Red, Crumb Cake, Early Espresso
* Embellishments - Forever Yours Sprinkletz (MoreButtons.com)
* Adhesive - Stampin’ Seal +. Double sided adhesive 1/8” (Scrapbook.com)

SLIDING GIFT CARD HOLDERS


That’s all for today. Thank you for joining me for Stamp Happy Holidays! Until next time . . .
Stamp Happy!

Kim

NOTE - I use mostly Stampin’ Up! products, many are retired and noted as such. Products from other companies are also noted as such. I encourage you to use what you have on hand to create your own versions of the sample projects.

Wednesday, December 13, 2023

CHRISTMAS TREAT POUCHES & GIFT CARD HOLDERS FOR QUICK GIFTS - A STAMP HAPPY HOLIDAYS POST

Hi Stampers!

We made it! We have reached the end of Stamp Happy Holidays for 2023! I cannot believe it has been over 3 months since the first Stamp Happy Holidays post! I hope the cards, tags, and other ideas I have shared inspired you and encouraged you along your Christmas card making journey.  Before we wrap things up for this year, I have a few more projects to share. Today’s samples are easy to make treat pouches and gift card holders. Let’s take a look:


VIDEO

EASY TO MAKE TREAT POUCHES & GIFT CARD HOLDERS


RIBBON PULL GIFT CARD HOLDER


Simply pull upward on the ribbon to reveal the gift card!


SUPPLIES

* Designer Series Paper (DSP)  A Walk In the Forest, cut at 5 1/2” tall x 5” wide (pay attention to the orientation of the DSP pattern) score along the 5” side at 2 1/4” and 4 1/2” then score along the 5 1/2” side at 4 3/4”.  Follow the diagram below for scoring, cutting, and mitering.
* Scraps of Basic White and Shaded Spruce cardstock
* Ink- Real Red; Stampin’ Blends - Shaded Spruce (dark) to color rhinestones
* Dies - Stylish Shapes - circles 3rd and 4th largest  - use largest die to cut Shades Spruce circle, and the smallest one to cut 2 circles from Basic White cardstock - one each for the front and the back (to /from)
* Sentiment - Mine is from the Festive &Fun stamp set. The to/from stamp is from the Joy of Noel stamp set.
* Ribbon - Real Red - about 18”
* Rhinestones - 3
* Hole punch
* Adhesive - Stampin’ Seal+ or Tear & Tape, Dimensionals


DIAPER FOLD TREAT POUCH


This treat pouch idea has been around a while. It can be created quickly, and it is super easy to change the size of the pouch. The pouch itself requires no adhesive. In my sample I used dimensionals to attach the greeting.

HOW TO

* Start with a square piece of DSP.  (For my pouch I used an 8” square.)
* Fold the paper in half diagonally creating a triangle shape.
* The folded edge is the bottom of your treat pouch. Take one of the bottom points of the triangle and fold it over to the middle of the opposite side of the triangle. Now repeat the process with the other bottom point.
* Fold down one layer of the top point of the triangle. 
* Hold the sides of the  pouch in your hand between your thumb and index finger and give it a gentle squeeze. I finds this helps “lock” the flap in place. 
* The pouch is finished. You can leave it as is or decorate it a bit.

NOTE
* A six inch square piece of DSP will create a pouch suitable for small candies or other small items.
* A twelve inch square will create a pouch suitable for full size candy bars, manicure items, etc. I made several this size and put a napkin and plastic eating utensils inside when I hosted a get together.

SUPPLIES

* DSP - Beary. Christmas 8” x 8” folded diagonally
* Greeting - from the Beary Cute stamp set
* Scraps of Basic White and Night of Navy cardstock for greeting and mat
* Ink - Night of Navy
* Dies - Stylish Shapes - circles, 3rd and 4th largest
* Adhesive and dimensionals

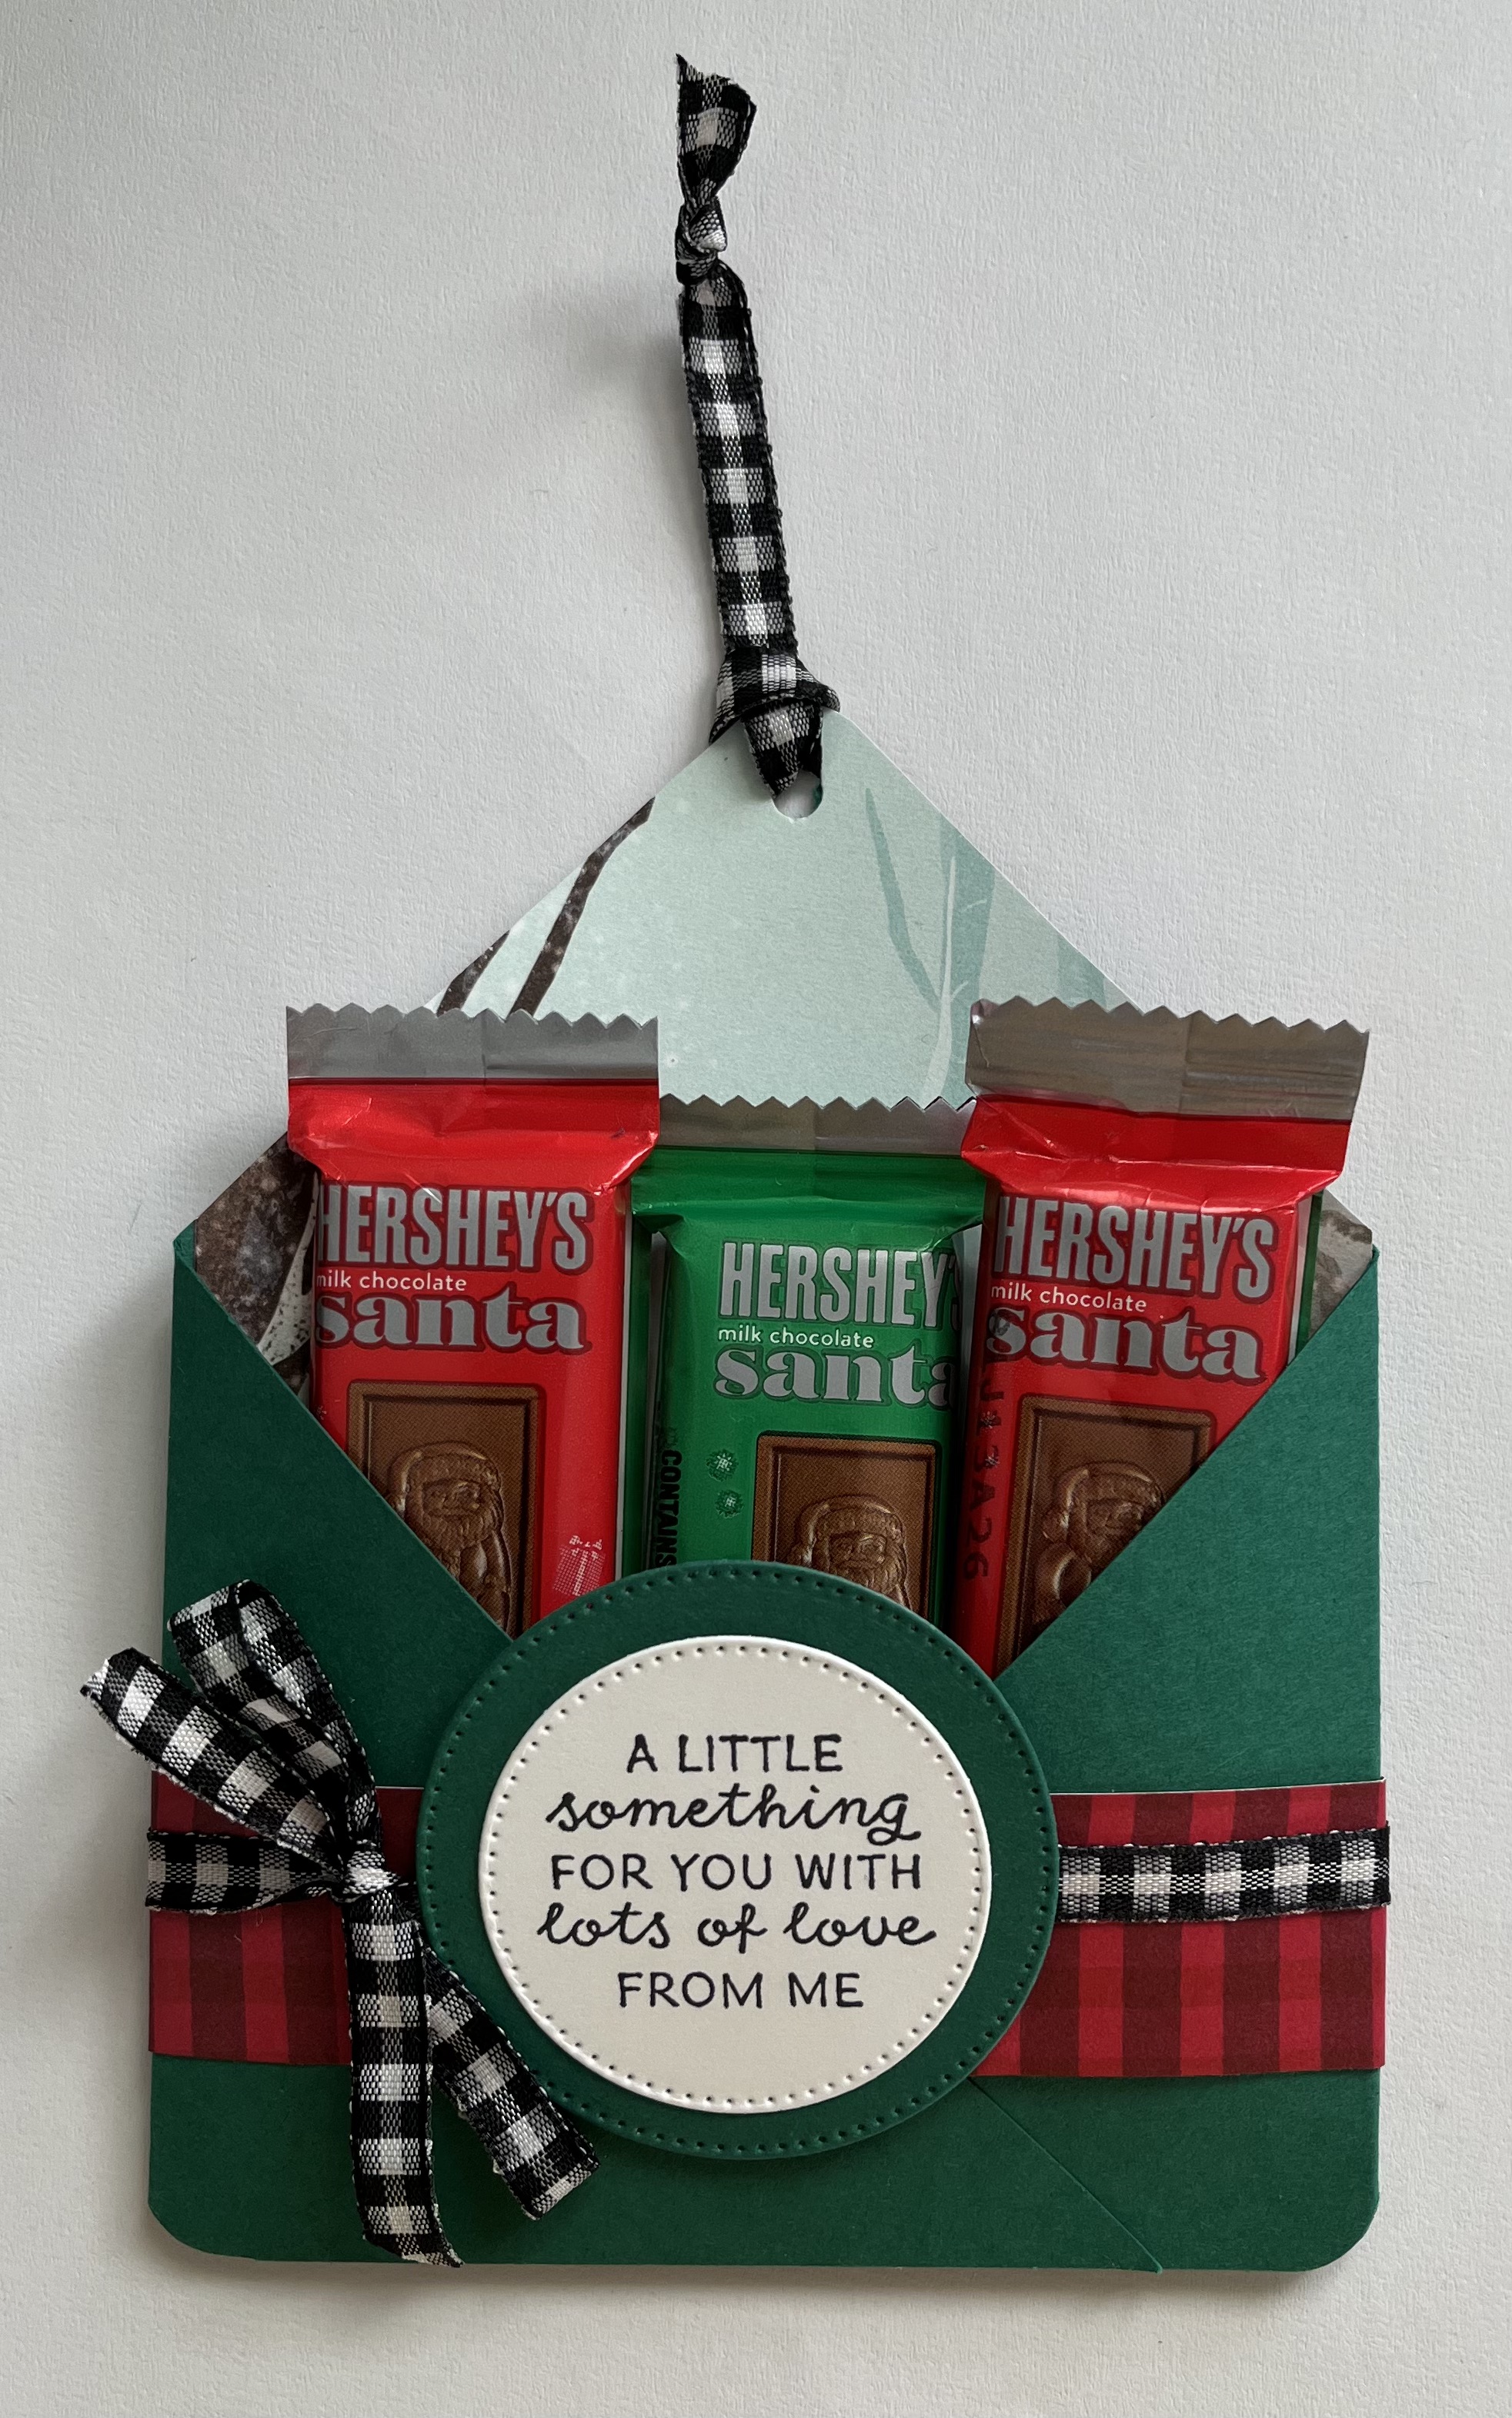
The next three items are basically the same pouch. I call them envelope pouches. I changed the size to accommodate the items I planned to fit inside the pouch. I made mine from cardstock, but you can  use DSP. I added a DSP insert to the two treat pouches. These pouches start with a square piece of cardstock cut in half diagonally. Two pouches can be created from each square.

SMALL ENVELOPE TREAT POUCH OR GIFT CARD HOLDER


SUPPLIES

* Cardstock - Shaded Spruce 8” x 8” cut in half diagonally (each cardstock square will make 2 pouches),
score along the long side at 3 1/2” and 7 3/4”
* Scraps of Shaded Spruce and Basic White cardstock for greeting  and a to / from tag if needed
* Greeting - from Fun & Festive stamp set
* Ink - Memento Tuxedo Black
* Belly band - Joy of Christmas DSP cut at 9” x 1”
* DSP insert - 5 1/2” x 4 1/8” - One Horse Open Sleigh
* Dies - Stylish Shapes - circles - 3rd & 4th largest 
* Hole punch; cirber rounder punch (optional)
* Ribbon - Black & White Gingham - about 18” to go around pouch and tie in bow, plus 7-8” to create loop at top of pouch (optional)
* Adhesive - Stampin’ Seal + or Tear & Tape, dimensionals 


 CLOSED ENVELOPE TREAT HOLDER / GIFT CARD HOLDER


This gift card holder was created like the previous pouch. I stepped the DSP panel, widened the belly band to 1 1/2”,  folded the top down and tucked it behind the belly band.

SUPPLIES

* Real Red cardstock - same cutting dimensions and scoring as for project above
* DSP - Joy of Christmas for focal image (scrap) and for belly band 9” x 1 1/2”
* Other cardstock - Shaded Spruce and Gold Foil
* Dies - Stylish Shapes - circles, 2nd and 3rd largest; Joy of Noel Dies - greenery
* Corner rounder punch (optional)
* Ribbon - Real Red about 8”
* Stampin’ Seal + or Tear & Tape and dimensionals

LARGER ENVELOPE TREAT POUCH


SUPPLIES

* Cardstock - Boho Blue 8 1/2” square, cut in half diagonally and scored along the long side at 4” and 8”
* Other cardstock - scraps of Basic White and Boho Blue
* DSP - Beary Christmas - insert 6” x 3 7/8” Belly band - 9” x 1 1/2”
* Ink - Boho Blue
* Dies - Stylish Shapes - circles, 3rd and 4th largest
* Stampin’ Seal+ or Tear & Tape; dimensionals

CHRISTMAS TREAT POUCHES & GIFT CARD HOLDERS

There you go! Treat pouches and gift card holders that allow for flexibility and are easy to create! Well, this wraps up Stamp Happy Holidays for 2023. I wish everyone a very Merry Christmas and a very Happy and Healthy 2024. 

Until next time . . .
Stamp Happy!

Kim

All stamps and stamped images ©️1990-2023 Stampin’ Up!®️


Tuesday, November 1, 2022

USING CELEBRATIONS TAG & MINI POCKET ENVELOPE DIES FOR EASY HOLIDAY GIFT CARD HOLDERS; A STAMP HAPPY HOLIDAYS POST

Hi Stampers!

Today let’s take a look at two sets of dies from Stampin’ Up! ®️that contain a die that can create a gift card holder in no time. The dies sets are CELEBRATIONS TAGS DIES from the June -December 2022 Mini Catalog, and the MINI POCKET ENVELOPE DIES from the 2022-2023 Annual Catalog. Here is a look at the gift card holders I made using these dies:


The cards on the left and in the middle were created using a die from the CELEBRATIONS TAGS DIES. The tag on the right was created using a die from the MINI POCKET ENVELOPE DIES.

CELEBRATIONS TAG DIES


MINI POCKET ENVELOPE DIES


CELEBRATIONS TAG DIES - LUGGAGE TAG/GIFT CARD HOLDER


I used this die from the CELEBRATIONS TAGS DIES to create two luggage tags gift card holders. One with solid side and one with a cut out on the front side.

CARDSTOCK CUTTING MEASUREMENTS 


To create the gift card holders with the luggage tag die I used a piece of cardstock cut at 6” x 8 1/2”. This is big enough to die cut 2 gift card holders.

LUGGAGE TAG GIFT CARD HOLDER
 

SUPPLIES FOR THIS GIFT CARD HOLDER
* Celebration Tag Dies - luggage tag die and snowflake die (cut 3)
* Pacific Point cardstock 3” x 8 1/2” for one gift card holder or 6” x 8 1/2” for 2
* Basic White cardstock - 3” x 2” for mat and a scrap to cut out 3 snowflakes
* Storybook Gnomes - Pacific Point with snowflake pattern cut at 2 7/8” x 1 7/8”
* Crinkled Seam Binding Ribbon - white, about 7”
* Adhesive - I suggest liquid glue to use on the tabs, glue dots for two snowflakes, and small pieces of dimensional for center snowflake

LUGGAGE TAG GIFT CARD HOLDER WITH WINDOW


SUPPLIES FOR THIS GIFT CARD HOLDER
* Celebrations Tags Dies - luggage tag die, snowflake die, mitten die, stitched rectangle die for window
* Celebrate With Tags stamp set - mitten image
* Tahitian Tide cardstock for gift card holder - same cutting instructions as for gift card holder above
* Basic White cardstock for stamping and die cutting
* Ink - Parakeet Party to stamp mitten
* Metallic Woven Ribbon - Tahitian Tide, about 7”
* Adhesive (liquid glue)

MINI POCKET ENVELOPE DIE


CARDSTOCK CUTTING MEASUREMENTS


For two gift card holder cut the cardstock at 8 1/2” x 6”

MINI POCKET ENVELOPE GIFT CARD HOLDER


SUPPLIES FOR THIS GIFT CARD HOLDER
* Mini Pocket Envelope Dies - gift card holder die, stitched oval die, leaf die (cut 3)
* Hydrangea Haven stamp set for greeting
* Shaded Spruce cardstock for gift card holder  3” x 8 1/2 for one, 6” x 8 1/2” for 2
* Scrapes of Shaded Spruce and Very Vanilla cardstock for die cutting and stamping
* DSP - 2” x 3” Rings of Love (July & August Sale-A-Bration - Retired)
* Ink - Shaded Spruce and Sweet Sorbet
* Open Weave Ribbon - Evening Evergreen - about 7”
* Adhesive (liquid glue) dimensionals for oval 

EASY GIFT CARD HOLDERS MADE WITH DIES


Thank you for checking in today. Until next time…
Stamp Happy!

Kim

All stamps and stamped images ©️1990-2022 Stampin’ Up!®️