Showing posts with label Joy of Noel. Show all posts

Wednesday, December 13, 2023

CHRISTMAS TREAT POUCHES & GIFT CARD HOLDERS FOR QUICK GIFTS - A STAMP HAPPY HOLIDAYS POST

Hi Stampers!

We made it! We have reached the end of Stamp Happy Holidays for 2023! I cannot believe it has been over 3 months since the first Stamp Happy Holidays post! I hope the cards, tags, and other ideas I have shared inspired you and encouraged you along your Christmas card making journey.  Before we wrap things up for this year, I have a few more projects to share. Today’s samples are easy to make treat pouches and gift card holders. Let’s take a look:


VIDEO

EASY TO MAKE TREAT POUCHES & GIFT CARD HOLDERS


RIBBON PULL GIFT CARD HOLDER


Simply pull upward on the ribbon to reveal the gift card!


SUPPLIES

* Designer Series Paper (DSP)  A Walk In the Forest, cut at 5 1/2” tall x 5” wide (pay attention to the orientation of the DSP pattern) score along the 5” side at 2 1/4” and 4 1/2” then score along the 5 1/2” side at 4 3/4”.  Follow the diagram below for scoring, cutting, and mitering.
* Scraps of Basic White and Shaded Spruce cardstock
* Ink- Real Red; Stampin’ Blends - Shaded Spruce (dark) to color rhinestones
* Dies - Stylish Shapes - circles 3rd and 4th largest  - use largest die to cut Shades Spruce circle, and the smallest one to cut 2 circles from Basic White cardstock - one each for the front and the back (to /from)
* Sentiment - Mine is from the Festive &Fun stamp set. The to/from stamp is from the Joy of Noel stamp set.
* Ribbon - Real Red - about 18”
* Rhinestones - 3
* Hole punch
* Adhesive - Stampin’ Seal+ or Tear & Tape, Dimensionals


DIAPER FOLD TREAT POUCH


This treat pouch idea has been around a while. It can be created quickly, and it is super easy to change the size of the pouch. The pouch itself requires no adhesive. In my sample I used dimensionals to attach the greeting.

HOW TO

* Start with a square piece of DSP.  (For my pouch I used an 8” square.)
* Fold the paper in half diagonally creating a triangle shape.
* The folded edge is the bottom of your treat pouch. Take one of the bottom points of the triangle and fold it over to the middle of the opposite side of the triangle. Now repeat the process with the other bottom point.
* Fold down one layer of the top point of the triangle. 
* Hold the sides of the  pouch in your hand between your thumb and index finger and give it a gentle squeeze. I finds this helps “lock” the flap in place. 
* The pouch is finished. You can leave it as is or decorate it a bit.

NOTE
* A six inch square piece of DSP will create a pouch suitable for small candies or other small items.
* A twelve inch square will create a pouch suitable for full size candy bars, manicure items, etc. I made several this size and put a napkin and plastic eating utensils inside when I hosted a get together.

SUPPLIES

* DSP - Beary. Christmas 8” x 8” folded diagonally
* Greeting - from the Beary Cute stamp set
* Scraps of Basic White and Night of Navy cardstock for greeting and mat
* Ink - Night of Navy
* Dies - Stylish Shapes - circles, 3rd and 4th largest
* Adhesive and dimensionals

The next three items are basically the same pouch. I call them envelope pouches. I changed the size to accommodate the items I planned to fit inside the pouch. I made mine from cardstock, but you can  use DSP. I added a DSP insert to the two treat pouches. These pouches start with a square piece of cardstock cut in half diagonally. Two pouches can be created from each square.

SMALL ENVELOPE TREAT POUCH OR GIFT CARD HOLDER
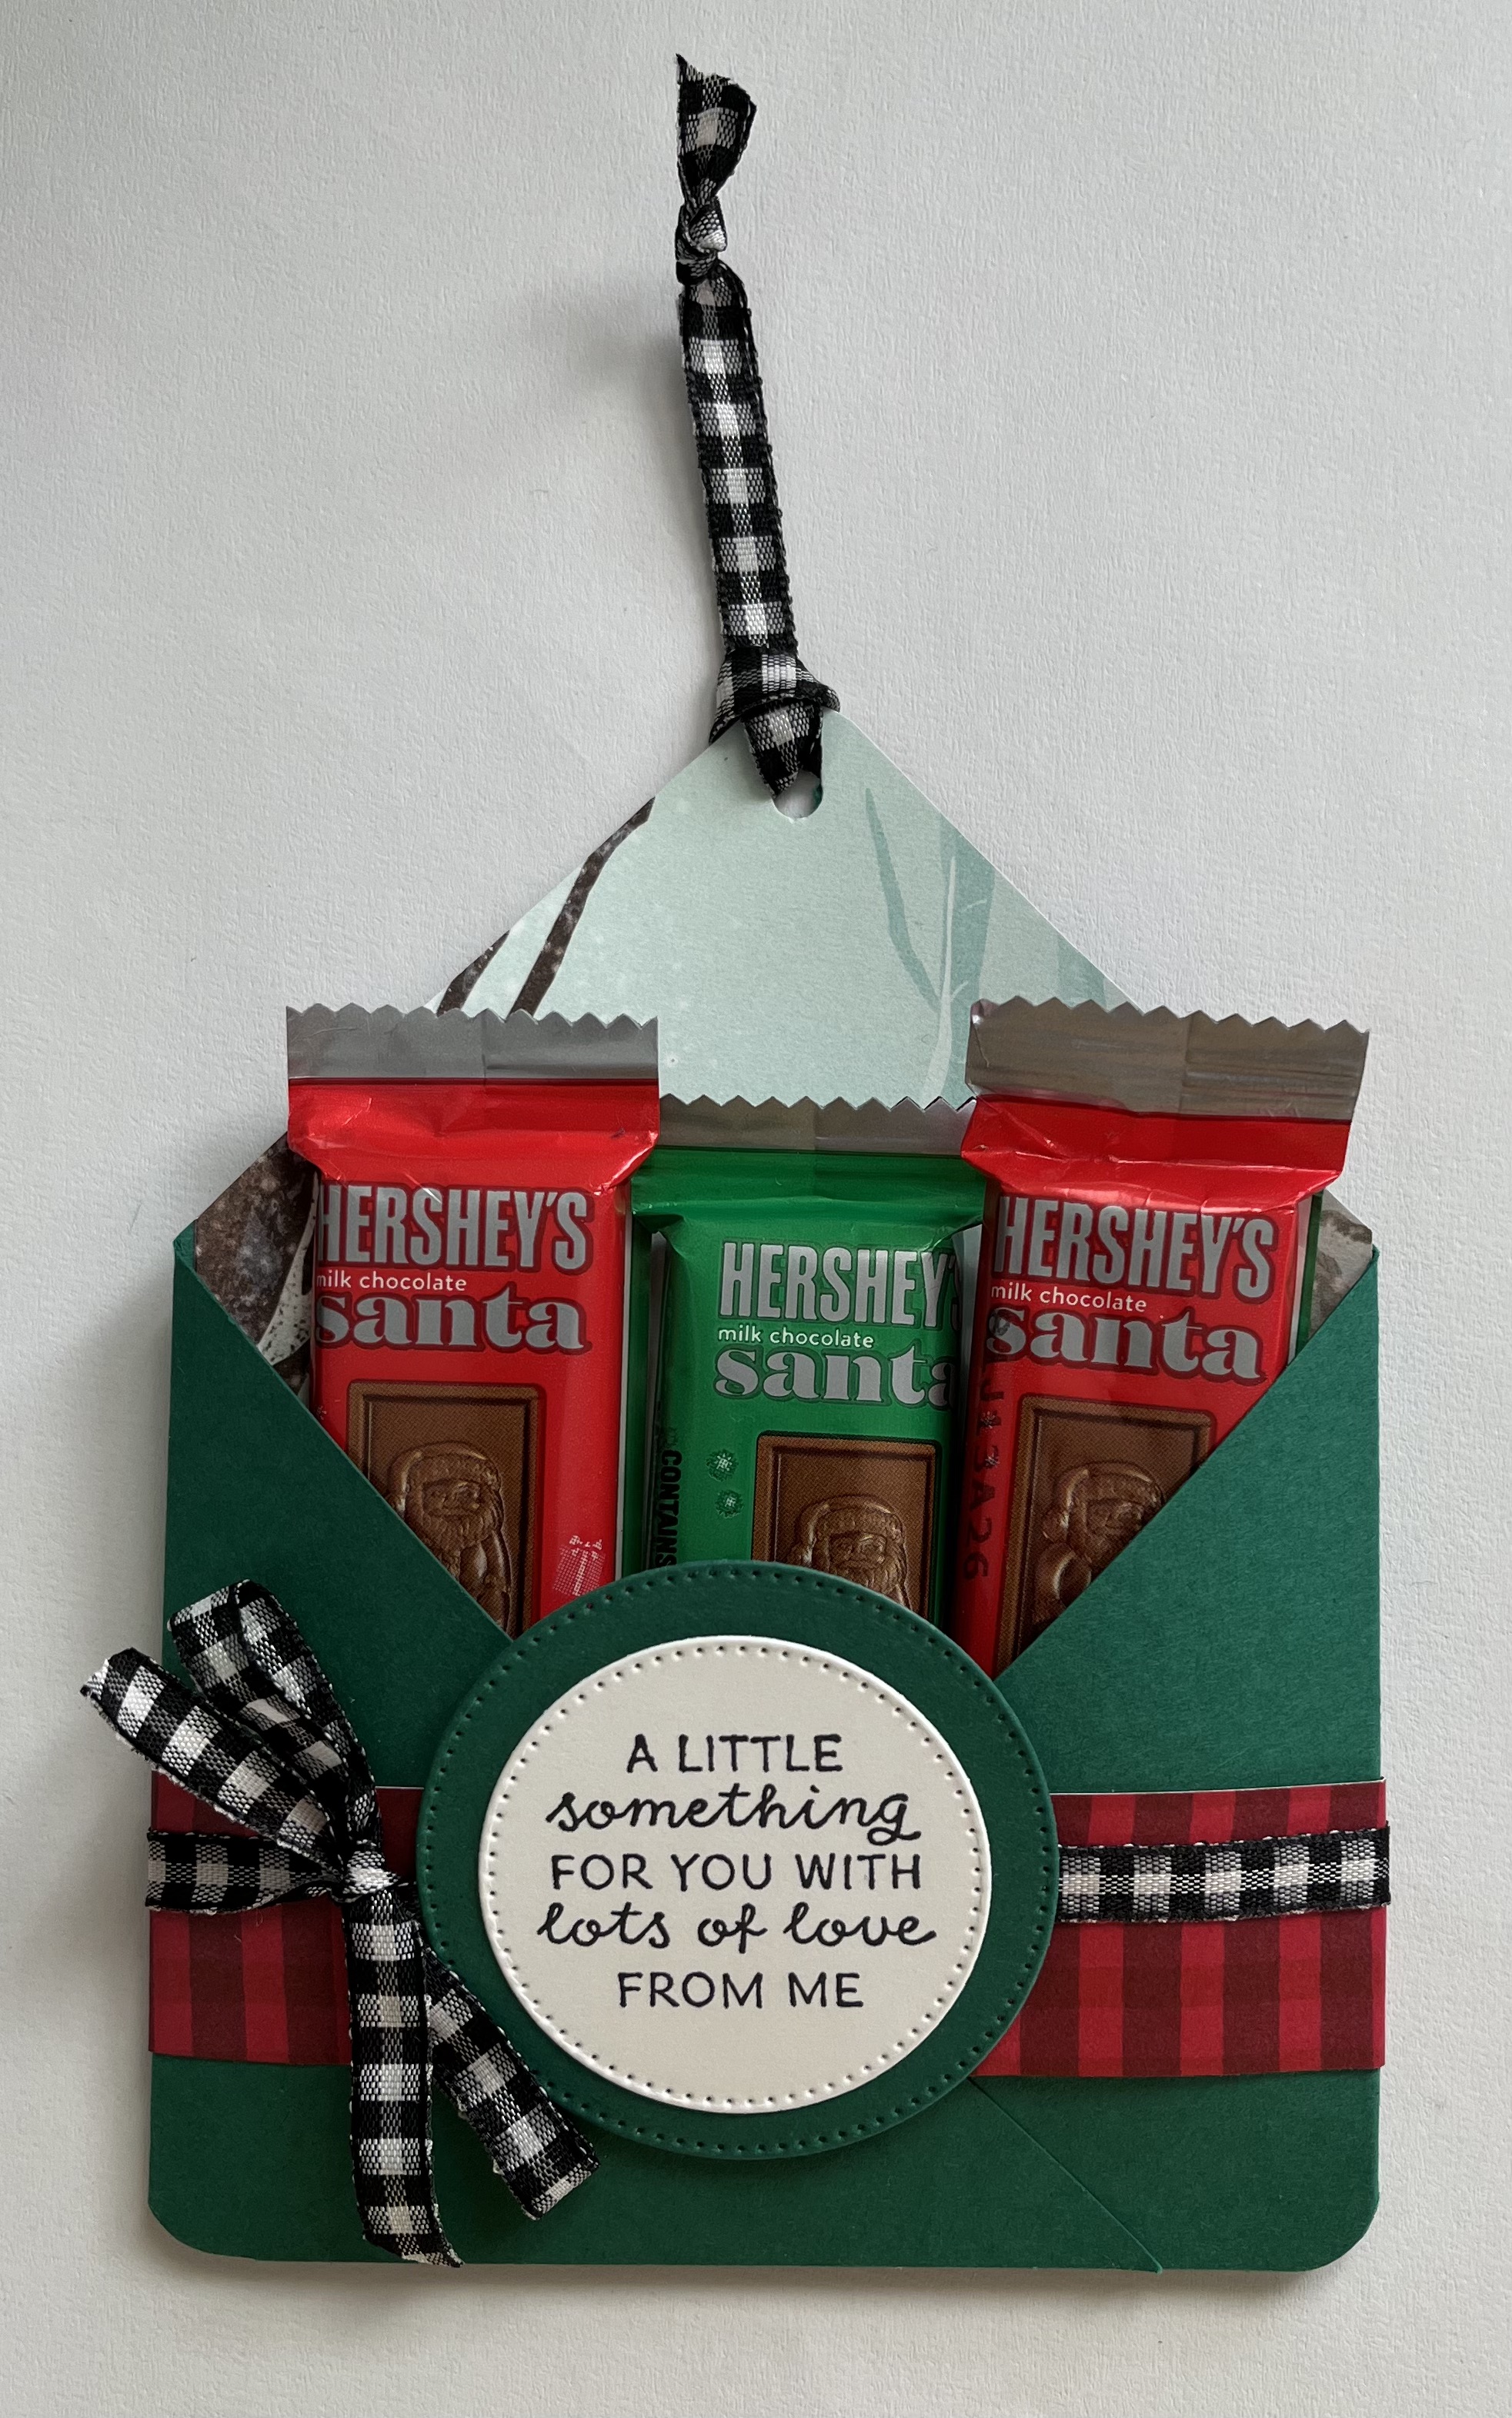

SUPPLIES

* Cardstock - Shaded Spruce 8” x 8” cut in half diagonally (each cardstock square will make 2 pouches),
score along the long side at 3 1/2” and 7 3/4”
* Scraps of Shaded Spruce and Basic White cardstock for greeting  and a to / from tag if needed
* Greeting - from Fun & Festive stamp set
* Ink - Memento Tuxedo Black
* Belly band - Joy of Christmas DSP cut at 9” x 1”
* DSP insert - 5 1/2” x 4 1/8” - One Horse Open Sleigh
* Dies - Stylish Shapes - circles - 3rd & 4th largest 
* Hole punch; cirber rounder punch (optional)
* Ribbon - Black & White Gingham - about 18” to go around pouch and tie in bow, plus 7-8” to create loop at top of pouch (optional)
* Adhesive - Stampin’ Seal + or Tear & Tape, dimensionals 


 CLOSED ENVELOPE TREAT HOLDER / GIFT CARD HOLDER


This gift card holder was created like the previous pouch. I stepped the DSP panel, widened the belly band to 1 1/2”,  folded the top down and tucked it behind the belly band.

SUPPLIES

* Real Red cardstock - same cutting dimensions and scoring as for project above
* DSP - Joy of Christmas for focal image (scrap) and for belly band 9” x 1 1/2”
* Other cardstock - Shaded Spruce and Gold Foil
* Dies - Stylish Shapes - circles, 2nd and 3rd largest; Joy of Noel Dies - greenery
* Corner rounder punch (optional)
* Ribbon - Real Red about 8”
* Stampin’ Seal + or Tear & Tape and dimensionals

LARGER ENVELOPE TREAT POUCH


SUPPLIES

* Cardstock - Boho Blue 8 1/2” square, cut in half diagonally and scored along the long side at 4” and 8”
* Other cardstock - scraps of Basic White and Boho Blue
* DSP - Beary Christmas - insert 6” x 3 7/8” Belly band - 9” x 1 1/2”
* Ink - Boho Blue
* Dies - Stylish Shapes - circles, 3rd and 4th largest
* Stampin’ Seal+ or Tear & Tape; dimensionals

CHRISTMAS TREAT POUCHES & GIFT CARD HOLDERS

There you go! Treat pouches and gift card holders that allow for flexibility and are easy to create! Well, this wraps up Stamp Happy Holidays for 2023. I wish everyone a very Merry Christmas and a very Happy and Healthy 2024. 

Until next time . . .
Stamp Happy!

Kim

All stamps and stamped images ©️1990-2023 Stampin’ Up!®️


Tuesday, October 31, 2023

STRATEGIES FOR CREATING HOLIDAY CARDS WHEN TIME IS RUNNING OUT - A STAMP HAPPY HOLIDAYS POST

Hi Stampers!

November is here, and if you have yet to begin your Christmas cards you might be feeling a bit stressed. Not to worry, there is still time to create festive Christmas cards. You just need a plan of attack or a strategy that keeps you focused, streamlines choices, yet allows for variation in card designs. Today I am sharing my strategy based on on the points I just mentioned. Before we get into the specifics of the strategy, let’s take a look at today’s sample cards:


For these cards I used items from the Joy of Christmas Suite. I used the JOY OF NOEL BUNDLE, the  CHRISTMAS CLASSICS STAMP SET, and the JOY OF CHRISTMAS 12” x 12” DSP.

JOY OF NOEL BUNDLE


CHRISTMAS CLASSICS BUNDLE


VIDEO
STRATEGIES FOR CREATING CHRISTMAS CARDS WHEN TIME IS RUNNING OUT!


STRATEGIES FOR CREATING CHRISTMAS CARDS WHEN TIME IS RUNNING OUT

1. Select 1 or 2 simple and versatile card layouts
    * Simple layouts include cards with limited layering.
    * Choose layouts that work well in both portrait and landscape orientation for variety.
    * This is not the time for complicated fun folds, but simple fun folds like Joy Fold cards or 
       Gate Fold cards go together quickly, and add a bit of a twist to the normal card fold.

2. Select stamp sets that have coordinating dies. This allows for more focal image options.

3. Select patterned paper (DSP) from a single collection. This allows you to mix and match patterns without worrying about whether or not the colors and patterns match. 

4. Choose card bases that are neutral (Basic White, Very Vanilla, CrumbCake, Night of Navy, etc.) or coordinate with colors in the DSP.
     * Stampin’ Up!®️ DSP packaging list the colors included in that collection. This
        information is also included in the product description found in the Stampin’ Up!
      online Store.

5. Select 2-3 ink colors that coordinate with the DSP or cardstock.

6. Add a bit of shimmer and shine, but keep embellishments simple.
    * Rhinestone Basic Jewels are versatile. Use them as is, or custom color them with 
       Stampin’ Blends Markers (alcohol markers).
    * You can never go wrong with silver or gold gems or pearls on Christmas cards.
    * Wink of Stella is an easy way to add shimmer without the bumps and bulk of gems.

7. Never underestimate the impact of dimensionals. They are an easy way to add a little some a little something extra to a card.

Now it is just a matter of preparing card bases, cardstock panels, and DSP. Next do your stamping and / or coloring, and die cutting. Then assemble your cards. Sign your cards, Place them in addressed envelopes, add a stamp, and mail. Now you can sit back, relax, and enjoy the season!!! Or at least have one item crossed off on your Holiday To Do List!!!

MY SAMPLE CARDS

* For all my sample cards I used the stamp sets, dies, and DSP mentioned earlier. 
* All card bases are A-2 size - 8 1/2” x 5 1/2” scored and folded at 4 1/4”.
* Most cards have an inside panel of Basic White or other neutral light colored cardstock cut at 5” x 3 3/4” or 5 1/4” x 4”.

BASIC ONE LAYER CARDS

These cards are quite basic, but still very festive. They consist of a card base, one layer of DSP,  plus a focal image and greeting. The greeting  can be the focal image. These cards can be made in portrait or landscape orientation.


ADDITIONAL SUPPLIES
* Cardstock - Garden Green and Basic White
* Inks - Garden Green, Cherry Cobbler
* Rhinestones - 3 colored with Cherry Cobbler (dark) Stampin’ Blend
* Stylish Shapes Dies - Circles, largest and next largest
* Dimensionals


ADDITIONAL SUPPLIES
* Cardstock - Crumb Cake for card base and to stamp focal image; Cherry Cobbler to die cut letters
* Inks - Pecan Pie; Water Color Pencils - Cherry Cobbler, Garden Green, Granny Apple Green; Blender Pen, Wink of Stella
* Dimensionals

DSP PANEL AND STRIP CARDS

Each of these cards require a panel of DSP that is 2” wide and a coordinating piece of DSP that is 3/4” wide. The length of these DSP pieces depends on whether you want the panel and strip to run from one end of the cardbase to the other, or if you wish to mount  the DSP pieces on a separate piece of Basic White or other neutral cardstock ( 5” x 3 3/4”) to create a framed look. Remember these cards can be oriented as landscape or portrait cards.


ADDITIONAL SUPPLIES
* Card base - Cherry Cobbler cardstock
* Focal panel / greeting - Basic White cardstock cut at 5” x 3 3/4”
* Ink - Shaded Spruce
* Embellishment - Festive Pearls, Gold, 5


ADDITIONAL SUPPLIES
* Card base - Crumb Cake
* Ink Crumb Cake

NOTES
* This card base is an example of using a neutral color of cardstock that is not included in the color scheme of the DSP, but still coordinates beautifully. 
* The portrait orientation of this card layout calls for a greeting that is tall and narrow. If you do not have a greeting like that in your stash, try the repeating greeting technique. For this card I simply stamped the “Peace on Earth greeting 3 times.

VIDEO CARDS


ADDITIONAL SUPPLIES
* Card base and greeting mat - Cherry Cobbler cardstock
* Inks - Cherry Cobbler and Shaded Spruce
* Embellishments - Rhinestones - 3 colored with Cherry Cobbler (dark) Stampin’ Blend
* Dies - Stylish Shapes - Circles, largest and second largest


ADDITIONAL SUPPLIES
* Cherry Cobbler card base

NOTE
* This card is identical to the NOEL card above, with the exception of the card base color and the direction of the focal image.


ADDITIONAL SUPPLIES
* Card base - Shaded Spruce
* Ink - Shaded Spruce
* Embellishments - Rhinestones - 3 colored with Cherry Cobbler (dark) Stampin’ Blend


If you are finished with your Christmas cards for this year, congratulations! I am so happy you met your goal. If you are closing in on finishing your cards, that is great! You are on course!!! If you have yet to start creating you card, that is okay. You still have time. If the strategy I suggested works for you, great! If you need to tweak it a bit and make it your own that is terrific. If you need a completely different strategy, that is fine too. The important thing is you can begin creating your cards knowing you will finish them in time to send Christmas greeting to all your friends and family. No need to panic! You’ve got this!!!

That is all for today. Thank you so much for stopping by! Until next time . . .
Stamp Happy!

Kim

All stamps and stamped images ©️1990 - 2023 Stampin’ Up!®️