Showing posts with label Halloween. Show all posts

Tuesday, October 18, 2022

SUPER EASY HALLOWEEN TREAT BOX - A STAMP HAPPY HOLIDAYS POST

 Hi Stampers!

Today I have an easy treat box to share. It is the perfect size to fill with a Halloween treat or two for all those ghosts, ghouls, and goblins who come calling. The treat box measures 2” x 2” x 1”. You can dress it up or simply add  some DSP and a sentiment. Let’s take a look!

FRONT OF BOXES


BACK OF BOXES


I used the SCARY CUTE BUNDLE (Scary Cute stamp set and the Scary Silhouettes dies). 

SCARY CUTE BUNDLE


FOR THE BOX:
* Cardstock cut at 4” x 5” - along the 4” side score at 1” and 3” then along the 5” side score at 2” and 3”
* Cut at the 2” and 3” score lines from the outside to the score line - on both sides; then miter each side of the tab - see diagram below.


TREAT BOX CUTTING AND SCORING DIAGRAM


CUT AND MITER MIDDLE TABS


Glue one of the mitered  1” x 1” tabs to one of the longer side tabs of the box.


Glue the other long side tab over the 1”x 1” tab/ longer tab.


Repeat process on other side of go 


Decorate as desired.

* I used the Bewitching Stamp Set and the Witch Hat Builder Punch to create the hat
* I used Memento Tuxedo Black ink to stamp the hat and the greeting on Basic White cardstock/ I used the following Stampin’ Blends - Daffodil Delight (dark), Highland Heather (dark), and Granny Apple Green (dark) Stamp the greeting with the black ink on Basic White cardstock. Die cut using the Beautiful Shapes Dies
* I adhered a Basic Black punched witch hat shape to the stamped and punched witch hat.
* I covered the die cut hat band with the Old Olive Glimmer Washi Tape and adhered it to the hat. I added a bow made from the 1/8” Metallic Woven Ribbon - Parakeet Party - about 6”
* I adhered one of the punched star images to the top of the hat, an placed another on on the opposite side
* The box is made of Mango Melody cardstock


SCAREDY-CAT TREAT BOX


SUPPLIES

* Scary Silhouettes Dies (cat)
* Box - 4” x 5”  Crushed Curry cardstock scored and folded as shown above
* Scrap of Basic Black cardstock to die cut two of the cat images
* Two pieces of DSP cut at 1 3/4” x 1 3/4” (Celebrate Everything)
* Black & White Gingham Ribbon - about 14”
* Basic White Baker’s Twine - about 10”
* Adhesive - I used liquid glue


HAUNTED HOUSE TREAT BOX


SUPPLIES

* Basic Black cardstock - 4” x 5”
* Smoky Slate cardstock - two cut at 1 3/4” x 1 3/4”
* Scraps of Basic Black to die cut 4 haunted houses
* Scraps of Mango Melody cardstock to place between two o& the haunted house die cuts and scrap to stamp & die cut greeting
* Two 2” pieces of Black & White Gingham Ribbon
* Memento Tuxedo Black ink
* Stylish Shapes Dies - smallest circle
* Adhesive and dimensionals

HALLOWEEN TREAT BOXES

I hope you give this super easy and cute treat box a try. Thank you so much for stopping by. Until next time…

Stamp Happy!

Kim

All stamps and stamped images ©️1990 -2023®️


COMING SOON!
FITTING FLORETS COLLECTION


* The FITTING FLORETS COLLECTION will be available for purchase 1 November 2022 - 4 January 2023.

* THE FITTING FLORETS COLLECTION includes the FRAMED FLORETS STAMP SET, FRAMED FLORET DIES, FRAMED & FESTIVE STAMP SET, the FITTING FLORETS 12” x 12” DSP, and the GOLD ADHESIVE-BACKED SWIRLS.

* The FRAMED FLORETS STAMP SET, FRAMED FLORETS DIES, &  FRAMED FLORETS BUNDLE will be available in the STAMPIN’ UP! JANUARY - JUNE 2023 MINI CATALOG.

* The FRAMED & FESTIVE STAMP SET, FITTING FLORETS 12” x 12” DSP, and the GOLD ADHESIVE BACKED SWIRLS are limited availability products. They will be available 1 November - 4 January, or while supplies last! 

FOR MORE INFORMATION AND TO VIEW ENTIRE COLLECTION CLICK HERE.

Tuesday, September 20, 2022

KEEPING IT SLIM FOR HALLOWEEN - A STAMP HAPPY HOLIDAY POST

 Hi Stampers!

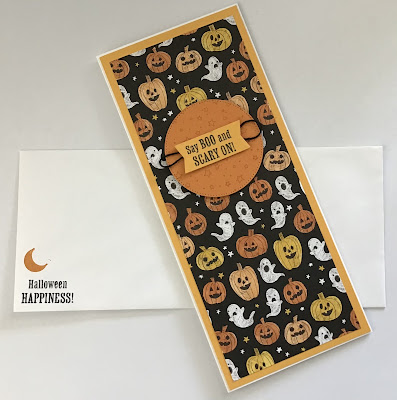
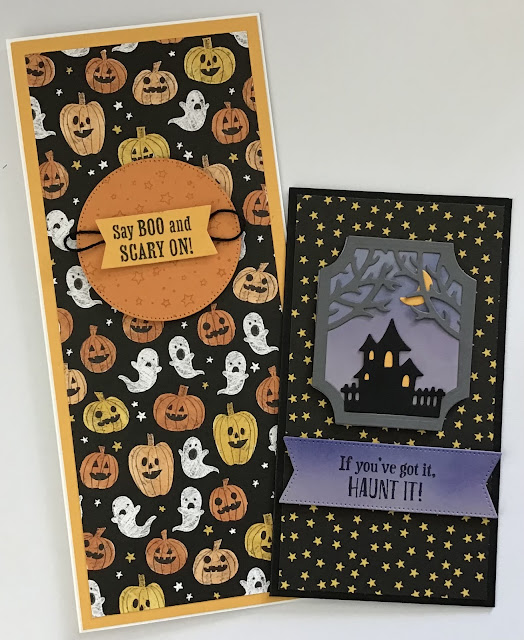
Welcome to week eight of my Stamp Happy Holidays series. Today I have two Halloween cards to share. The cards are slimline cards. The taller card fits in a business size envelope. My mini-slimline card fits in a letter size envelope. I use the envelopes that do not have the security lining. Let’s look at the cards:


I like making cards in different sizes; it is a strategy I use to get me out of creative ruts. Slimline cards are super easy to make, and help add a little variety to your card making. There are different measurements for slimline cards. I prefer cutting my cardstock at 9 1/4” x 8” and score along the 8” side at 4”. This creates a card that is 9 1/4” long x 4” wide, and it fits perfectly inside a business envelope (#10). For my mini slimline card the card base is cut at 7” x 6 3/8” and score along the 7” side at 3 1/2”. This card fits into a letter size envelope (#6 3/4).

SAY BOO! SLIMLINE CARD


SUPPLIES FOR THIS CARD
* Basic White card base 9 1/4” x 8” - along 8” side score and fold at 4”
* Mango Melody cardstock cut at 9 1/8” x 3 7/8”
* Celebrate Everything DSP - Jack-o-lantern & Ghost pattern, 8 3/4” x 3 1/2”
* Pumpkin Pie cardstock large enough to cut a 2 1/2” circle die cut
* Baker’s Twine, black - about 7”
* Inks - Memento Tuxedo Black, Pumpkin Pie -Stampin’ Blends - Pumpkin Pie (light & dark), Daffodil Delight (dark)
* Scary Silhouettes Dies, Stylish Shapes Dies
* Best Witches and Scary Cute stamp sets
* Adhesive, dimensionals 

ASSEMBLY
* Die cut the circle from the Pumpkin Pie cardstock using the Sylish Shapes Dies (circle), and die cut the banner from the Mango Melody mat using the Scary Silhouette dies
* Use the Stampin’ Blends to color the pumpkins on the DSP
* Use the Pumpkin Pie ink and the stars stamp from the Best Wishes stamp set and stamp stars on the circle die cut
* Stamp the greeting on the banner with Memento Tuxedo Black ink
* Place some adhesive on the back side of the banner and adhere the baker’s twine create a loop on each end
* Place dimensionals on the back side of the greeting and adhere it to the circle die cut
* Place dimensionals on the back side of the greeting piece
* Adhere the DSP to the Mango Melody card base and adhere this to the card base
* Place the greeting on the card
* Stamp a sentiment inside the card using Memento Tuxedo Black ink

+ If desired use Memento Tuxedo Black ink to stamp a greeting in the lowers left corner of the envelope.
+ Use Pumpkin Pie ink to stamp the crescent moon image above the greeting

SAY BOO CARD AND ENVELOPE


HAUNT IT MINI SLIMLINE CARD


SUPPLIES FOR THIS CARD
* Card base - Basic Black cut at 7” x 6 3/8” along the 7” side score and fold at 3 1/2”
* Celebrate Everything DSP - black with star pattern - cut at 6 1/8” x 3 1/4”
* Basic White cardstock cut at 6 1/8” x 3 1/4” for inside panel
* Scraps of Smoky Slate, Basic Gray, Basic Black, and Mango Melody
* Inks - Memento Tuxedo Black, Gorgeous Grape, Starry Sky
* Blending Brushes
* Best Witches and Scary Cute stamp sets
* Scary Silhouettes Dies & Stylish Shapes Dies - largest banner
* Adhesive, dimensionals, cellophane tape

+ TIP - The 6 3/8” mark is a bit difficult to find on the Paper Trimmer. One way to overcome this is to score the cardstock on the Simply Scored Scoring Tool at 6 3/8”, then on the Paper Trimmer line up the scored line right at 0 - where the blade cuts.

ASSEMBLY
* Die cut the pieces for the focal image using the Scary Silhouettes Dies - haunted house (Basic Black), moon (Mango Melody), tree frame (Basic Gray) label (Smoky Slate), and die cut the banner using the Stylish Shapes Dies (Smoky Slate)
* Use the blending brushes, Gorgeous Grape and Starry Sky inks and create a night sky look on the label die cut and the banner die cut. I started at the bottom of the pieces and added Gorgeous Grape ink. Next I added Starry Sky, then I went back over the pieces adding a bit more of each color of ink until I reached a saturation I liked.
* Put the focal image together - adhere the moon to the label die cut. Adhere the tree frame (I used liquid glue and only put it on the outside part of the frame, but not on the trees. Use small pieces of Mango Melody and tape them behind the windows of the haunted house. Adhere the house to the focal piece.
* Stamp the greeting on the banner using Memento Tuxedo Black ink.
* Stamp a greeting from the Scary Cute stamp set on the Basic White panel for inside the card using the Memento Tuxedo Black ink. 
* Adhere the DSP to the front of the card and adhere the inside panel inside the card.
* Use dimensionals to attach the focal piece and greeting banner to the front of the card.

+ If desired use the Memento Tuxedo Black ink and stamp a greeting in the lower left corner of the envelope and stamp the star images from the Best Witches stamp set in Mango Melody above the greeting.

HAUNT IT CARD AND ENVELOPE


HALLOWEEN SLIMLINE CARDS


That is all for today. Until next time…
Stamp Happy!

Kim

All stamps and stamped images ©️1990 - 2022 Stampin’ Up,©️


Tuesday, September 22, 2020

ANOTHER BANNER YEAR!

 BANNER YEAR BACKGROUNDS

Cards using Banner Year images for great backgrounds!

Yes, one more post featuring the stamp set, Banner Year! I promise this will be the last post featuring this stamp set (this year 😁).  Banner Year is not the style stamp set I am usually drawn to, but I bought it and I have enjoyed using it. I believe it is a great stamp set for beginning stampers (as well as all other stampers) as it is relatively inexpensive at $17 (US), and it contains 13 sentiments and 16 images that cover autumn / fall, Halloween, Thanksgiving, Christmas, and Valentine’s Day!That is a lot of bang for your paper crafting buck! 

If you would like to view previous projects I made using this stamp set search my blog by typing Banner Year In the search window on the right column of this page.

Just to remind you what the stamp set looks like:

This stamp set is featured in the Stampin’ Up! ®️ August- December Mini Catalog on page 65. It can be purchased alone or bundles with the the Banners Pick a Punch for a 10% savings on each.

Now let’s look at today’s cards:


A Cajun Craze, Bumble Bee, and Crumb Cake color combo add a lot of fall color to this card, but the stars of the show are the squirrel, acorn, and leaf images! The “Happy Fall Y’all” sentiment adds a bit of charm, and the little linen thread bow finishes off the autumn greeting card!


A spooky Halloween greeting using Whisper White, Basic Gray, and Granny Apple Green cardstock, and Basic Gray and Memento Tuxedo Black ink. The ribbon is the Whisper White Crinkle Seam Binding Ribbon colored with thr Basic Black - light Stampin’ Blend.


How about a cute pumpkin patch for Thankgiving?For this card I used Pumpkin Pie, Whisper White, and Crumb Cake cardstock. The pumpkins and the greeting are stamped with Pumpkin Pie. The Pumpkin stems are stamped using Old Olive, and the leaves are stamped with Crumb Cake. Again, I used a linen thread bow to finish the card.


This Christmas card is bright and cheery and very traditional with the Real Red and Garden Green color scheme. I tied some of the Braided Red Linen Trim (see page 9 in the mini catalog) around the sentiment panel for another pop of color.


Here is another Christmas card in Balmy Blue and Granny Apple Green, and Whisper White. The bow is made from the Whisper White Crinkle Seam Binding Ribbon (Annual Catalog page 161).
* The sentiment I used on this card is from a retired set, Four the Holiday. It debuted in 2009. A current stamp set featuring the “Peace on Earth” sentiment is Dove of Hope (Mimi catalog page 13). The Yuletide Pasture set contains “Wishing You Peace Now and Always” which would work well too. (Page 28 Mini Catalog)

Finally, a card for Valentine’s Day or an any day card to give your child, grandchild, or other lived one:


Real Red, Magenta Madness, and Whisper White along with the Heartfelt Punch Pack help make this a card filled with love.

I hope these cards provide you with greatinkspirations, and help you recognize the varied uses for this terrific stamp set! 


Remember tomorrow, Wednesday 23 September 2020 is the Stampin’ Up! 24 Hour Stamp Sale! Selected stamp sets from the annual catalog will be on sale for 15% off!!!  The sale is tomorrow (9/23/20) only  from 12 AM (Midnight) - 11:59 PM Mountain Time, or 2 AM Wednesday - 1:59 AM Thursday in the Eastern Time Zone (USA).

To view the list of stamp sets included click

HERE

or tomorrow visit my online store (click on one of the catalogs on the right hand side of this blog) and click on Shop Now. Look for the Stamp Sale catagory.

Until Next Time...

Stamp Happy!

Kim

greatinkspirations.stampinup.net                                                                                                                        greatinkspirations@gmail.com.                                                                                                                          On You Tube - Kimberly Tolbert / Greatinkspirations

All stamps and stamped images ©️1990 - 2020 Stampin’ Up!

Monday, September 7, 2020

I FOUND MY MARBLES!

 I FOUND MY MARBLES

SO I MADE A CARD!

The other day I  decided it was time to go through some of the drawers and shelves in my craft room, and see if there were items that could be tossed, given away, repurposed, or perhaps used as opposed to collecting dust!  I ran across a small container of marbles. They reminded me of a background technique I haven’t used in some time. It is called the Rolling Marble Technique. Once upon another lifetime ago I taught preschoolers this very same technique! When I took up card making I was so excited to see a tutorial using the technique for card backgrounds! (The link to this tutorial will be toward the end of this post.) I thought I would share this fun and easy technique with you. 

Here is the card I made:


This is what you will need to make this card:


The Banner Year stamp set, found in the Stampin’ Up!®️ August- December 2020 Mini Catalog; and the A Wish for Everything stamp set found in the Stampin’ Up! 2020-2021 Annual Catalog. 


A card base of Pumpkin Pie cardstock cut at 4 1/4” x 11”, scored at 5 1/2”.                                                   2 pieces of Whisper White cardstock cut at 5 1/4” x 4”                                                                                   Basic Black  cardstock cut at 3 7/8” x 5 1/8”, and another piece that is cut at 3 3/4” x 1”.                             Scraps of Pumpkin Pie, Basic Black, and Whisper White .


Pumpkin Pie ink, Memento Tuxedo Black ink, Basic Gray ink refill.


Dimensionals, Stampin’ Seal, Stitched Shapes Dies - the three largest circles.


4-6 marbles, and a box to contain the marbles. One of Stampin’ Up!’s Full Wide Stamp Cases is a great option (annual catalog page163), but a plastic container With a lid will work. If neither is available a shoe box will work! Line the bottom of the shoe box with wax paper or foil to prevent the cardboard from absorbing the ink. I find when using the shoebox there is no need for the lid. Just keep tilting the box one way, then another to get a design you are happy with.

To make the card begin with creating the background, and stamping images and sentiments.


Put a few drops of the ink refill on the bottom of the box. Drop the marbles inside the box and roll them around, making certain they pass through the ink numerous times.


Place a piece of 5 1/4” x 4” Whisper White cardstock in the bottom of the box. Close the lid and roll the marbles around on the cardstock until you are satisfied with the design. Use tweezers to remove your background piece from the box to help avoid inky fingers.


On the remaining piece of 5 1/4” x 4” Whisper White stamp the sentiment for the inside (Wishing You A Trick-Or- Treating....). On the scrap piece of Whisper White stamp the bat from Banner Year stamp set in Memento Tuxedo Black. Then stamp the happy and the Halloween from Wishes for everything in Pumpkin Pie, and the bat image from Banner Year in the Tuxedo Black.


Use the three largest circle dies from Stitched Shapes Dies to die cut the circles from the Whisper White, Basic Black, and Pumpkin Pie cardstock scraps.


To assemble the card use the Stampin’ Seal to adhere the whisper White panel with the stamped sentiment to the inside of the card base. Adhere the Rolling Marble panel to the Basic Black cardstock. Place the Basic Black strip of cardstock about 1 1/2” from the top of the panel. Adhere this piece to the card front. Now adhere the Whisper White circle with the stamped image to the Basic Black circle, and the adhere those to the Pumpkin Pie circle. Put 4-5 dimensionals  on the back side of this piece, and position the focal piece over the Basic Black strip. There you have it! A cute Halloween card using a fun background technique.

In the opening paragraph of this post I promised to share the link to a tutorial for this technique. The tutorial is located on the Splitcoast Stampers web site (splitcoaststampers.com). Click on tutorials, then go to page 68, or type in Rolling Marble Background in the search box. I tried to provide a direct link to the page, but the link took me to another tutorial. I apologize for not being able to directly link you to the tutorial. 

Here is my video for this card.


Until next time...
Stamp Happy!

Kim
greatinkspirations.stampinup.net
greatinkspirations@gmail.com
On You Tube - Kimberly Tolbert / Greatinkspirations

All stamps and stamped images ©️1990-2020 Stampin’ Up!®️


Thursday, July 30, 2020

A BANNER YEAR FOR CASING!

A BANNER YEAR
CASING THE CATALOG

Have you ever ordered a stamp set you absolutely love, finally get it in your hands, and.... you find you have no idea what to do with it! I am fairly certain this happens to all card makers every now and again. When it happens to me I grab the catalog, look for card samples featuring the stamp set, and CASE one or more of the cards. It is a great way to get those creative juices flowing. CASE, yes, - Copy And Share Everything! 

You can copy the the card exactly (please, remember to give credit where credit is due when posting your cards on social media.). You can copy the layout. You can copy the color scheme. You can change an element of the layout. There are so many ways to CASE! 

Today I have two cards to share. I cased them from the upcoming Stampin’ Up!®️August- December 2020 Mini Catalog (formerly the Holiday Catalog). I used this cute set - Banner Year. It can be purchased separately, or bundled with the Banners Pick a Punch for a 10% savings.


Isn’t it cute? Cute images, fun fonts, and great greetings! I was so excited to get it! Then it sat on my desk, then on top of my paper cabinet, then on the shelf, and finally it was back on my desk. Today I decided the time had come. I was going to ink up these stamps!

Here is the first card I made.


This card is a CASE of a gift tag found on page 65 of the catalog. I simply turned the tag into a card. 
The Basic Black card base is 4 1/4” x 11” scored at 5 1/2”. I cut 5 Whisper White strips 3/4” x 5 7/8”, and punched each end with the Banners Pick a Punch. I used Gorgeous Grape ink, and randomly stamped the spiderweb image on each strip. On a scrap piece of Whisper White cardstock I stamped 3 of the bats with Memento Tuxedo Black ink. Then I fussy cut them. I used the Stitched Nested Labels and die cut two shapes from Smoky Slate cardstock for the sentiment. I used the Memento Tuxedo Black ink to stamp the “Happy Haunting” sentiment. The strips were adhered to the card base with Stamp & Seal, as was the bottom layer of the sentiment panel. The bats and the top sentiment layer were adhered with dimensionals. 

Here is the second card I made.


This card is almost identical to the sample in the catalog. It is a 4 1/4” square. The Whisper White card base is 4 1/4”x 8 1/2”, scored at 4 1/4”. The Just Jade banner is 3 3/8”x 1”, punched with the flag end of the Banner Pick a Punch. The Whisper White strip is 3 5/8” x 3/4”. The greeting is stamped using Real
Red. The card is stamped repeatedly with the holly leaf  (Just Jade) and holly berries (Real Red) images from the stamp set. The Whisper White banner is adhered to the Just Jade banner using Stamp & Seal. The banner is popped up on dimensionals. The ribbon I used for the bow is different than the sample card in the catalog. I chose the Real Red Double Stitched Ribbon found in the annual catalog.  

Now I have numerous ideas for other projects using the Banner Year stamp set! When you are in a creative slump, CASE a card, and get ready to bid that slump good-bye! Stampin’ Up! catalogs are great sources of inspiration. I hope my CASEd cards provide you with greatinkspirations!

Until next time...
Stamp Happy,

Kim
greatinkspirations.blogspot.com
greatinkspirations.stampinup.net
greatinkspiations@gmail.com
On You Tube - Kimberly Tolbert / Greatinkspirations

All stamps and stamped images ©️1990-2020 Stampin’ Up!®️