Showing posts with label Masking. Show all posts

Wednesday, May 28, 2025

ADDING INTEREST TO NO LAYER CARDS

Hi Stampers!

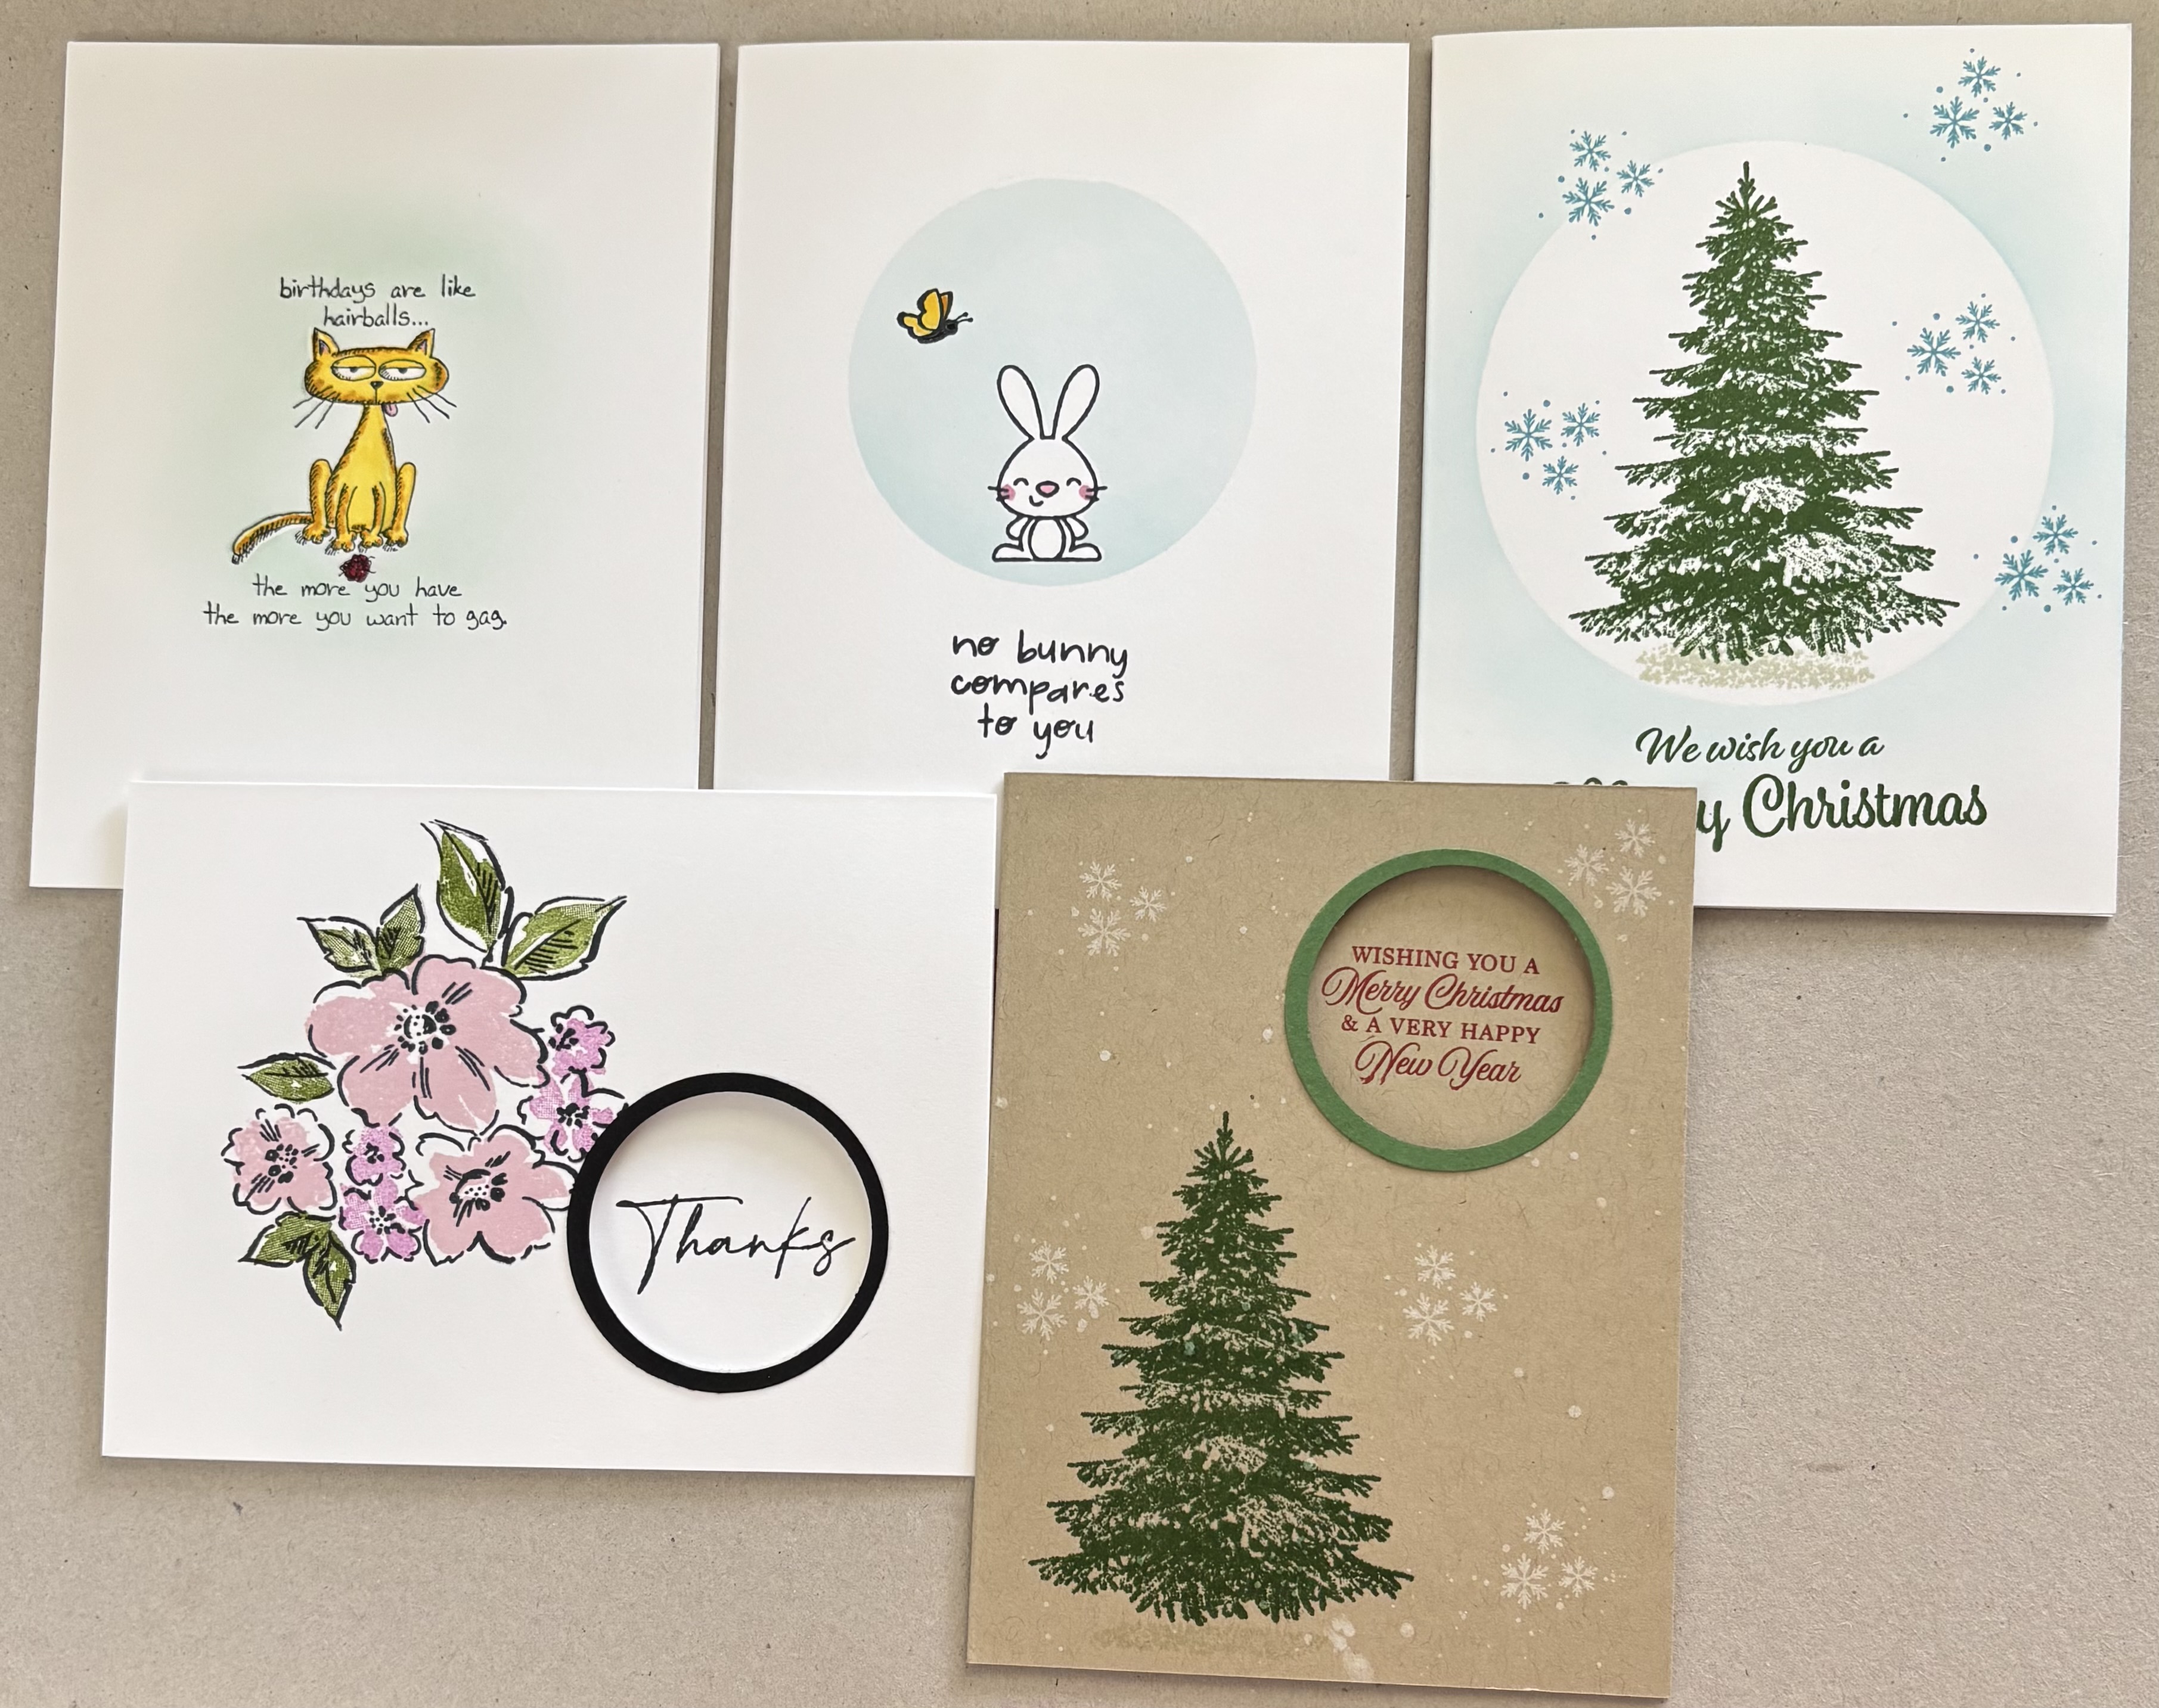
I have a lifetime supply of  - well, everything for card making! I enjoy using all the supplies and tools I have, but sometimes I like to go back basics, and see what I can come up with using stamps, inks, and paper - for the most part - and just a card base. No, patterned paper, no die cuts, no embellishments, nothing like that. I allow myself to use a punch to create widows, and I use dies to create some masks. As someone who has made cards for more years than I care to admit, this exercise is a great opportunity to see just how much I can do with minimal supplies. It also gets me out of my routine. For example, a no layer card means my focal image will be stamped directly onto the front of the card, so no alcohol markers as they tend to bleed through white cardstock.  This provides an opportunity to use my often ignored dye based markers, two-step stamps, or images that require no extra coloring! This exercise also is a great opportunity for me to come up with other ways to add color and depth to my cards. 

What if you are a beginner? How does this post help you? Well, the techniques and tips can help you expand your skills and get the most out of the supplies you have. Beginner or seasoned stamper, we all want to get the most from our supplies! So, let’s get started. Here is a look at the sample cards:


VIDEO
ADDING INTEREST TO NO LAYER CARDS


MASK IMAGE AND ADD A BACKGROUND


The stamp I used for this card includes the image and text. I stamped it using black ink, then colored the cat with my dye ink markers. Next I stamped the image on a piece of masking paper (you can use a post it not, or printer paper). I fussy cut the image right along the line (I left no white border), then I placed it over the image. I took a blending brush inked it, and added a bit of ink over the sentiment and around the image in a freeform shape that turned out to be rectangular. I remove the mask, and my card front was finished.

SUPPLIES I USED
* Card Base - Basic White (thick) cardstock
* Stamps - Giggle Greetings (retired)
* Inks -Tuxedo Black (Memento), Pool Party; Stampin’ Write Markers - Lemon Lolly, Daffodil Delight, Crushed Curry, Real Red, BubbleBath
* Masking Paper or other paper to use as a mask
* Blending brush or sponge

MASK WITH WINDOW


For this card I cut a mask at 5 1/2” x 4 1/4”. I used a circle die to cut a hole about 1” down from the top, centered from left to right. I placed the mask over the front of the card and secured it. I stamped the bunny,] and added a bit of color to it with a marker. I created a mask of the bunny, placed it over the image, then added color to the circle with ink and a blending brush. I removed the masks, then stamped and colored the butterfly, then stamped the greeting.

SUPPLIES I USED
* Card Base -Basic White (thick) cardstock
* Stamps - Forest Friends (Doodlebug Designs Inc.) Kangaroo & Company (retired)
* Inks - Tuxedo Black (Memento), Balmy Blue; Stampin’ Write Markers - Bubble Bath, DaffodilDelight, Crushed Curry
* Masking Paper or other paper - create a mask that is 5 1/2” x 4 14” and cut a 2 1/2” circle out of it about 1/2 in from top and centered from right to left.
* Blending Brush

MASK THE CENTER


For this card I did the opposite of what I did for the previous card. I cut out a circle to use as a mask and placed it on the card. I used a blending brush to add color around the mask. I removed the masked, stamped the images and the greeting. The great thing about the tree stamp I used is that I did not have to color it in. I just used the color ink I wanted the tree to be. Even better, the image is self shading and even creates the illusion of snow on the branches! How great is that. I stamped a greeting, and called it good!

SUPPLIES I USED
* Card Base - Basic White (thick) cardstock
* Stamp - Winter Woods
* Inks - Garden Green, Basic Beige, Balmy Blue
* BlendingBrush
* Masking Paper or substitute - create a circle from it that is about 3 1/2” in diameter

PEEK-A-BOO GREETING
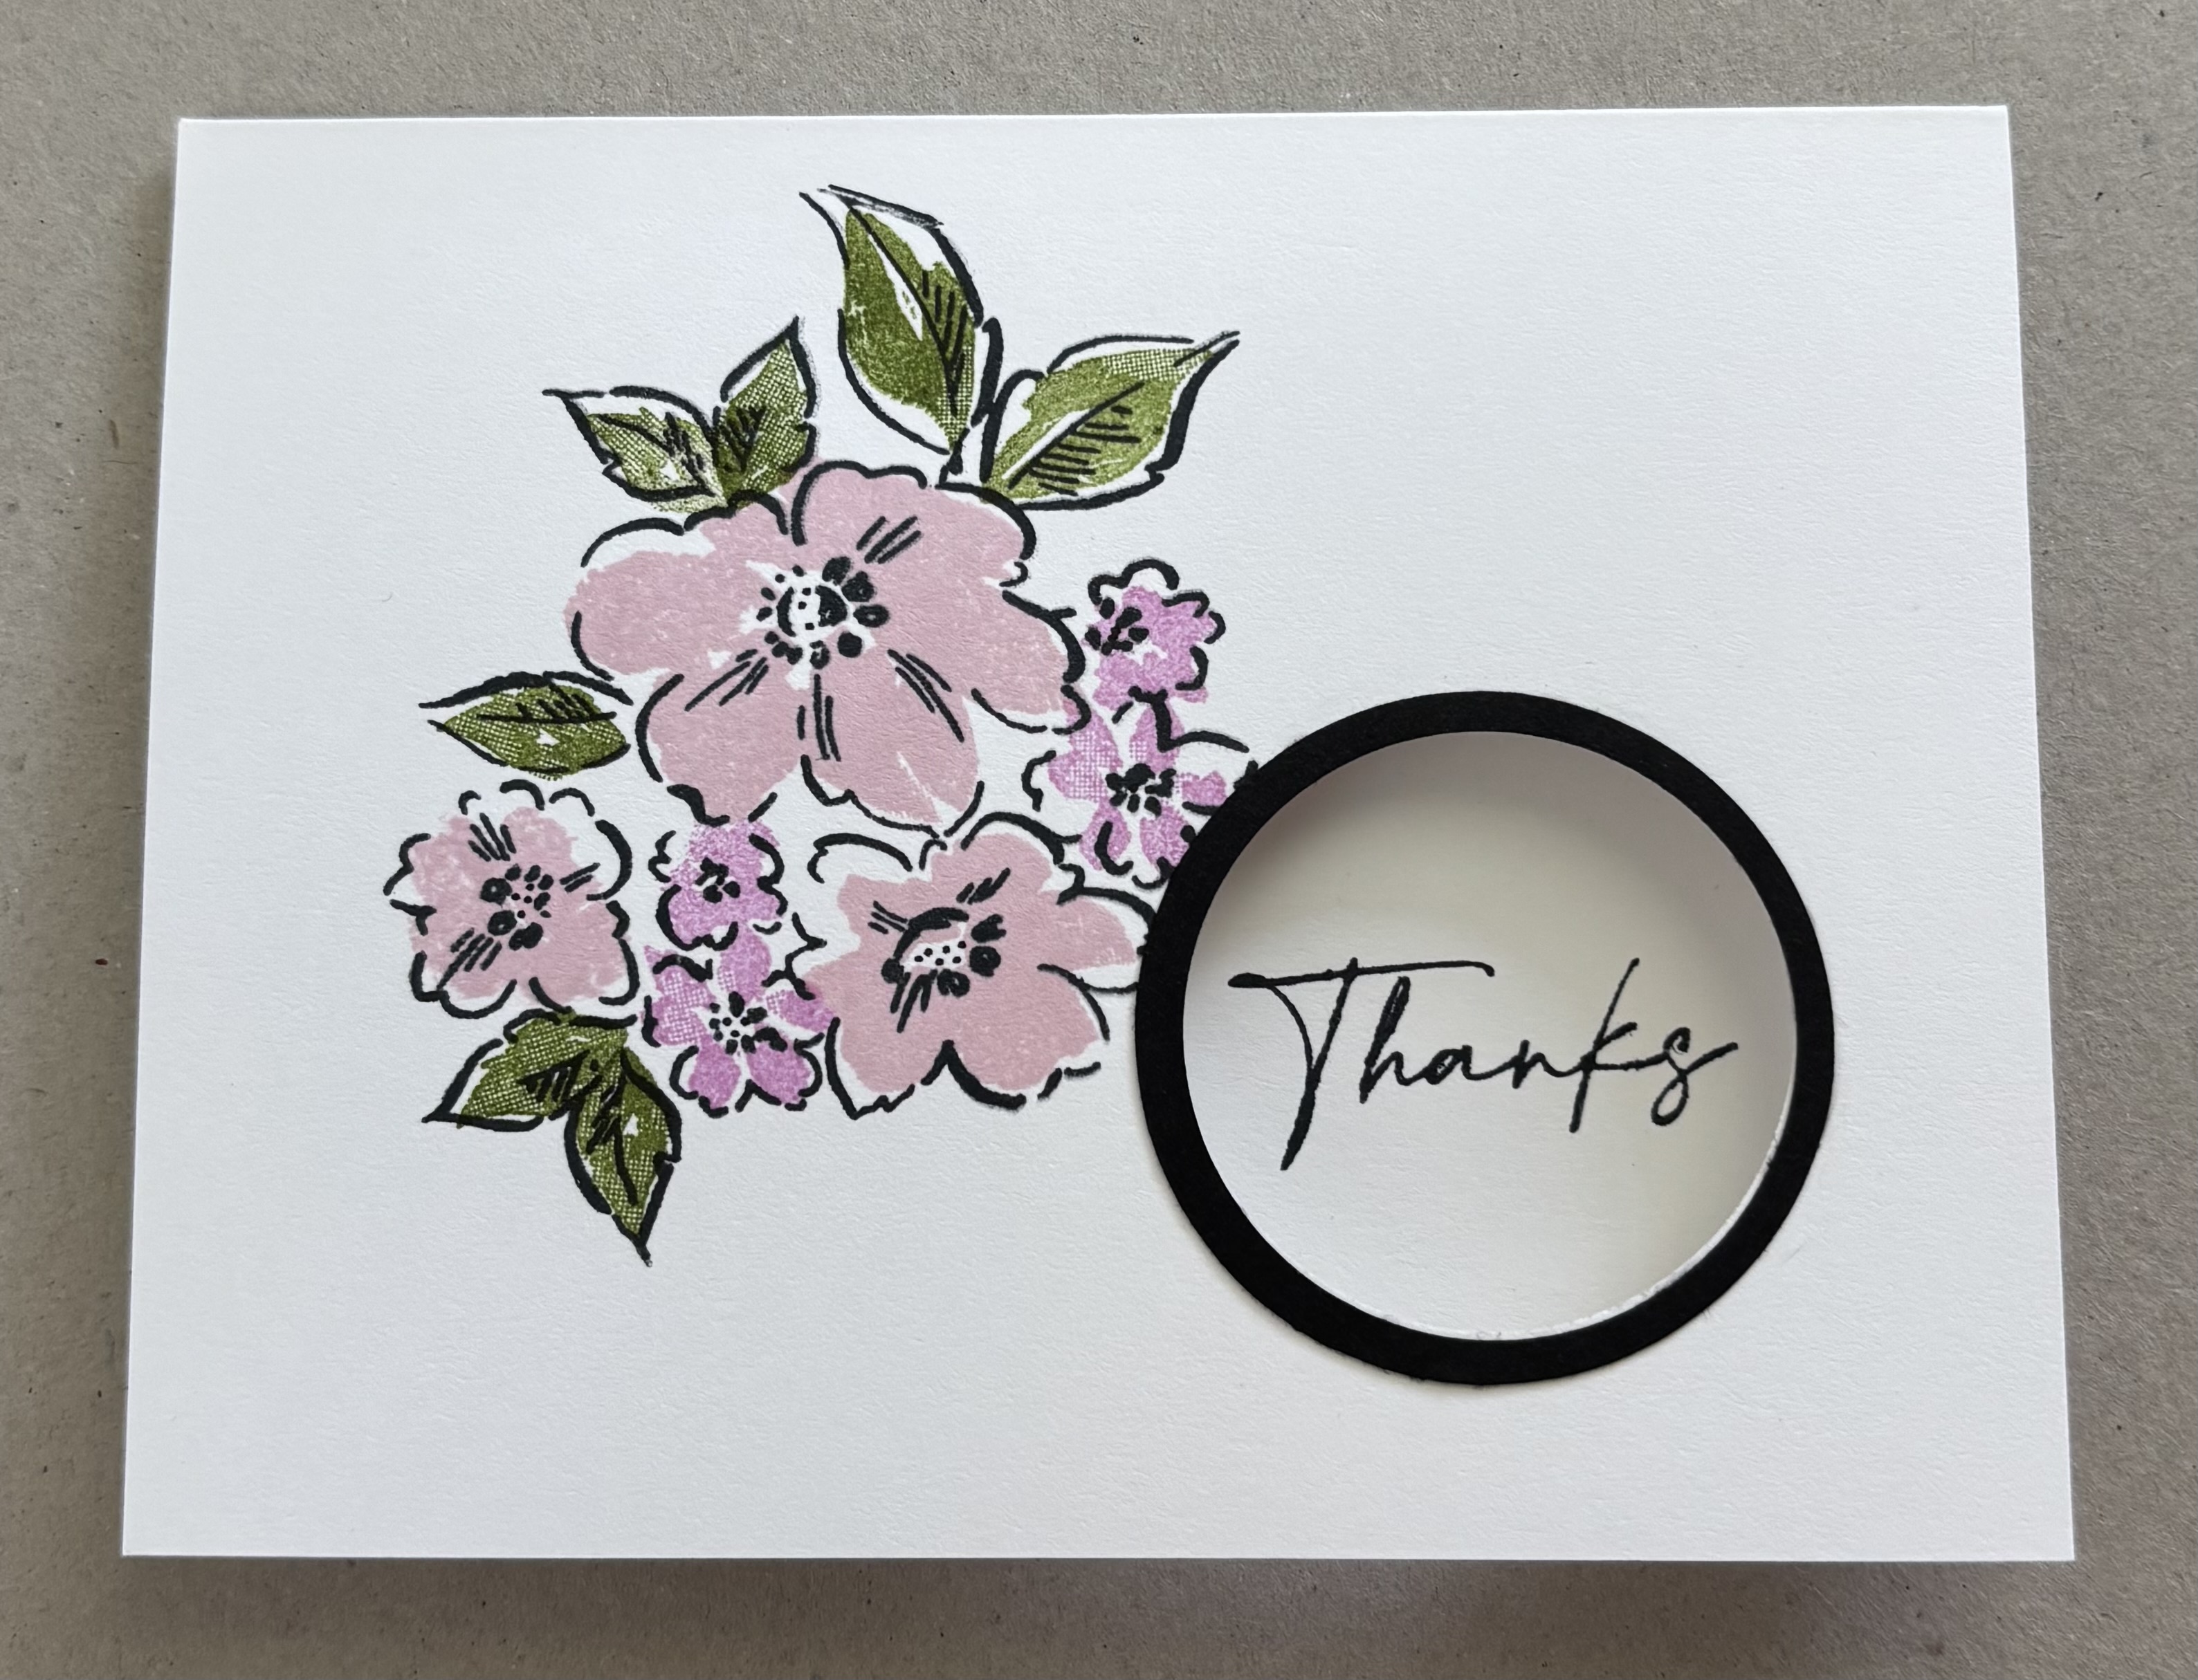

A nice feature to add to a no layer card is a peek-a-boo window. I used two circle punches to create a frame for the window. Once upon a time I used my punches almost every time I made a card! Then dies came along! I still love my punches, but I admit they do get overlooked a bit these days. I show how I created the frame down below the next card. The first thing I did was punch out the circle. I stamped my image. This is a two-step image, meaning there is a stamp for the outline of the image, and a stamp or stamps to fill in the image with color. With the card closed I stamped the greeting. I added the frame (optional), and the card was complete.

SUPPLIES I USED
* Card Base - Basic White (thick) cardstock
* Stamps - Hand Penned (retired)
* Inks - Tuxedo Black (Memento), BubbleBath,Old Olive
* Scrap of black cardstock 
* Circle punches -1 3/4” and 2”

PEEK-A-BOO GREETING II
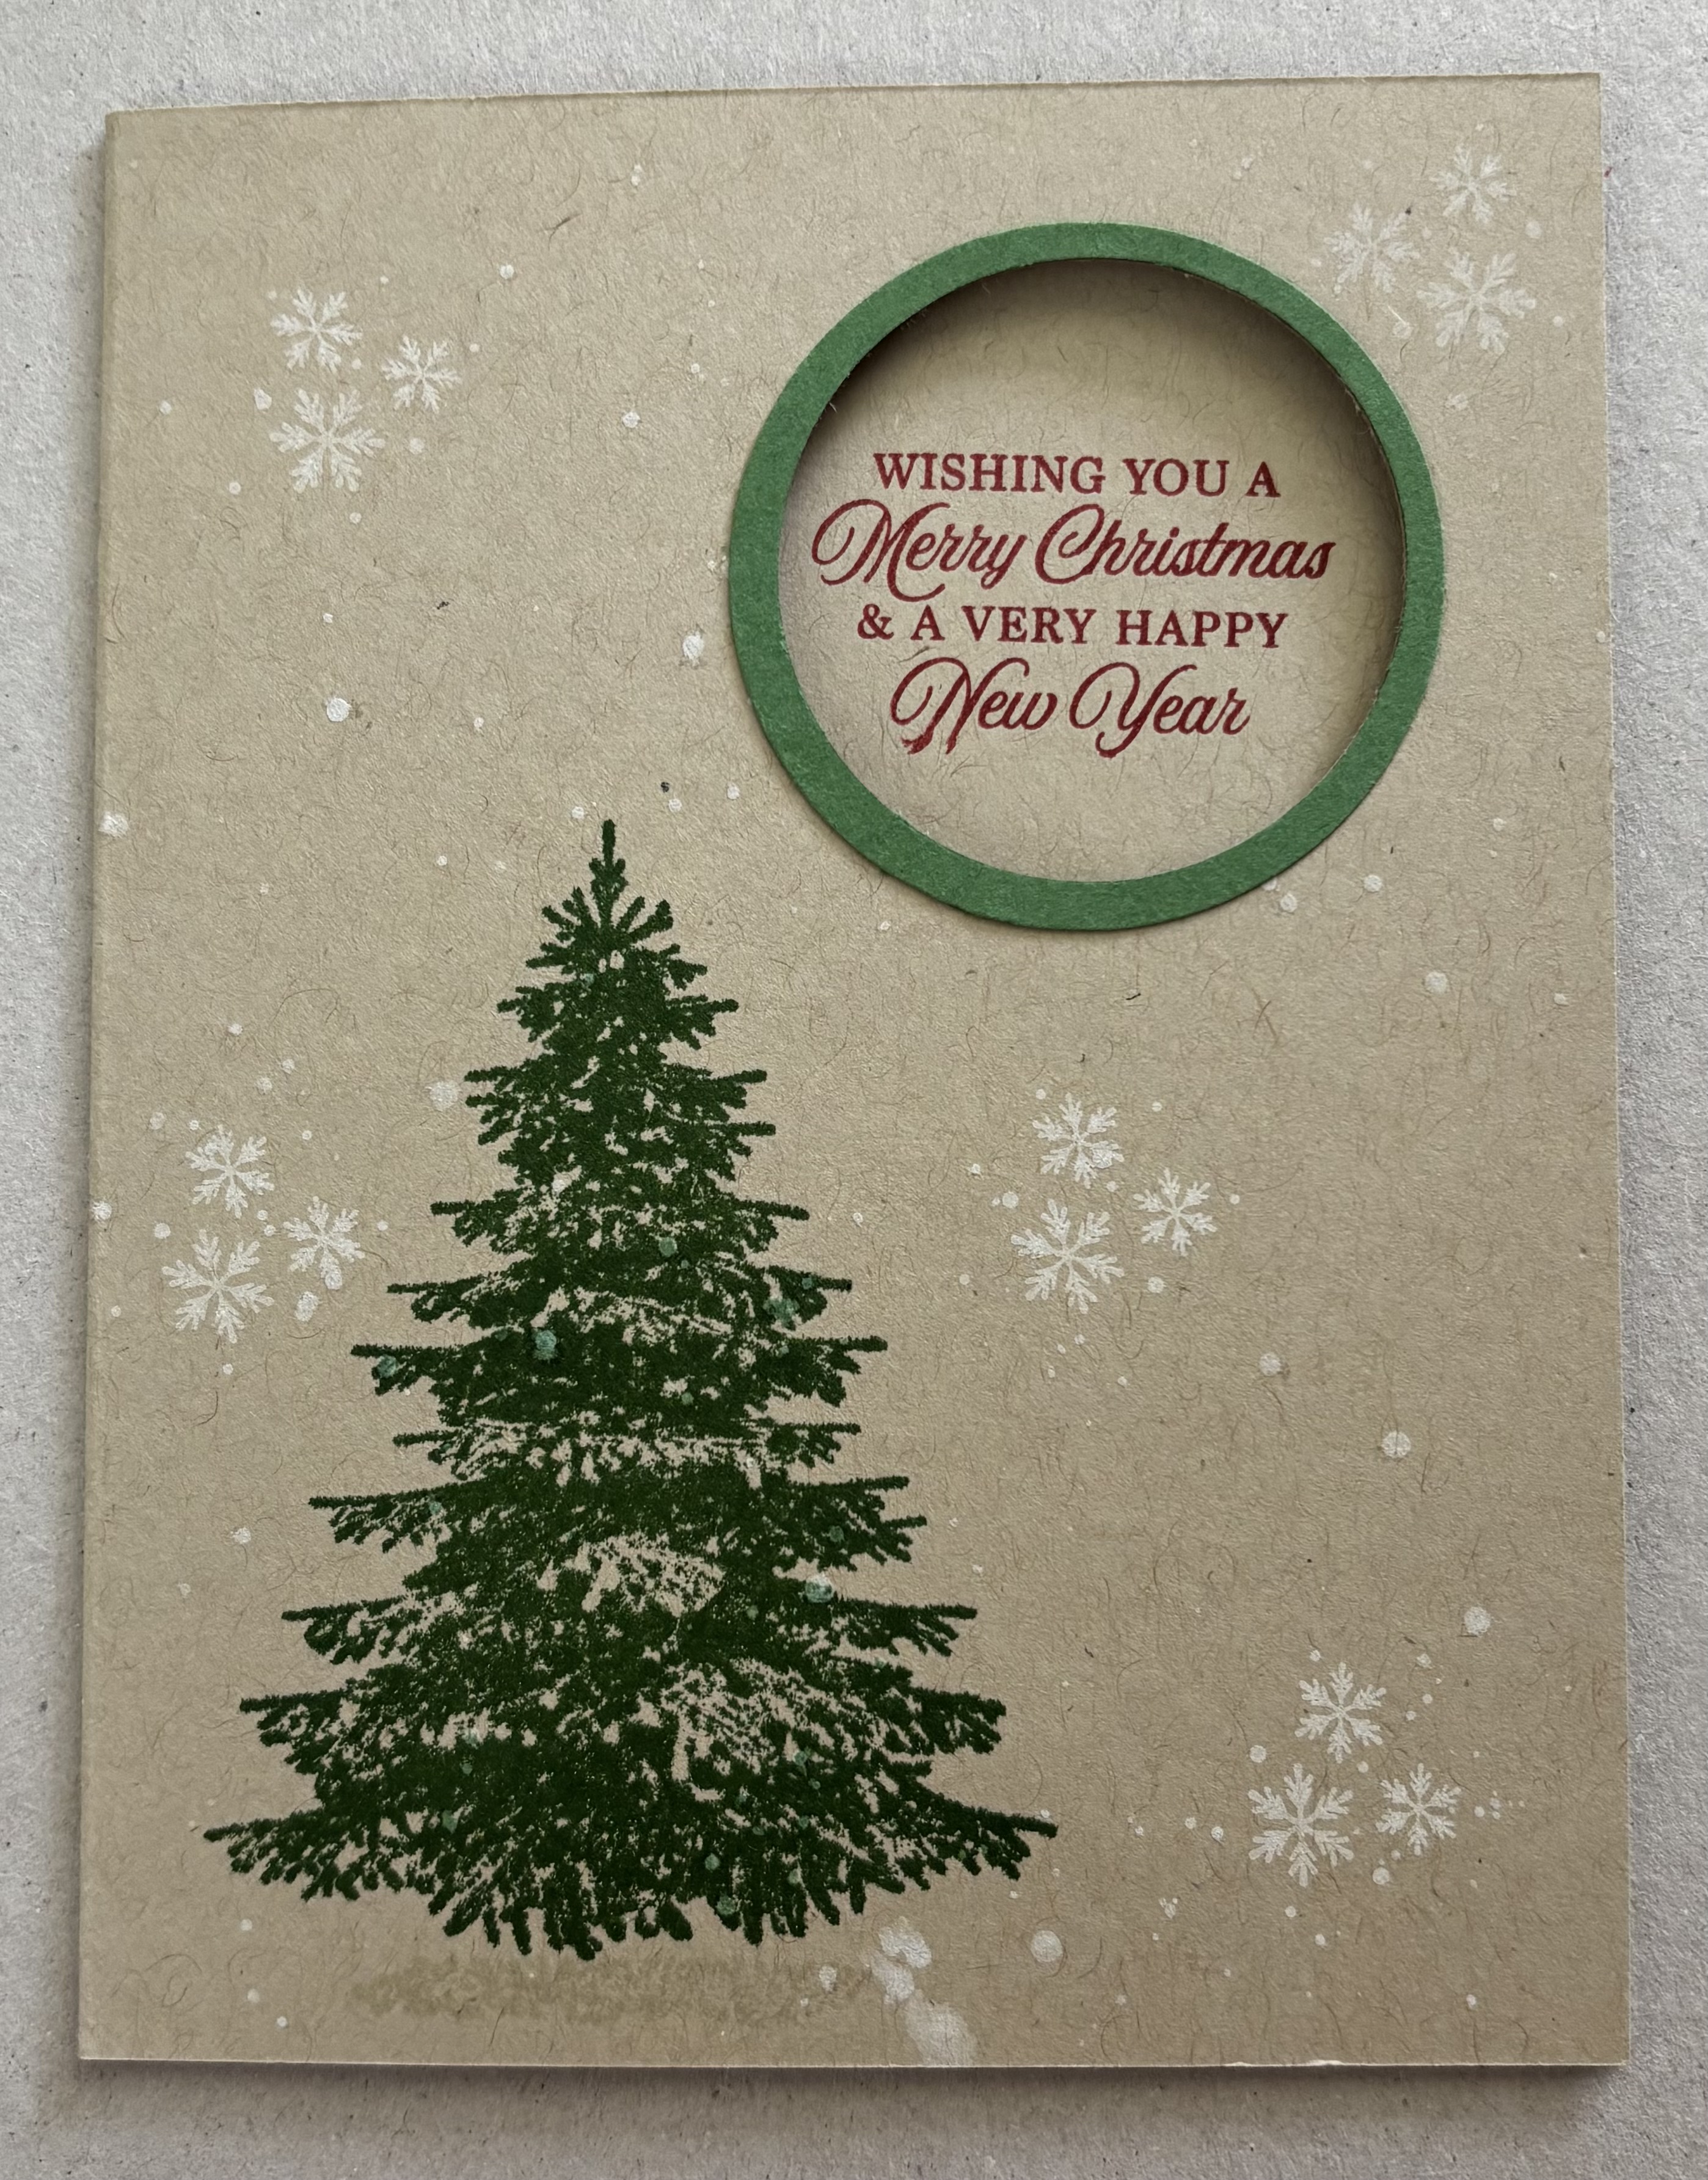

I switched out the white card base for this kraft colored (Crumb Cake) card base. I spattered white craft ink on the front and let it dry. I punched out the window. I stamped the greeting. Next I stamped the tree.This particular tree to create color variation and texture. This makes it a great image for a no layer card! I added some snowflakes stamped with white ink, and a green frame around the peek-a-bow window.

SUPPLIES I USED
* Card Base - Crumb Cake cardstock
* Stamps - Winter Woods (retired)
* Inks - Garden Green, Real Red, White Craft Ink (pigment ink)
* Small scrap of Garden Green cardstock
* Circle Punches - 1 3/4” & 2”

MAKING A FRAME WITH CIRCLE PUNCHES

STEP 1

Gather supplies -
* Two circle punches 1/4” difference in diameter. I used a 1 3/4” & 2” punches
* Cardstock large enough to accommodate the largest punch and allow you to hold the paper to position it.


STEP 2

* Use the smallest punch and punch in the center of the cardstock.


STEP 3

* Slide the cardstock into the larger punch. Center the punch on the hole previously punched. When you are satisfied with the placement, punch. You now have a frame.


NO LAYER CARDS


I find creating no layer cards to be challenging and relaxing! Challenging as it breaks up my cardmaking routine. I have to switch up my supplies (like switching out alcohol markers for dye based markers), and come up with different ways to add dimension and interest without using dimensionals or gems! It is relaxing, because I can just sit and stamp. Creating no layer cards reminds me why I began stamping it the first place! Of course if you want to add ribbon, gems, die cuts, etc to you no layer card, you can, because that is the other reason I began stamping, there really are no rules! So give no layer cards a try and do them your way!

Thank you for stopping by today. Until next time . . .
Stamp Happy!

Kim


NOTES

*All of today’s card bases are A-2 size cut at 8 1/2” x 5 1/2” scored and folded at 4 1/4”. Card bases cut at 11” x 4 1/4” scored at 5 1/2” will work just fine too.

*I use mostly Stampin’ Up! products, because I have them. I use a mix of current and retired items. Retired items are listed as such. Products from other companies are listed as such. I list sources of my supplies as a resource only. I am not associated with. Nor do I receive compensation from any company or manufacturer.


Tuesday, August 29, 2023

EEK!!! THE TRICKS & TREATS BUNDLE - AN IN DETAIL POST


Hi Stampers!

Today we’ll take an “In Detail” look at the TRICKS & TREATS BUNDLE featured in the STAMPIN’ UP! SEPTEMBER - DECEMBER 2023 MINI CATALOG. This bundle will be available for order next Wednesday, 6 September 2023.

The bundle includes the stamp set and coordinating dies. The stamp set contains 12 photopolymer stamps, and 15 dies make up the die set. Some of the dies are “stand alone” meaning they do not coordinate with any of the stamps, but are images that coordinate with the theme of the stamp set. 

Let’s take a look at the projects I created using the TRICKS & TREATS BUNDLE:

TRICKS & TREATS CARDS


TRICKS & TREATS TREAT BAGS


TRICKS & TREATS STAMP SET


TRICKS & TREATS DIES


NOTE - There are a total of 15 dies, not 12.

Watch the video below to see how to tips  for stamping and die cutting, as well as tips for assembling the treat bags. You will also see what not to do when it comes to assembling the treat bags!😁

VIDEO
EEK! TRICKS & TREATS BUNDLE - IN DETAIL


FRANKENSTEIN CARD

SUPPLIES

* TRICKS & TREATS BUNDLE
* Card base - A-2 size Pumpkin Pie cardstock
* Mat - Lemon Lime Twist cardstock 5 1/4” x 4” - stamp the star images along the outer edges of the mat
* Focal panel mat - Basic White cardstock - 5 1/4” x 4” - stamp with Trick or Treat stamp repeatedly to create a background. Fill in white spaces by stamping the star images onto the cardstock. Trim to 5” x 3 3/4”, then use zig -zag die on each side of the panel to create the jagged edges
* Cardstock for Frankenstein - Lemon- Lime Twist and Basic Black
* Inks - Pumpkin Pie, Lemon Lime Twist, Basic Black
* Dies - Deckled Circle Dies (coming 6 September) - 2 1/2” diameter
* Adhesive and dimensionals- for Frankenstein and Basic Black die cuts

DRACULA CARD


SUPPLIES

* TRICKS & TREATS BUNDLE
* Card base - Gorgeous Grape cardstock - A-2 size - stamp bat images on card front for background
* Basic Black cardstock - die cut with Nested Essentials Dies; largest 6 sided die
* Basic White cardstock cut with rectangular die (2 2/8” x 1 1/2” ) from the Nested Essentials Dies
* Fresh Freesia cardstock scrap for Dracula’s face
* Inks - Memento Tuxedo Black, Gorgeous Grape, Parakeet Party
* Nested Essentials Dies
* Adhesive and dimensionals

TRICK & TREATS SCARY SCENE


SUPPLIES

* TRICK & TREATS BUNDLE
* Card base - Gorgeous Grape cardstock - A-2 size
* Mat - Pumpkin Pie cardstock 5 1/4” x 4”
* Focal panel - Basic White cardstock 5” x 3 3/4”
* Printer paper or masking paper cut at 5” x 3 3/4”
* Basic White cardstock to stamp and die cut haunted house and graves
* Inks - Starry Sky, Smokey Slate, Basic Gray, Gorgeous Grape, Lemon Lolly, Memento Tuxedo Black 
* Blending Brushes
* Sponge Dauber
* Glow in the Dark Bats & Ghosts (coming 6 September) - 3 ghosts
* Sentiment - my Happy Halloween is from the Pick of the Patch stamp set (coming 6 September)
* Circle die or circle punch for moon mask - 1 1/2” diameter; I used the circle dies from the Reach for the Stars Dies
* Scissors or snips to fussy cut 4 of the grave stones
* Adhesive and dimensionals 

NOTE - Use the masking paper / printer paper and die cut or punch a circle toward the upper left side of the paper. You are making 2 masks - 1 to cover all the focal panel except th3 area for the moon, and the circle die cut will cover your moon once you have inked it.
* Place the large mask over the top of the focal panel. Use a nlending brush and the Lemon Lolly ink to create the moon. Remove the mask.
* Place the circle mask over the moon. Apply a light layer of Starry Sky all over the focal panel. Then go over the Starry Sky ink with Smoky Slate. Add more Starry Sky and Smokey Slate until you are satisfied with your night sky. 
* With the sponge dauber add just a hint of the Smoky Slate ink to the moon. Use the sponge dauber and Smoky Slate ink to add mote color along the bottom of the panel for the ground. 
* Stamp and die cut the haunted house and go over it lightly with the Smoky Starwood ink and blending brush to tone down the white areas on the haunted house
* Stamp the bats over the moon. Stamp the grave stones on the focal panel.
* Stamp the greeting.
* Stamp and fussy cut 4 more grave stones. Place on card with dimensionals.
* Place the haunted house on th3 card front with dimensionals, add the 3 ghosts to 
the focal panel
* Adhere focal panel to mat and adhere this piece to the card base.

TRICKS & TREATS TREAT BAGS

SIDE 1

SIDE 2

SUPPLIES FOR BLACKBERRY BLISS BAG

TRICKS & TREATS BUNDLE
* Bright & Beautiful DSP - Blackberry Bliss Ombré - 2 6” x 6” pieces
* Other cardstock - Basic White & Basic Black and Glow In the Dark Specialty Paper (coming 6 September)
* Cardstock to make re-enforcements for ribbon holes - cut two fro cardstock 2 1/2” x 5/8”
* Black and White Gingham Ribbon - 2 pieces cut at about 8” each
* Glow - In - the Dark Bats & Ghosts - 1 ghost, 2 bats
* Ink - Gorgeous Grape
* Adhesive, Tear & Tape, Stampin’ Seal +, dimensionals

SUPPLIES FOR TRICK OR TREAT BAG

* Bag - 6” x 6” DSP - Brights - Lemon Lime Twist, 2 pieces
* Cardstock scraps - Basic White, Pumpkin Pie Daffodil Delight
* Adhesive, dimensionals, Tear & Tape, Stampin’ Seal +

Watch the video to learn how to assemble the bags, and how not to assemble the bags!😁

TRICKS & TREATS CARDS


That’s all for today. Thank you for popping by. Until next time. . .
Stamp Happy!

Kim

All stamps & stamped images ©️1990-2023 Stampin’ Up!®️

COMING 6 SEPTEMBER 2023


BEAUTIFUL NEW DESIGNER SERIES PAPERS ADDED 
TO THE ONLINE EXCLUSIVES
COMING 6 SEPTEMBER 2023


* Several of the papers contain images that can be die cut with dies featured in the upcoming mini catalog.

Friday, April 29, 2022

SIT STAY RELAX & MAKE A MINI EASEL CARD

Hi Stampers!

It’s been a while since I’ve posted. Today is the first day I’ve been in my craft room in almost two weeks!
What kept me from my favorite room in the whole house? Well, it all started with a bout of seasonal allergies which triggered something called bronchial spasms (bronchospasms)! This malady involves a lot of coughing! Let’s just say bronchial spasms are no fun, none at all!!! I am feeling much better now, and am thrilled to be back in my craft room creating again!

Today’s cards feature the SIT STAY RELAX stamp set. This is a host set and can be obtained with STAMPIN’ REWARDS.  All orders of $150 or more earn STAMPIN’ REWARDS. The stamp set is found in the STAMPIN’ UP!®️ 2022-2023 ANNUAL CATALOG that premiers Tuesday 3 May! For more information on STAMPIN’ REWARDS look in current catalogs under Host & Join (at the back of the catalogs) or log on to my Stampin’ Up Online Store HERE and click on HOST.

Let’s take a look at the cards:


I call these cards MINI EASEL CARDS. The design is simply a resizing of a classic fun fold. These cards measure 4 1/4” square, and they do fit in a Stampin’ Up! Medium Envelope (A-2 size). 

Here is a look at the cards in their easel position.


STAY SIT RELAX & CREATE A MINI EASEL CARD VIDEO TUTORIAL


CUTTING DIMENSIONS FOR MINI EASEL CARDS CARD BASE AND LAYERS:

* Card base - 4 1/4” x 8 1/2” scored at 2” and 4 1/4”. Fold and score on the 4 1/4” score line. 
* Piece of cardstock same color as card base cut at 4 1/4” square.
* Background layer - 4” x 4”.
* Basic White or light colored cardstock cut at 4” square for inside card.
* Piece of cardstock, DSP, etc cut at 1” x 4” and scored at 1/2”. Place adhesive on one side of the score line, then press the two side together. This piece serves as the stopper to display the card in easel position.

Creating each of my sample cards requires a little masking. I created my masks by stamping the images on scraps of printer paper, and then fussy cut them. Why are my masks colored? Many times I use scrap printer paper to stamp and color images to get an idea of how they will look on the card. I find this saves me from tossing out a lot of Basic White cardstock.


RELISH THE DAY CARD


SUPPLIES

* Card base - Blushing Bride
* Layer - Soft Suede
* Inside layer - Soft Suede
* Stopper - Soft Suede
* Focal panel - Basic White 3 3/4” Square
* For another inside layer - Basic White 3 3/4” square.
* Blushing Bride, Soft Suede; Stampin’ Blends - Crumb (dark & light).
* Beautiful Shapes Dies
* Image mask, textured stamp (Whiskey Business), background image (Lovely You)
* Adhesive & dimensionals

JUST SITTING HERE CARD


SUPPLIES

* Card base - Soft Sea Foam
* Layer and Stopper - DSP from Tea Boutique 
* Inside layer - Basic White
* Ink - Old Olive and Soft Saffron; Stampin’ Blends - Soft Sea Foam (light), Crumb Cake (light), So Saffron (light).
* Blending Brush and image mask.
* Adhesive & dimensionals

WISH YOU WERE HERE CARD


SUPPLIES

* Card base - Orchid Oasis cardstock (New In Color)
* Layer - Orchid Oasis Glimmer Paper - 2022-2024 In Color Glimmer Paper
* Inside layer - Basic White 4” x 4”
* Stopper - Orchid Oasis Glimmer Paper 4” x 1” - score on back side of paper along the 1” side at 1/2” 
* Focal Image - Shimmery White cardstock 2 1/4” x 2 3/4”
* Mat for focal image - Orchid Oasis cardstock 2 1/2” x 3”
* Inks - Memento Tuxedo Black, Orchid Oasis, Highland Heather, Balmy Blue; Wink of Stella
* Image mask and Blending Brush
* Adhesive, Tear &Tape, Dimensionals


That’s all for today. Thank you so much for stopping by. Until next time…
Stamp Happy!

Kim

All stamps and stamped images ©️1990-2022 STAMPIN’ UP!®️

Wednesday, June 16, 2021

USING MASKS FOR NO LAYER CARDS WITH AN OCEAN VIEW

 Hi Stampers!

Every year about this time I hear the ocean calling! While a trip to the seashore is not in “the cards” this year, ocean themes can be featured in “my cards.” 😁 Today I have four cards with ocean themes to share.  The cards are no layer cards. I used masks to allow me to apply ink for the focal point. Along with the masks I used blending brushes to create the background for the focal point.

Here are the cards:


And here are my masks!


For three of the masks I used 5 1/2” x 4 1/4” (1/4 sheets) pieces of  printer paper. I used dies to cut out the desired shapes. For the fourth mask I just tore pieces of scrap grid paper, and placed them over my cardstock. As you can see I used Washi tape to hold the masks in place.

Here are the stamp sets I used; WHALE DONE, SEASCAPE,TIMELESS TROPICAL, and FRIENDS ARE LIKE SEASHELLS.

For each card I used a Basic White card base that measured 11” x 4 1/4” scored and folded at 5 1/2”. To create the focal points I put the cardstock flat on my stamping surface (a grid paper pad in my case), positioned the mask over the card front, and taped the mask in place with the Washi tape. I also covered up the back half of the card base with scrap paper to make sure there were no ink accidents.

Next I stamped and inked the focal point, removed the mask, and stamped the greeting. 


SUPPLIES FOR THIS CARD: Basic White card base, Layering Circles Dies (largest one) for mask, TIMELESS TROPICAL stamp set, TIMELESS TULIPS stamp set (for greeting), Shaded Spruce and Early Espresso Stampin’ Write markers, Sahara Sand, Pool Party, Balmy Blue, and Shaded Spruce inks, blending brushes.

ASSEMBLY: Place the  mask over the card base. Begin adding color to the area with Sahara Sand ink on a blending brush, next add Pool Party ink, and finish with the Balmy Blue. Using the Stampin’ Write Markers, add color to the stamp. Stamp the palm trees image. Remove the mask. Stamp the greeting with the Shaded Spruce ink.


This card is very similar to a card I created for another post (8 April 2021). This masking technique results in a torn paper look (Faux Torn Paper Masking Technique). See page 26 of the STAMPIN’ UP!®️ 2021-2022 ANNUAL CATALOG for another example of the technique.

SUPPLIES FOR THIS CARD: Basic White card base, two pieces of torn grid paper and Washi tape for masking, WHALE DONE stamp set, HAPPY THOUGHTS stamp set (Mini Catalog - retiring) for the sentiment, Soft Succulent, Flirty Flamingo, Highland Heather, Calypso Coral, Pool Party, and Balmy Blue inks, blending brushes.

ASSEMBLY: Position the masks over the card front, and secure with Washi tape. Stamp the seaweed, stamp the remaining images, using the blending brushes and Pool Party and Balmy Blue inks cover the exposed cardstock. It is okay to go right over the stamped images with the blending brush. remove the masks and stamp the greeting with Soft Succulent ink.


SUPPLIES FOR THIS CARD: Basic White card base, SEASCAPE stamp set, WHALE DONE stamp set, Layering Diorama Dies (3rd largest) - for mask, Granny Apple Green, Mango Melody, Soft Suede, Crumb Cake, Pool Party, and Balmy Blue inks, and blending brushes.

ASSEMBLY: Create the mask and position it over the card front, secure with Washi tape. Stamp the seaweed and the fish. Create the water by starting at the bottom of the piece with a bit of Crumb Cake ink on a blending brush. Next add Pool Party and Balmy Blue inks. Remove the mask. Stamp the greeting with Soft Suede ink.


This card is just a bit different from the other three. It is still a one layer card, but I added some die cut images.

SUPPLIES FOR THIS CARD: Basic White card base, Pearlescent Specialty Paper, FRIENDS ARE LIKE SEASHELLS stamp set, HAPPY THOUGHTS stamp set (Mini Catalog - retiring) for sentiment, Seashells Embossing Folder, Seaside Seashells Dies, Flirty Flamingo, Calypso Coffee, Pale Papaya, Sahara Sand, Gray Granite, Pool Party, and Balmy Blue inks, and Granny Apple Green (dark)and Mint Macaron (dark) Stampi ‘ Blends, Stitched Rectangles Dies (3rd largest). 

ASSEMBLY: Make your mask with the Stitched Rectangles die. Use a 5 1/2” x 4 1/4” piece of the Pearlescent paper and the Seaside Seashells die to cut out the images. Stamp the images. Place the piece in the Seashells embossing folder and run it through the Stampin’ Cut & Emboss Machine. Snip the images you want for the card from the die cut. Color the sea plants with the Stampin’ Blends and set the die cuts aside. Position the mask over the cardstock. Secure in place with Washi tape. Use the Sahara Sand and a touch of Gray Granite inks and blending brushes to create the base for the sand. Use the Pool Party and the Balmy Blue inks to create some water. With Sahara Sand ink and “sand” stamp add some texture to the “sandy area” of the card. Remove the mask. Arrange and adhere the sea plants and seashells on the card front. Stamp the greeting with Sahara Sand ink.


These card were easy to make, and best of all went together quickly. I do enjoy making no layer cards. These types of cards help me to reach a little bit beyond my usual routine, and forces mr to come up with creative ways to create interesting, but simple cards. I hope you give the masking techniques to create some no layer cards.

* The printer paper and grid paper are interchangeable, actually any thinner paper will do. If you do not have Washi tape, no problem. You can use masking tape, painter’s tape, or even Scotch tape. 

That’s all for today. Thank you for stopping by. Until next time...
Stamp Happy!
Kim

All stamp and stamped images ©️1990-2021Stampin’ Up!®️


Tuesday, June 23, 2020

SEASIDE NOTIONS

I AM EXPERIENCING SEASIDE NOTIONS
AND SO CAN YOU!

I love all things beach and ocean related. I have no clue why I feel so connected to the ocean. I am a Hoosier farm girl who spent summers along ponds, lakes, creeks, and the Ohio River. I was 15 years old when I saw an ocean for the first time. It was truly love at first sight. I felt so at home, and such a sense of calm. Over the years I have spent quite a bit of time on all types of beaches all over the country, and a few odd places outside the US, watching the ocean. I lived on the Island of Oahu for three years, and time at the beach was a daily routine. In places like Maine and Alaska beach going is a far different story than a trip to Ala Moana Beach in Honolulu, or Holden Beach in North Carolina. Still, a beach is a beach and an ocean is an ocean. I cherish the time spent on all beaches everywhere. 

What in the world does any of this have to do with stamping or card making, you ask? Well, first of all I own most, if not all beach / ocean related stamp sets Stampin’ Up!has released since 2006. (Might have missed one.)  I love them. I will never part with them! Secondly, there is a great ocean themed stamp set right in the current Stampin’ Up! Annual Catalog! It is called Seaside Notions. (Page 36)  It was introduced in the 2019-2020 Annual Catalog, and I am so happy it carried over to the current catalog! Whenever I feel a need for an ocean view I create one. Here is the ocean themed card I created using the  Seaside Notions stamp set.


The background is sponged using a masking technique. I took a piece of scrap paper a little larger than my background panel.  I tore the scrap paper Into two pieces to create a mask, and placed one piece of it on top of the background cardstock close to the bottom, and secured the mask with washi  tape. I used Sahara Sand ink on a sponge and applied the ink onto the cardstock below the mask using downward strokes. Once I was happy with the coverage I moved the mask up a bit, and continued the process with the next color, and worked my way up the card. I did not worry too much about the sponging going into the color below it. From the bottom of the card upward I used Sahara Sand, Night of Navy, Pacific Point, Bermuda Bay, Coastal Cabana, Just Jade, and Pool Party inks. As I went up the card I moved my mask to the right or left to get a different look for each layer of color. 

Once I finished sponging the background panel, I used a spritzer and lightly spritzed the panel with water to add a few spots of lighter color here and there. I ended up spritzing this card twice. I dried the panel with my heat tool. To finish the panel I used the sand stamp from the set and Sahara Sand ink to add the sand texture to the Sahara Sand section of the panel.

Next  I stamped my images on a piece of Whisper White cardstock with MementoTuxedo Black ink, and colored the images with Stampin’ Blends. I fussy cut the images.

I adhered the background panel to a piece of Basic Black cardstock, and adhered that to a Bermuda Bay card base. I took my bone folder and ran it over the back side of the coral a bit to give it a little dimension. I put adhesive toward the bottom of both pieces of coral, and placed them on the card. I adhered the sand dollar over the bottom of the coral. The shell was adhered using dimensionals. The seahorse is attached with a dimensional at his head and belly, none on his tail.

I stamped the Happy Birthday from the set with Memento Tuxedo Black ink. Next I added some Frosted & Clear Epoxy Droplets, and my card was finished. 

A trip to the ocean is just that easy with the Seaside Notions stamp set

I wish you Greatinkspirations with Seaside Notions!

Until next time...
Stamp Happy!

Kim